Quantcast
Channel: Leap Motion Blog
Viewing all 481 articles
Browse latest View live

Defeat Your Enemies with Rock-Paper-Scissors in RPS Island

$
0
0

One of the most widely played games on the face of the planet is your only means of survival in RPS Island. Created by ISVR, it took third place in this year’s 3D Jam VR Track for addictive gameplay and solid interaction design. Faced with a never-ending onslaught of enemies on a tropical island, you must defeat them by signalling their weakness. The demo is available free for download on our Developer Gallery.

rps

ISVR is an indie studio based in Beijing, formed last year to focus on VR game development. RPS Island was originally inspired by games between ISVR founder Yi Zhang and his five-year-old daughter. “We have lot of fun with it, so it came into my mind when we decided to join the 3D Jam. We designed lots of details for characters, background story, etc. and we hope players could have a new experience with RPS.”

rps-island-team

Yi has worked as a game artist and programmer since 2004, producing PC, web, and mobile games. We asked him about his preferred RPS strategy, and while there is random chance involved, he points out that it’s often possible to outthink human opponents.

“There are some Chinese professors who reported on social cycling and conditional responses in rock-paper-scissors. The result is there are a few more people who choose ‘rock’ than others, and if the player didn’t lose in this round (won or tied), in the next round there is a higher possibility he will choose the same.”

Despite building an award-winning game around rock-paper-scissors, it seems like ISVR has terrible luck in the real world – at a recent developer meetup where the game was played, they all lost in the first round. “And later people asked me what VR game we did. I told them RPS Island…”

“My daughter also outthinks me, and she enjoys defeating me a lot.”

The post Defeat Your Enemies with Rock-Paper-Scissors in RPS Island appeared first on Leap Motion Blog.


Interaction Sprints at Leap Motion: Exploring the Hand-Object Boundary

$
0
0


Physical interaction design for VR starts with fundamentally rethinking how objects should behave.
Click To Tweet


When you reach out and grab a virtual object or surface, there’s nothing stopping your physical hand in the real world. To make physical interactions in VR feel compelling and natural, we have to play with some fundamental assumptions about how digital objects should behave. The Leap Motion Interaction Engine handles these scenarios by having the virtual hand penetrate the geometry of that object/surface, resulting in visual clipping.

With our recent interaction sprints, we’ve set out to identify areas of interaction that developers and users often encounter, and set specific design challenges. After prototyping possible solutions, we share our results to help developers tackle similar challenges in your own projects.

For our latest sprint, we asked ourselves – how can penetration of virtual surfaces be made to feel more coherent and create greater sense of presence through visual feedback?

To answer this question, we experimented with three approaches to the hand-object boundary – penetrating standard meshes, proximity to different interactive objects, and reactive affordances for unpredictable grabs. But first, a quick look at how the Interaction Engine handles object interactions.

Object Interactions in the Leap Motion Interaction Engine

Earlier we mentioned visual clipping, when your hand simply phases through an object. This kind of clipping always happens when we touch static surfaces like walls, since they don’t move when touched, but it also happens with interactive objects. Two core features of the Leap Motion Interaction Engine, soft contact and grabbing, almost always result in the user’s hand penetrating the geometry of the interaction object.

Similarly, when interacting with physically based UIs – such as our InteractionButtons, which depress in Z-space – fingertips still clip through the geometry a little bit, as the UI element reaches the end of its travel distance.

Now let’s see if we can make these intersections more interesting and intuitive!

Experiment #1: Intersection and Depth Highlights for Any Mesh Penetration

For our first experiment, we proposed that when a hand intersects some other mesh, the intersection should be visually acknowledged. A shallow portion of the occluded hand should still be visible but with a change color and fade to transparency.

To achieve this, we applied a shader to the hand mesh. This checks how far each pixel on the hand is from the camera and compares that to the scene depth, as read from the depth texture to the camera. If the two values are relatively close, we make the pixels glow, and increase their glow strength the closer they are.

This execution felt really good across the board. When the glow strength and and depth were turned down to a minimum level, it seemed like an effect which could be universally applied across an application without being overpowering.

Experiment #2: Fingertip Gradients for Proximity to Interactive Objects and UI Elements

For our second experiment, we decided to make the fingertips change color to match an interactive object’s surface, the closer they are to touching it. This might make it easier to judge the distance between fingertip and surface, and less likely to overshoot and penetrate the surface. Further, if they do penetrate the mesh, the intersection clipping will appear less abrupt – since the fingertip and surface will be the same color.

Using the Interaction Engine OnHover, we check the distance from each fingertip to that object’s surface whenever a hand hovers over an InteractionObject. We then use this to drive a gradient change, which affects each fingertip color individually.

Using a texture to mask out the index finger and a float variable, driven by fingertip distance, to add the Glow Color as a gradient to the Diffuse and Emission channels in ShaderForge.

This experiment definitely helped us judge the distance between our fingertips and interactive surfaces more accurately. In addition, it made it easier to know which object we were closest to touching. Combining this with the effects from Experiment #1 made the interactive stages (approach, contact, and grasp vs. intersect) even clearer.

Experiment #3: Reactive Affordances for Unpredictable Grabs

How do you grab a virtual object? You might create a fist, or pinch it, or clasp the object. Previously we’ve experimented with affordances – like handles or hand grips – hoping these would help guide users in how to grasp them.


Reactive affordances can shape how users interact with virtual objects.
Click To Tweet


While this helped many people rediscover how to use their hands in VR, some users still ignore these affordances and clip their fingers through the mesh. So we thought – what if instead of modeling static affordances we created reactive affordances which appeared dynamically wherever and however the user chose to grip an object?

By raycasting through each joint on a per-finger basis and checking for hits on an InteractionObject, we spawn a dimple mesh at the raycast hit point. We align the dimple to the hit point normal and use the raycast hit distance – essentially how deep the finger is inside the object – to drive a blendshape which expands the dimple.

Three raycasts per finger (and two for the thumb) that check for hits on the sphere’s collider.

Bloop! By moving the dimple mesh to the hit point position and rotating it to align with the hit point normal, the dimple correctly follows the finger wherever it intersects the sphere.

In a variation on this concept, we tried adding a fingertip color gradient. This time, instead of being driven by proximity to an object, the gradient was driven by the finger depth inside the object.

Pushing this concept of reactive affordances even further we thought what if instead of making the object deform in response to hand/finger penetration, the object could anticipate your hand and carve out finger holds before you even touched the surface?

Basically, we wanted to create virtual ACME holes.


VR lets us experiment with cartoon-style physics that feel natural to the medium.
Click To Tweet


To do this we increased the length of the fingertip raycast so that a hit would be registered well before your finger made contact with the surface. Then we spawned a two-part prefab composed of (1) a round hole mesh and (2) a cylinder mesh with a depth mask which stops any pixels behind it being rendered.

By setting up the layers so that the depth mask won’t render the InteractionObject’s mesh, but will render the user’s hand mesh, we create the illusion of a moveable ACME-style hole in the InteractionObject.

These effects made grabbing an object feel much more coherent, as though our fingers were being invited to intersect the mesh. Clearly this approach would need a more complex system to handle objects other than a sphere – for parts of the hands which are not fingers and for combining ACME holes when fingers get very close to each other. Nonetheless, the concept of reactive affordances holds promise for resolving unpredictable grabs.

Hand-centric design for VR is a vast possibility space – from truly 3D user interfaces to virtual object manipulation to locomotion and beyond. As creators, we all have the opportunity to combine the best parts of familiar physical metaphors with the unbounded potential offered by the digital world. Next time, we’ll really bend the laws of physics with the power to magically summon objects at a distance!

An abridged version of this post was originally published on RoadtoVR. A Chinese version is also available.

The post Interaction Sprints at Leap Motion: Exploring the Hand-Object Boundary appeared first on Leap Motion Blog.

Summoning and Superpowers: Designing VR Interactions at a Distance

$
0
0

One of the core design philosophies at Leap Motion is that the most intuitive and natural interactions are direct and physical. Manipulating objects with our bare hands lets us leverage a lifetime of physical experience, minimizing the learning curve for users. But there are times when virtual objects will be farther away than arm’s reach, beyond the user’s range of direct manipulation. We can force users to walk over to access those objects – or we could give them superpowers!

For our latest interaction design sprint, we prototyped three ways of summoning distant objects to bring them within arm’s reach. The first is a simple animated summoning technique, well-suited to interacting with single objects. The second gives you telekinetic powers, while the third virtually augments your body’s capabilities.

Experiment #1: Animated Summoning

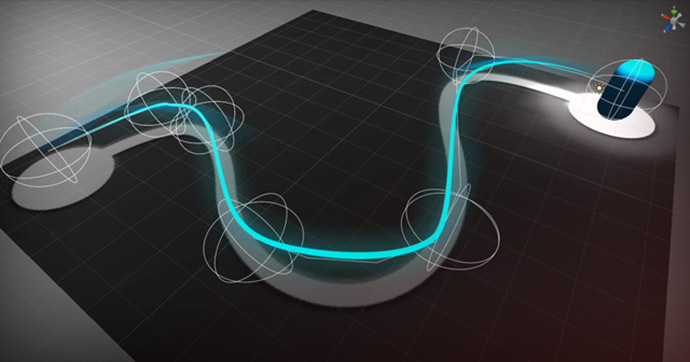
Our first experiment looked at creating an efficient way to select a single static distant object, then summon it directly into your hand. After inspecting or interacting with it, you could dismiss it, sending it back to its original position. The use case here would be something like selecting and summoning an object from a shelf then having it return automatically – useful for gaming, data visualization, and educational sims.

This approach involved four distinct stages of interaction: selection, summoning, holding/interacting, and returning.

1. Selection

One of the pitfalls that many VR developers fall into is thinking of our hands as analogous to controllers, and designing interactions that way. Selecting an object at a distance is a pointing task and well-suited to raycasting. However, holding your finger or even your whole hand steady in midair to point accurately is quite difficult, especially if you need to introduce a trigger action.

Rather than simply casting a ray directly from a transform on your hand, we used the head/HMD position as a reference transform, added an offset to approximate a shoulder position, and then projected a ray from the shoulder through the palm position and out toward a target. (Veteran developers will recognize this as the experimental approach first tried with the UI Input Module.)

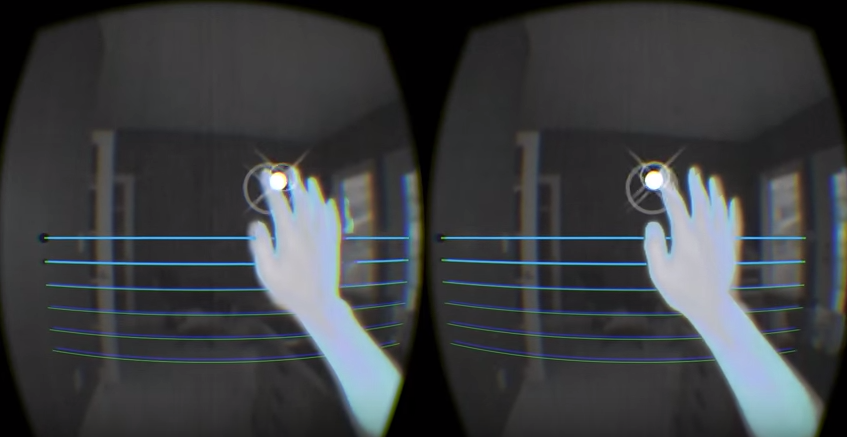
This allowed for a much more stable projective raycast, which we visualized by using a line renderer and a highlight circle which appears around an object when its collider is hit by the raycast.

In addition to the stabilization by projective raycasting, we added larger proxy colliders to the distant objects. This means we have larger targets that are easier to hit. We also added some logic to the larger proxy colliders so that if the targeting raycast hits a distant object’s proxy collider, we bend the line renderer to end at that object’s center point. The result is a kind of snapping of the line renderer between zones around each target object, which again makes them much easier to select accurately.

After deciding how selection would work, we needed to decide when this ability would activate – since once the object was brought within reach, you would want to switch out of ‘selection mode’ and go back to regular direct manipulation.

Since shooting a ray out of your hand to target something out of reach is quite an abstract interaction we thought about related physical metaphors or biases that could anchor this gesture. When a child wants something out of their immediate vicinity, their natural instinct is to reach out for it, extending their open hands with outstretched fingers.

We decided to use this action as a basis for activating the selection mode. When your hand is outstretched beyond a certain distance from your head, and your fingers are extended, we begin raycasting for potential selection targets.

To complete the selection interaction, we needed a confirmation action – something to mark that the hovered object is the one we want to select. Continuing with the concept of a child reaching for something beyond their grasp, curling your fingers into a grab pose while hovering an object will select it. As your fingers curl, the hovered object and the highlight circle around it scale down slightly, mimicking a squeeze. When you’ve fully curled your fingers the object pops back to its original scale and the highlight circle changes color to signal a confirmed selection.

2. Summoning

Now that we’ve selected our distant object, we want to summon it into direct manipulation range. Again we thought about existing gestures used in the real world. A common everyday action to signal that we want to bring something closer begins with a flat palm facing upwards followed by curling the fingers quickly.

At the end of the selection action, we have our arm extended, palm facing away toward the distant object, with our fingers curled into a grasp pose. So we defined our heuristics for the summon action as first checking that the palm is (within a range) facing upward. Once that’s happened, we check the curl of the fingers, using how far they’re curled to drive the animation of the object along a path toward the hand. When your fingers are fully curled the object will have animated all the way into your hand and becomes grasped.

During the testing phase we found that after selecting an object – with arm extended, palm facing toward the distant object, and fingers curled into a grasp pose – many users simply flicked their wrists and turned their closed hand towards themselves, as if yanking the object towards themselves. Given our heuristics for summoning (palm facing up, then degree of finger curl driving animation), this action actually summoned the object all the way into the user’s hand immediately.

This single motion action to select and summon was more efficient than two discrete motions, though they offered more control. Since our heuristics were flexible enough to allow both, approaches we left them unchanged and allowed users to choose how they wanted to interact.

3. Holding and Interacting

Once the object arrives in your hand, all of the extra summoning specific logic deactivates. Now you have a regular InteractionObject! It can be passed from hand to hand, placed in the world, and interacted with (if it has UI components). As long as the object remains within arm’s reach of the user, it’s not selectable for summoning.

4. Returning

You’re done with this thing – now what? If you grab the object and hold it out at arm’s length (beyond a set radius from your head position) a line renderer appears showing the path the object will take to return to its start position. If you release the object while this path is visible, the object automatically animates back to its anchor position.

Overall, this execution felt accurate and low effort. It easily enables the simplest version of summoning – selecting, summoning and returning a single static object from an anchor position. However, it doesn’t feel very physical, relying heavily on gestures and with objects animating along predetermined paths between two defined positions.

For this reason it might be best used for summoning non-physical objects like UI, or in an application where the user is seated with limited physical mobility where accurate point-to-point summoning would be preferred.

Experiment #2: Telekinetic Powers

While the first experiment handled summoning and dismissing one static object along a predetermined path, we also wanted to explore summoning dynamic physics-enabled objects. What if we could launch the object towards the user, having it land either in their hand or simply within their direct manipulation range? This execution drew inspiration from Force pulling, Magneto yanking guns out of his enemies’ hands, wizards disarming each other, and many others.

In this experiment, the summonable objects were physics-enabled. This means that instead of sitting up at eye level, like on a shelf, they were most likely resting on the ground. To make selecting them a more low-effort task, we decided to change the selection mode hand pose from overhanded, open palm-facing-the-target pose to a more relaxed open palm-facing-up with fingers pointed toward the target.

To allow for a quicker, more dynamic summoning, we decided to condense hovering and selecting into one action. Keeping the same underlying raycast selection method, we simply removed the need to make a selection gesture. Keeping the same finger-curling summon gesture meant you could quickly select and summon an object by pointing toward it with an open, upward-facing palm, then curling your fingers.

Originally, we used your hand as the target for the ballistics calculation that launched a summoned object toward you. This felt interesting, but having the object always land perfectly on your hand felt less physics-based and more like the animated summon. To counter this, we changed the target from your hand to an offset in front of you – plus a slight random torque to the object to simulate an explosive launch. Adding a small shockwave and a point light at the launch point, as well as having each object’s current speed drive its emission, completed the explosive effect.

Since the interaction had been condensed so much, it was possible to summon one object after another in quick succession before the first had even landed!

Once you got the hang of it you could even summon objects again, in mid-air, while they were already flying toward you.

This experiment was successful in feeling far more dynamic and physics-based than the animated summon. Condensing the stages of interaction made it feel more casual, and the added variation provided by enabling physics made it more playful and fun. While one byproduct of this variation was that objects would occasionally land and still be out of reach, simply summoning it again would bring it close enough. While we were still using a gesture to summon, this method felt much more physically based than the previous one.

Experiment #3: Extendo Hands!

For our third and final experiment, we wondered if we could flip the problem. Rather than simply gesturing to command a distant object to come within reach, we could instead give ourselves longer arms and grab the faraway object with our fingers.

The idea was to project the underlying InteractionHands out to the distant object to allow an Interaction Engine grab. Then once the object was held the user, would be in full control of it, able to pull it back to within their normal reach or even relocate and release it.

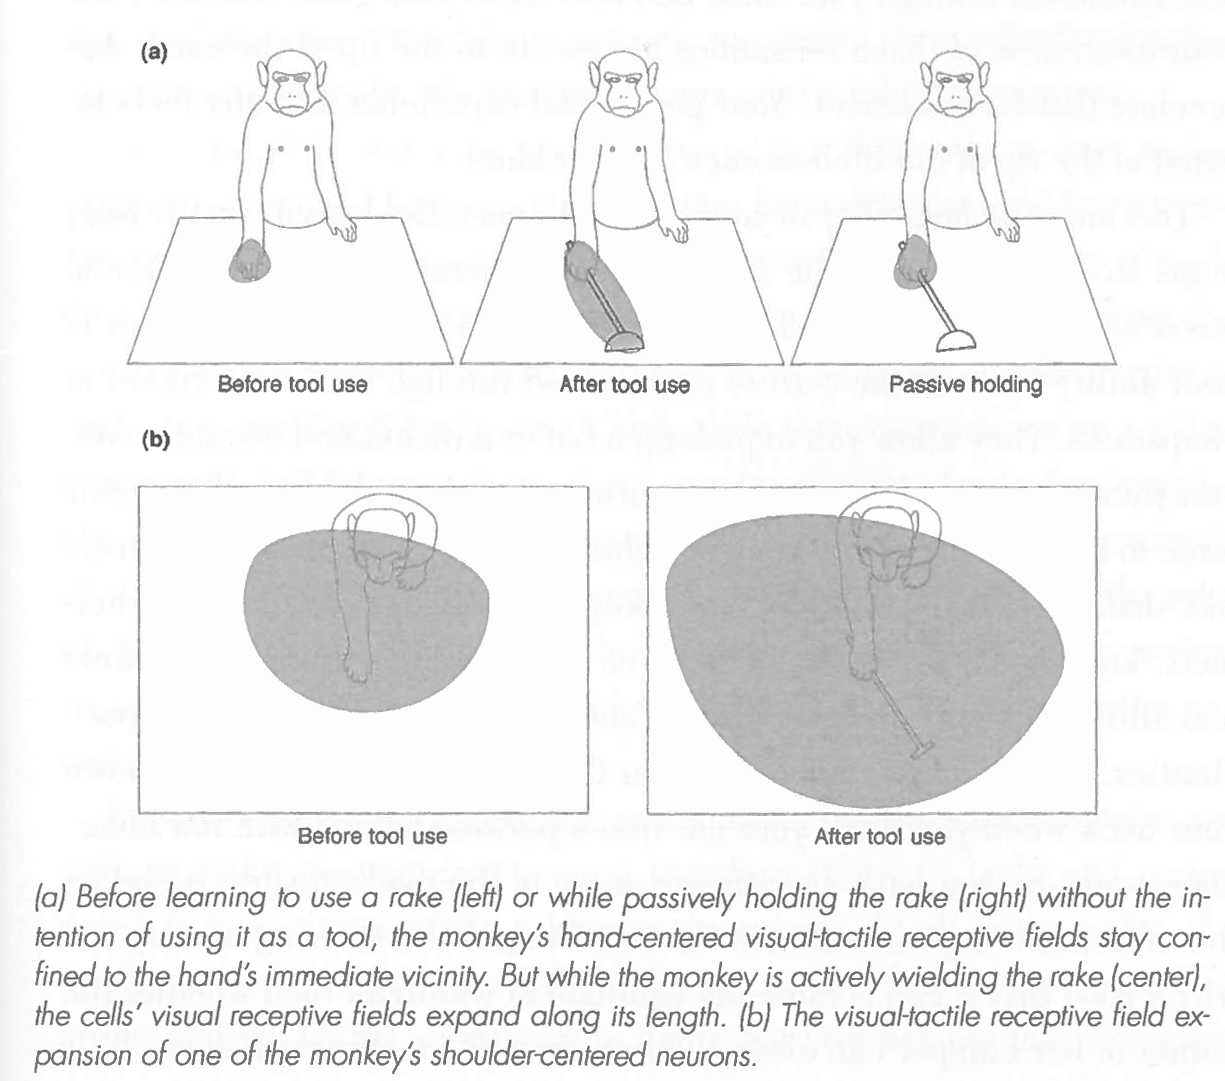
This approach touches on some interesting neuroscience concepts, such as body schema and peripersonal space. Our brains are constantly using incoming sensory to model both the position of our bodies and their various parts in space, as well as the empty space around us in which we can take immediate action. When we use tools, our body schema expands to encompass the tool and our peripersonal space grows to match our reach when using the tool. When we use a rake or drive a car, those tools literally become part of our body, as far as our brain is concerned.

Diagram from The Body Has a Mind of Its Own by Sandra Blakeslee and Matthew Blakeslee.

Our body schema is a highly adaptable mental model evolved to adopt physical tools. It seems likely that extending our body schema through virtual means would feel almost as natural.

For this experiment, our approach centered around the idea of remapping the space we could physically reach onto a scaled-up projective space, effectively lengthening our arms out to a distant object. Again, the overall set of interactions could be described in stages: selecting/hovering, grabbing, and holding.

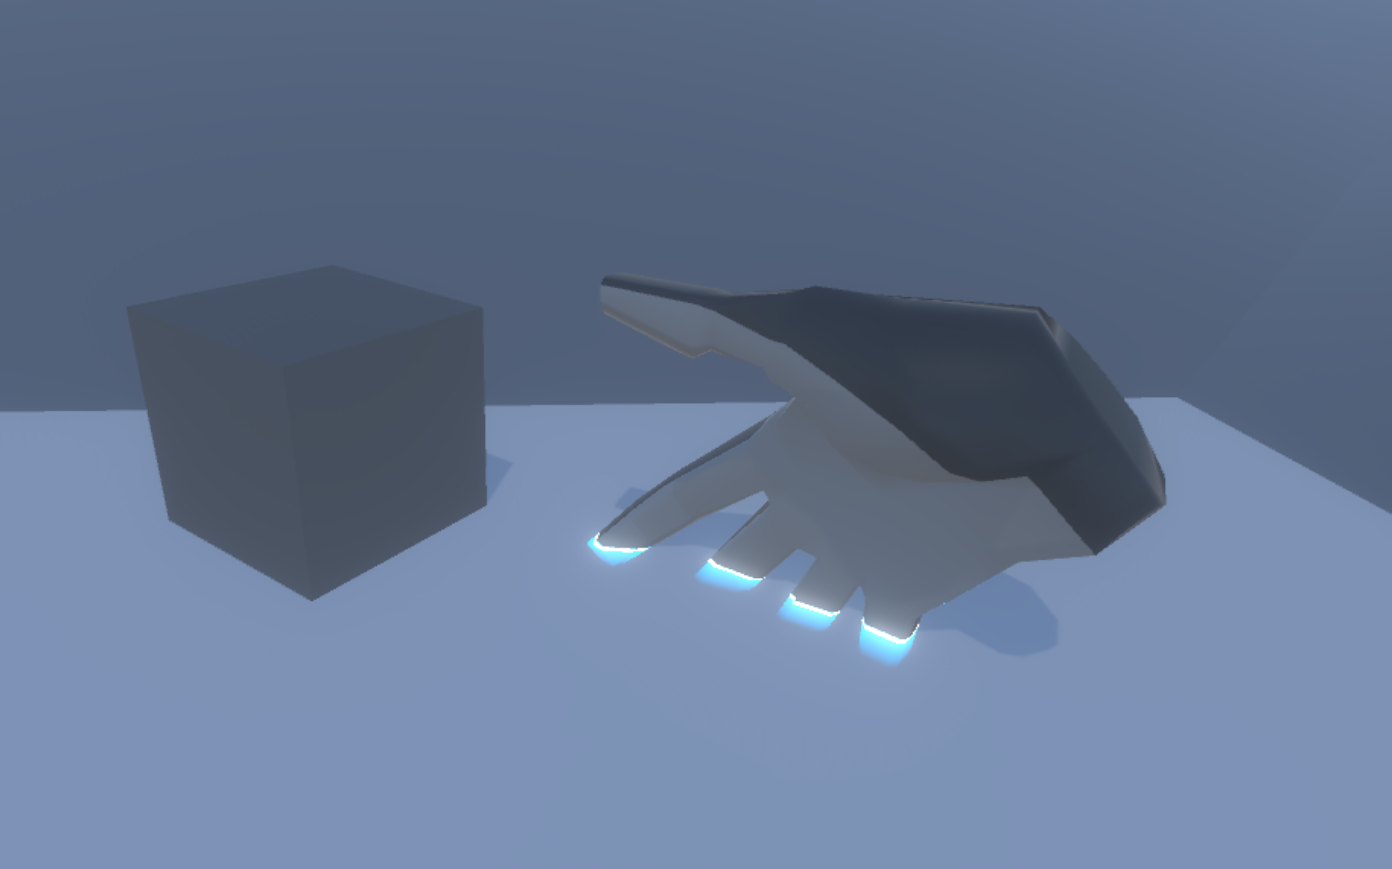
1. Selecting/Hovering

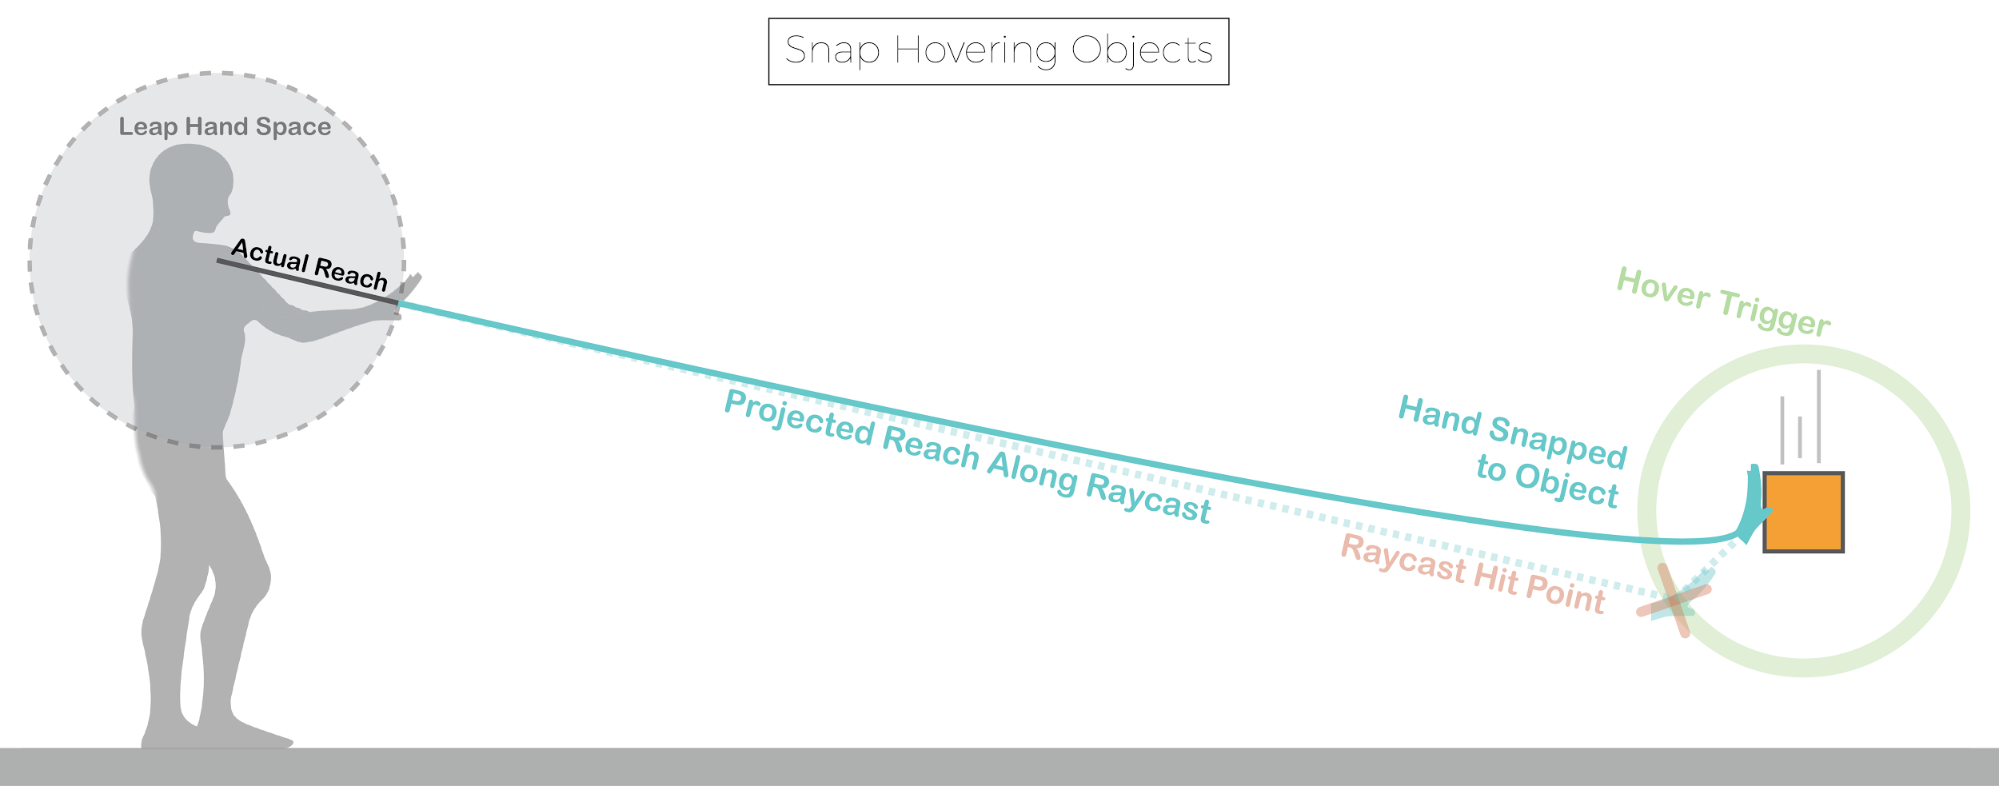
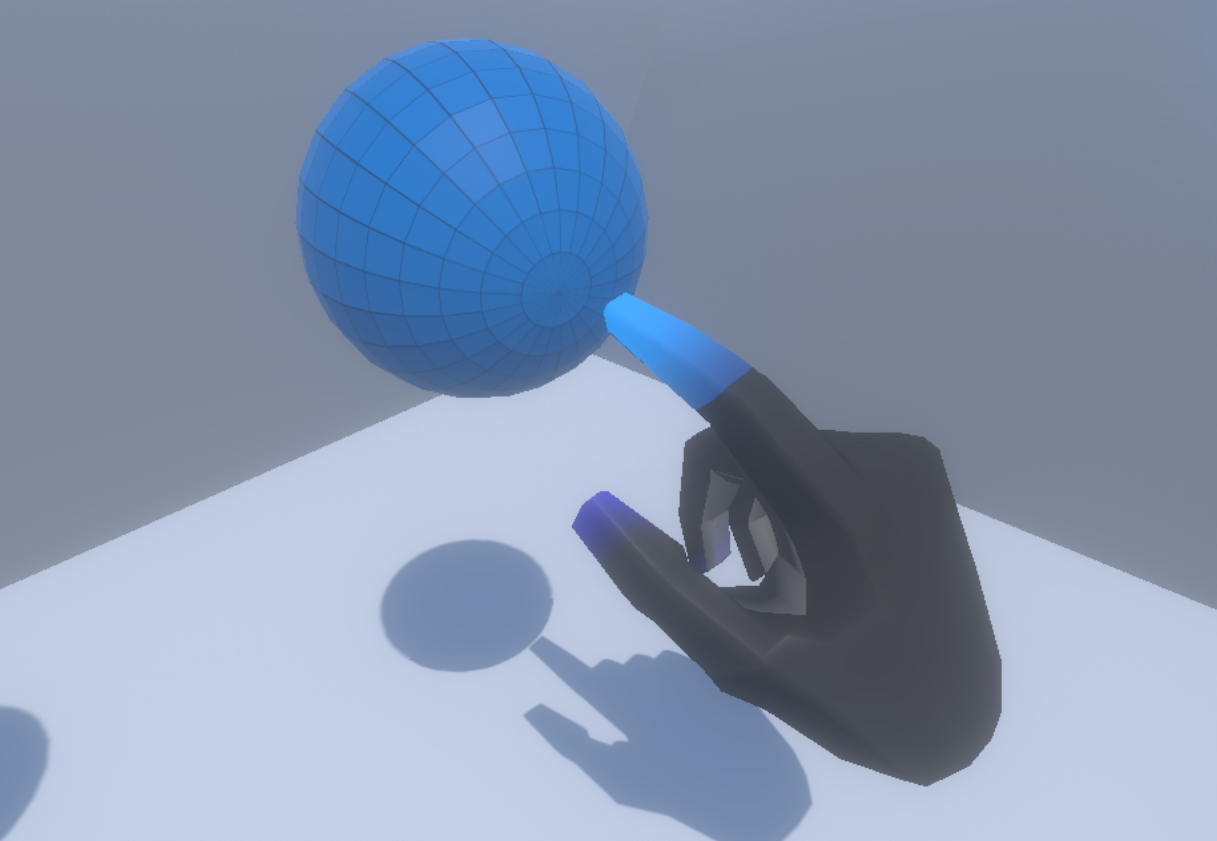
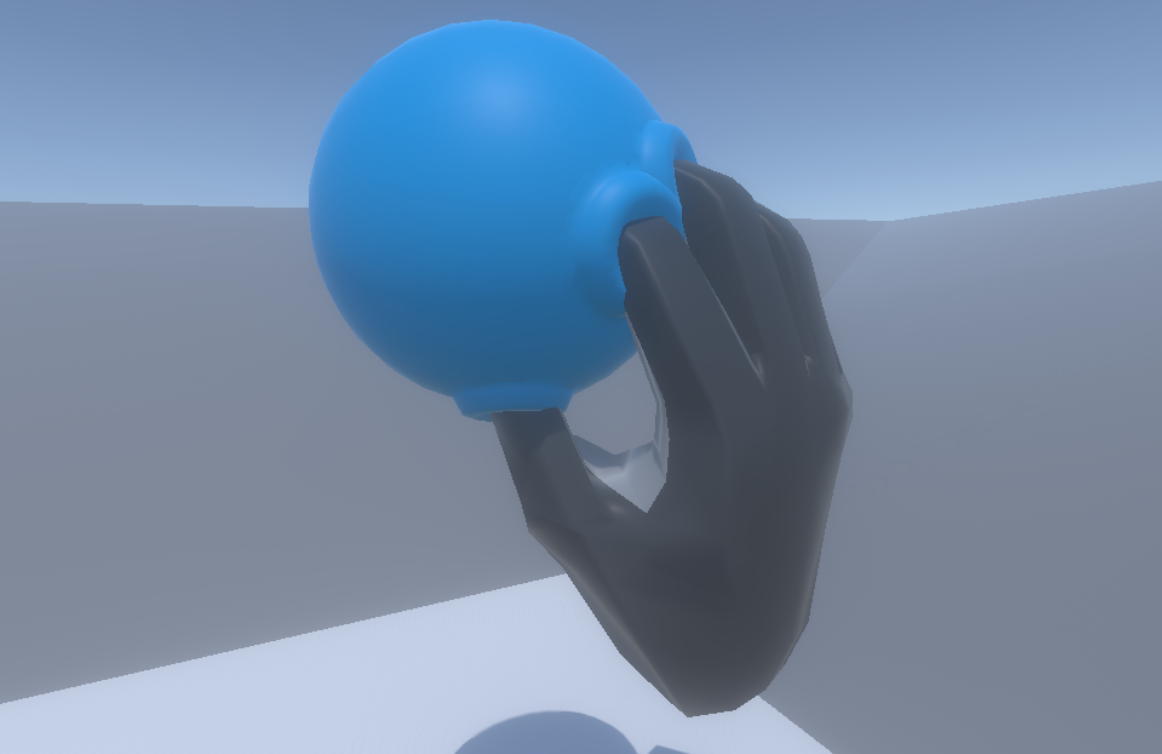
To select an object, we were able to reuse much of the logic from the previous executions, raycasting through the shoulder and palm to hit a larger proxy collider around distant objects. Once the raycast hit an object’s proxy collider, we projected a new blue graphic hand out to the object’s location as well as the underlying InteractionHand, which contains the physics colliders that do the actual grabbing. We used similar snapping logic from previous executions so that when an object was hovered, the blue projected hand snapped to a position slightly in front of the object, ready to grab it.


Raycasting against a distant object’s proxy collider, sending a projected hand out and snapping it to a position directly in front of the object ready to grab it.

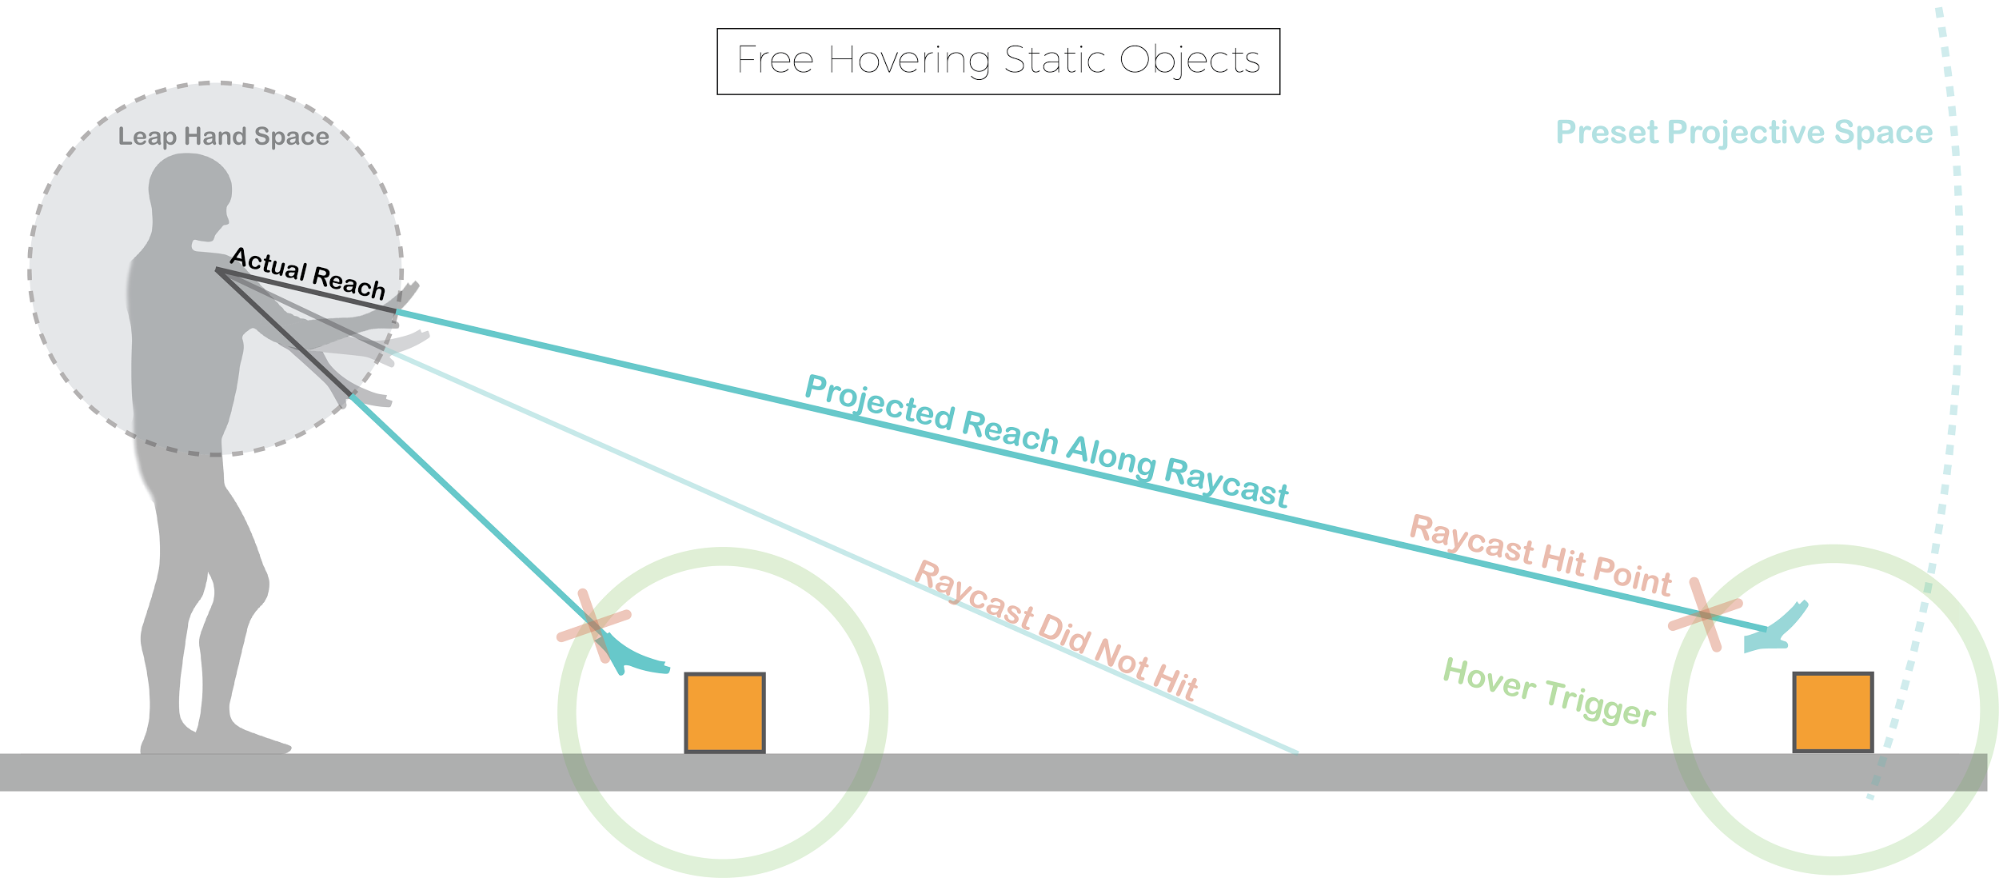
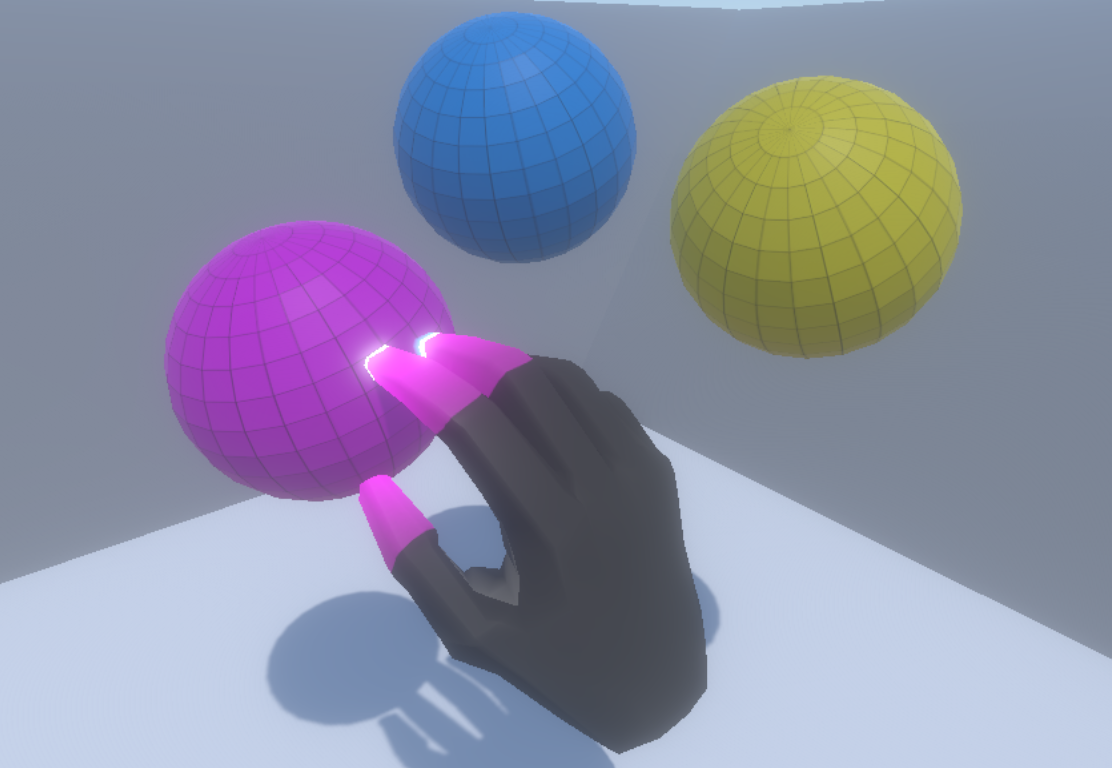
As an alternative, we looked at an approach without snapping where we would hover over a distant object and project out a green hand, but let the user retain full control of their hand. The idea was to allow the full freedom of Interaction Engine manipulation, including soft contact, for distant objects.

To do this we remapped the reachable range of your hands onto a preset projective space that was large enough to encompass the farthest object. Then whenever your raycast hit an object’s proxy collider, we would simply send out the projected hand to its corresponding position within the projective space, letting it move freely so long as your raycast was still hitting the proxy collider. This created a small bubble around each object where free hovering with a projected hand was possible.


Free hovering distant objects to allow soft contact for distant objects

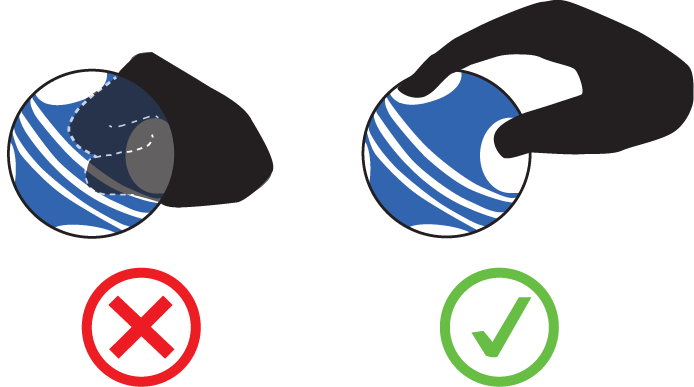
This action felt interesting but ended up being quite difficult to control. Regular soft contact interaction with virtual objects takes a bit of getting used to – since from the perspective of a game engine, your hands are immovable objects with unstoppable force. This effect is multiplied when operating in a projectively scaled-up space. A small movement of your real hand is magnified by how far away your projective hand is. Often, when trying to roll our hand over a distant object, we instead ended up forcefully slapping them away. After some tests we removed free hover and stuck with snap hovering.

2. Grabbing

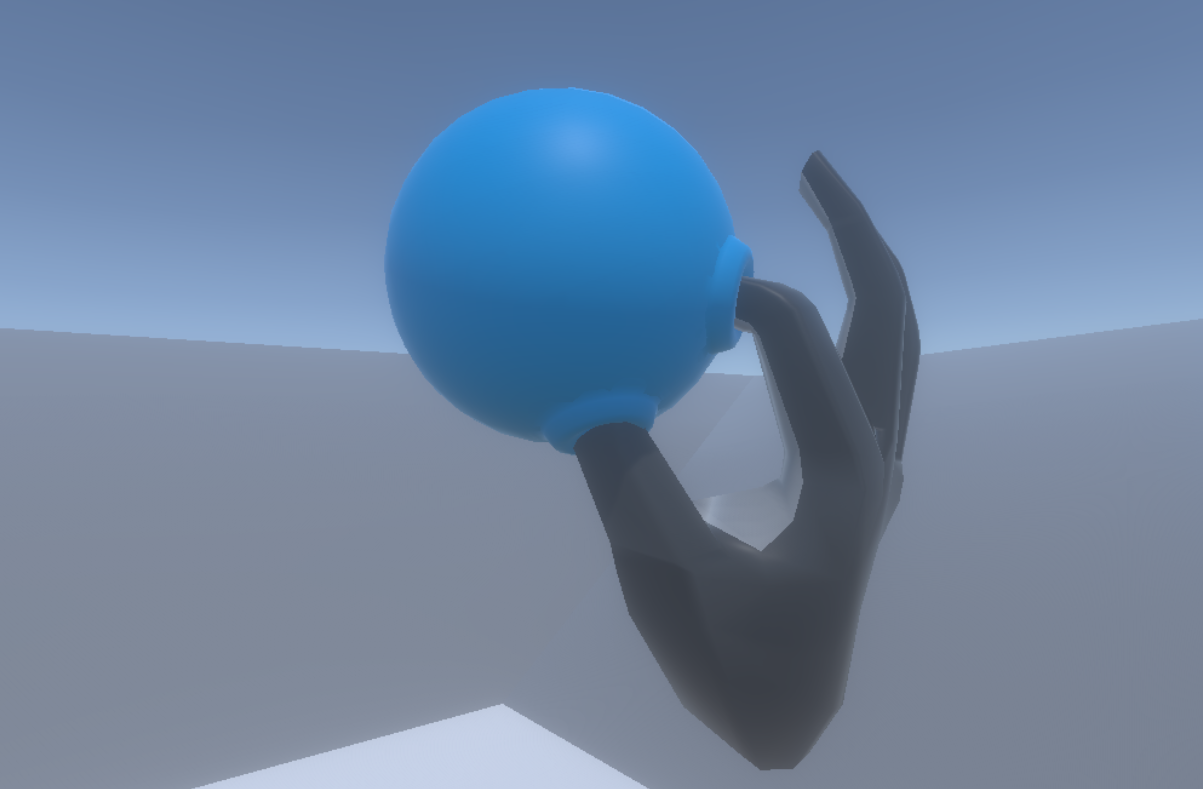
Grabbing in this execution was as simple as grabbing any other virtual object using the Interaction Engine. Since we’d snapped the blue projected hand to a convenient transform directly in front of the distant object, all we had to do was grab it. Once the object was held we moved into the projective space held behaviour that was the real core of this execution.

3. Holding

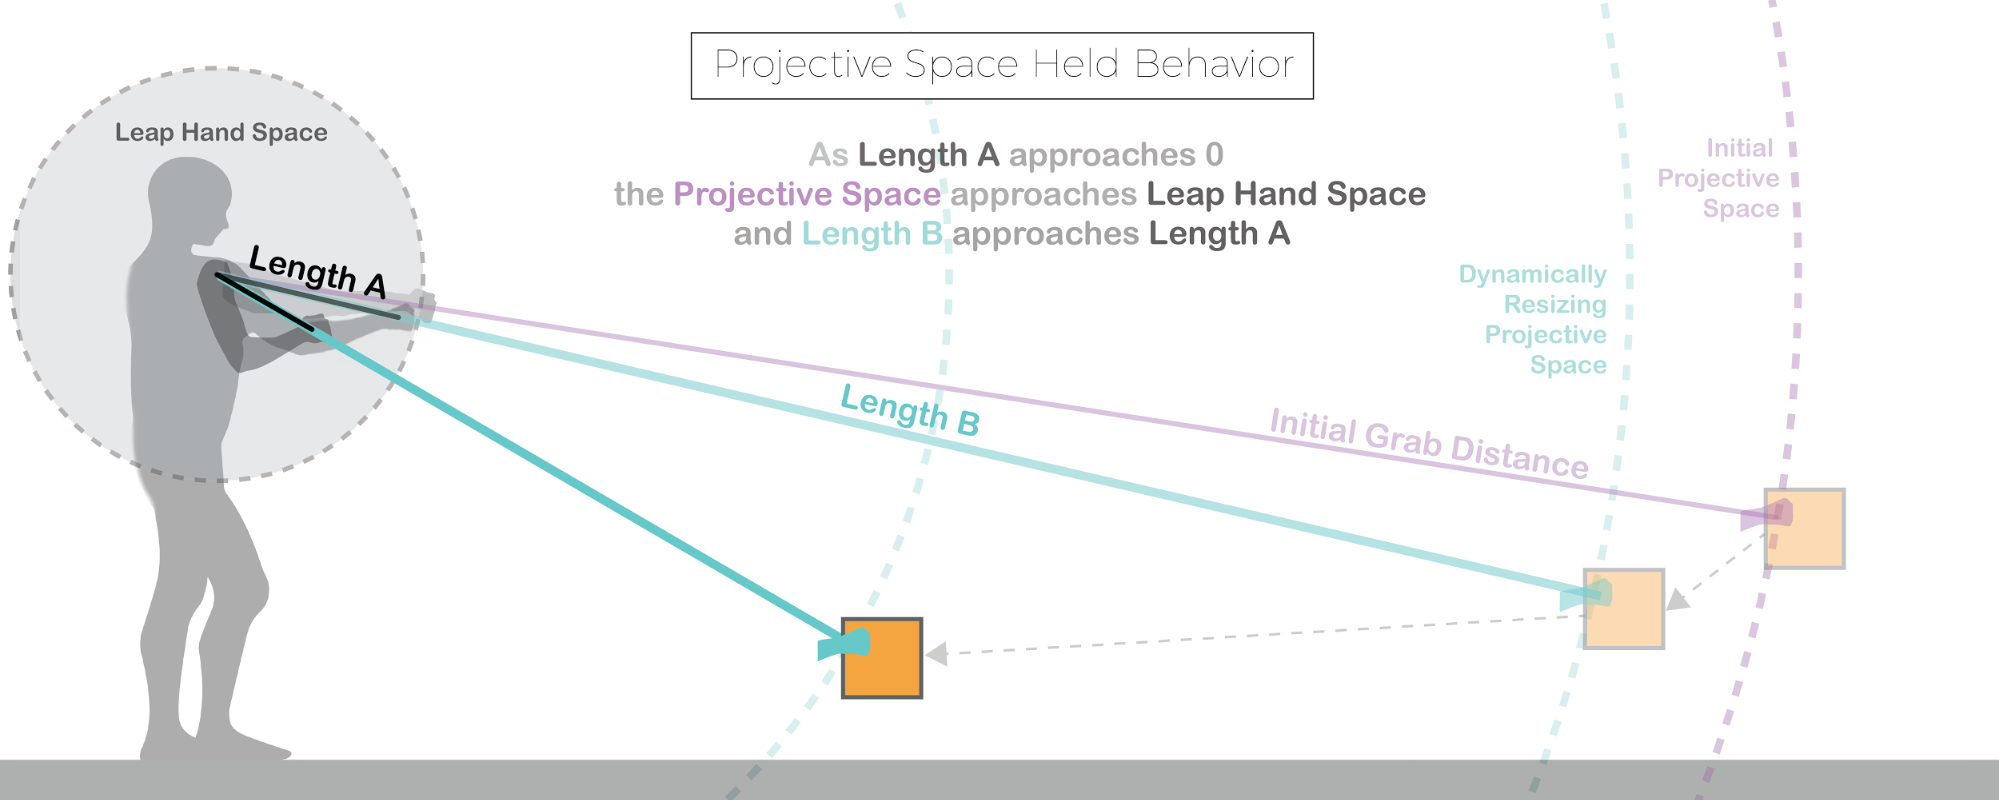
At the moment you grab a distant object, the distance to that object is used to create a projective space, onto which your actual reach is remapped. This projective space means that moving your hand in an arc will move the projected hand along the same arc within the projected space.

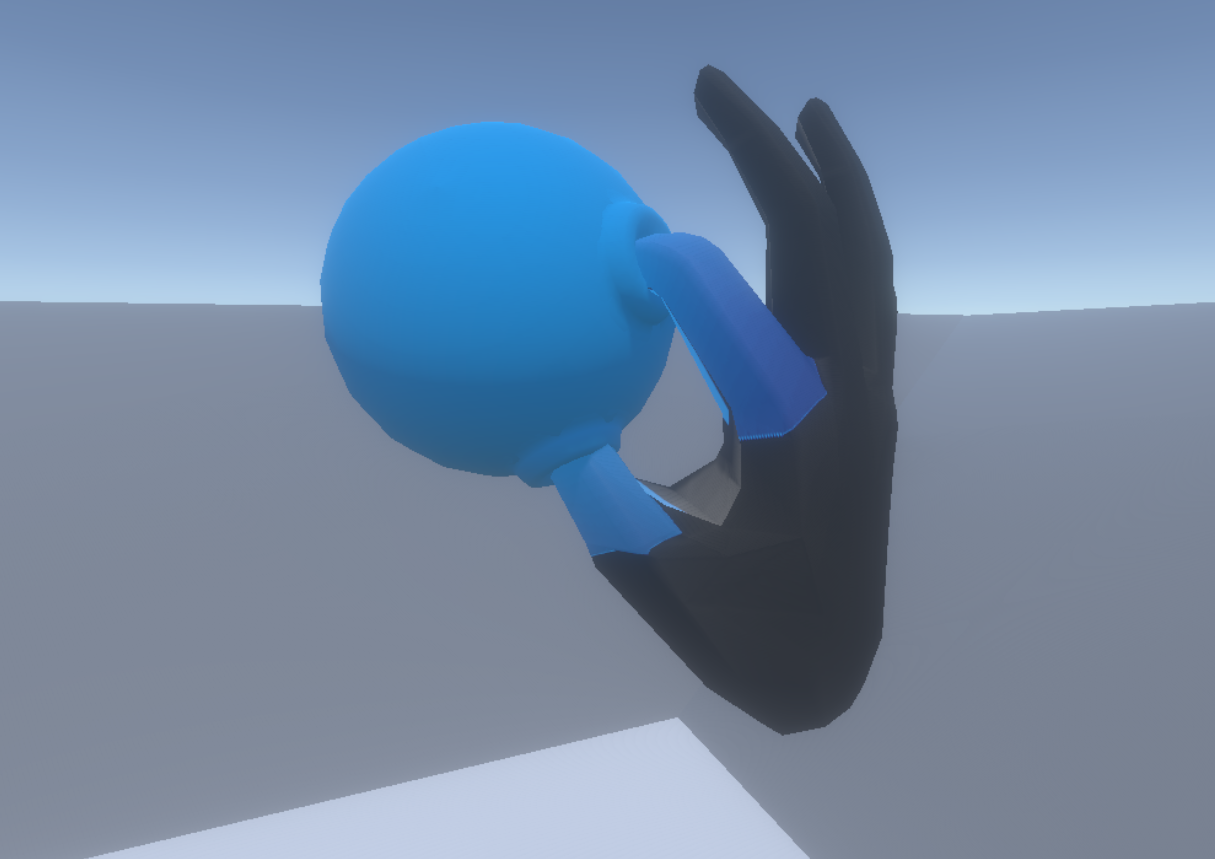
However, as you bring your hand toward yourself the projective space dynamically resizes. As the distance between your actual hand and a reference shoulder position approaches zero, the projective space approaches your actual reach space.

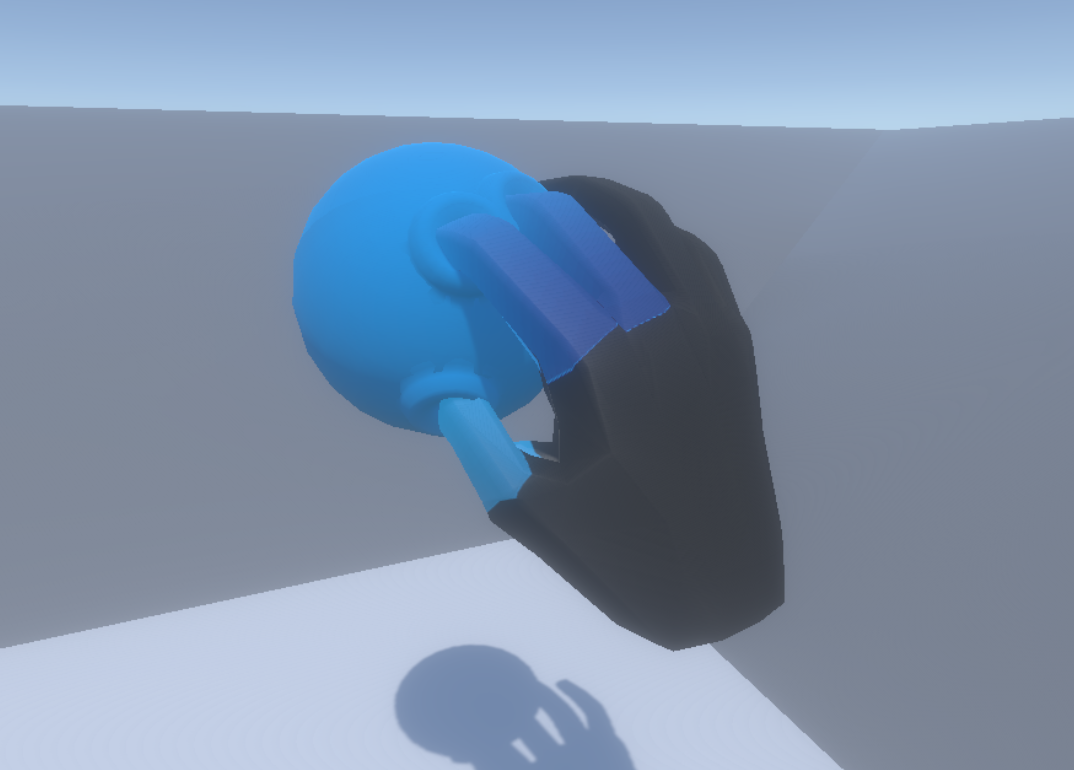
Then, once your hand is almost as far back as you can bring it and the projective space is almost equal to your actual reach space, your projected hand fuses into your actual hand and you are left holding the object directly.

The logic behind this dynamically resizing projective space held behaviour sounds quite complicated, but in practice feels like a very natural extension of your hands.

After a bit of practice these extendo hands begin to feel almost like your regular hands just with a longer reach. They make distant throwing, catching, and relocation possible and fun!

Extendo arms feel quite magical. After a few minutes adjusting to the activation heuristics, you could really feel your sense of peripersonal space expand to encompass the whole environment. Objects previously out of reach were now merely delayed by the extra second it took for your projected hand to travel over to them. Moreso than the other two executions this one felt like a true virtual augmentation of your body’s capabilities. We look forward to seeing more work in this area as our body schemas are stretched to their limits and infused with superpowers.

Photo credits: Leap Motion, picturesbymom.com. An abridged version of this post was originally published on RoadtoVR. A Chinese version is also available.

The post Summoning and Superpowers: Designing VR Interactions at a Distance appeared first on Leap Motion Blog.

VR Flight Simulator Lets You Explore the World and the Web

$
0
0

Want to reach into a VR cockpit that’s a little closer to Earth? This week, Daniel Church achieved lift-off with a successful Kickstarter campaign for his virtual reality flight simulator. FlyInside FSX is a plugin for Microsoft Flight Simulator and Prepar3D that brings you inside a completely realistic airplane flight deck.

Well, not entirely realistic – maybe a little bit better. As Daniel points out on his Kickstarter page, “real life pilots don’t have an empty cockpit. They have navigational charts, checklists, clipboards, and even iPads placed around them. With FlyInside, I want you to have your own cockpit. You’ll be able to place sectionals, checklists, and more around you in three-dimensional space.

“You’ll be able to take any window off of your desktop and keep it in the cockpit with you, whether it’s a chart of the airport you’re flying to, or your favorite NetFlix show to entertain you for a long-haul flight.”

b2dcb164b7d4f1fab0f2c13258901ae8_original

Of course, users will need a way to interact with all this content, especially with more flight simulator menus and dialogs being added. Daniel’s first stretch goal for the Kickstarter was to bring hands into the experience, and he’s already made major progress with his Leap Motion integration. Further down the road, users will be able to press buttons inside the cockpit, interact directly with virtual windows, and switch between the virtual flight deck and the real world using the Leap Motion Controller’s image passthrough.

To try an early alpha demo of FlyInside FSX, be sure to check out Daniel’s website. While the free demo doesn’t currently include features like virtual desktop windows and Leap Motion support, it’s still a great preview of how VR can take us to new heights.

The post VR Flight Simulator Lets You Explore the World and the Web appeared first on Leap Motion Blog.

Break Out Your Scissors: The Secret of Rapid 3D Prototyping for AR/VR & IoT

$
0
0

Virtual reality and the Internet of Things are fundamentally different in many ways, but they share a common goal – bringing digital experiences into the 3D world. And whether that world is a space full of physical objects, or a parallel universe of our own creation, the best 3D interfaces are the ones that have the power to become part of the environment.

Most of our experience of technology is through screens, or what I refer to as magic pieces of paper. True, the surface inside is definitely magical – we can turn it into any number of configurations depending on our immediate needs – but for the most part the 2D interface is very flat. There is no depth and the edges of the screen mostly act like the edges of paper, in that the experience ends at those boundaries. It doesn’t bleed out into our real world, instead it is all nicely contained in this little area.

The result is that the technology stays in its world, while we stay in ours. The only place the two interact is a thin little membrane, or screen, between you and your interface. All you need to do is interact with that membrane with a touch or a cursor and – boom – magic happens. Which can be great, because we’ve optimized the 2D interface to be highly efficient. We have shallowly defined buttons and sliders that don’t require any more depth because of this single point of contact with the membrane.

2d-interface

However, when you expand these into 3D spaces like AR/VR or the Internet of things, you have a lot of floating membranes. They act as more of a barrier than an inviting point of interaction. This feels flat and artificial, and doesn’t live up to the potential of truly three dimensional input. The more floating screens we have in our environment, the more noise and interruption between us and our world.

2d-interface-in-the-real-world

Please make it stop.

David Carson said in 2000 that we had reached the end of print. And while he was a bit premature, he was clearly the harbinger of doom because today, in 2015, we can say that we have reached the end of “the end of print.” We will still use those principles for screens and paper, but when it comes to 3D interactions with technologies, it’s time to leave that thinking behind. It’s time for us to start talking about designing rooms full of objects, rather than buttons on screens.

This is significant. It’s a very different way of thinking about technology, and how we interact with technology. When you look at a room there is very little text that that needs to be read, or buttons that need to be pushed. We know immediately how to interact with the objects in our room because their size and shape affords proper usage, telling us where to put our hands and where to apply pressure. In the real world, we spend less time looking at our tools, and more time using them.

That’s where paper comes in. It’s time to roll up your sleeves, open your mind, and start cutting and taping. In this post, we’ll take a look at ways you can hack the power of paper to bring your ideas into the real (or virtual) world – before you commit them to code. Marshall McLuhan famously said that “we shape our tools and thereafter our tools shape us.” As we embark into a world of 3D interface this is a crucial insight. We will not be able to move past floating magic pieces of paper until we use different tools to design interfaces. In other words, we cannot design a 3D world with 2D screens.

“We shape our tools and thereafter our tools shape us.” –Marshall McLuhan

If we want to think about the future of technology into imaginary worlds (VR) or technology into objects (IoT), we need to stop designing for the screen. The interfaces that we design today are the frameworks that will be very difficult to escape in a matter of years. Now is the time to design 3D interfaces that work for us.

Hacking with Paper

So where does paper come in? Back in 1992, I co-owned a small architectural firm called Zoyes East Inc. We quickly found that our clients had a hard time translating our 2D blueprints into what the final product would look like. So we built architectural models to help them understand what the space would be like.

house-blueprints

house

What we quickly discovered was that not only did this help our clients, but it also helped us. We learned more about our own process because instead of just imagining it in our heads, we could actually see them in the real world. We could say “this window could give a great sightline through the archway to this other window, if we just moved it a few inches to the left.”

As a result, models became an essential part of our 3D design process, and I developed a rapid paper prototyping approach. In the next two sections, we’ll take a look at how this is reflected in two designs – a physical object and a virtual menu widget.

Paper + IoT: Digital Experiences that Feel Analog

Making tea is an incredibly physical experience – warmth and color, smell and taste. Even so, time and temperature are essential metrics to making the perfect cup of tea, and many people rely on timers and thermometers. The Kicker teapot was a concept design that we used to stretch our creative muscles and explore how we could bring the analog and digital together in a new way.

When we looked in the marketplace at teapots, we saw mostly glass and ceramic, and a little bit of metal. But when we looked at the market for teamakers, they looked a lot like coffee pots, with lots of knobs and lights and gears.

teamakers

This was the complete antithesis of what tea drinkers said they wanted in their process. So we decided to make a completely analog-feeling digital tea maker. The metaphor came easily – an hourglass, with its analog sense of time and materials. But when we tried to design the controls, we basically ended up with a much larger, more clunky version of buttons and knobs. We needed to try a different approach.

We went physical. We created several rounds of prototypes, from rough mockups with plastic bottles to an Arduino with a tilt sensor taped to a glass jar. Through the process, we quickly discovered that the carafe itself could serve as the actuator for the technology – triggering a digital timer. The act of turning over the carafe still feels incredibly analog, but provides the necessary bridge between human input and digital power. No buttons needed.

kicker-teapot

It was the physical models that really helped us get to this point, because while we had made plenty of sketches, elaborate digital diagrams, and talked about it, it was only when we had a physical object in the real world that we could take it to the next step.

Paper + AR/VR: Designing the Leap Motion Widgets

The simplest things in life are often the most difficult to perfect – especially things that we normally take for granted. There’s nothing new about buttons or sliders, but how these fundamental UI elements translate to VR is profoundly important. Especially when you have a touchless interface where there’s no way to physically restrict people’s movements. Instead, you have to guide users to take certain approaches to the interface.

Our original ideas for the Unity Widgets began with translating existing interfaces that people are already familiar with. For the Dial Picker, the original concept was very 2D. The next natural step was to bring it into three dimensions.

dial-widget-design

We quickly realized that the approach that people’s hands took was as important as the mobile “contact point” we talked about earlier. VR makes it really easy to move through the target, and people take all kinds of different approaches to get to that affordance. As a result, users needed to understand that their trajectory was as important as the contact.

We had a few ideas, but it was the paper model that helped solidify how people would actually interact with the Widget. The options within would exist in 3D space as a wheel, but be bound by a flat plane. This ensured that users would approach the widget from the front and interact with it in predictable ways:

dial-widget-paper-prototype

dials

How to Create Your Own Paper Prototypes

Paper is kind of dumb, so you often need other tricks of the trade to emulate state changes. I create origami with clear mylar, which makes it easy to create 3D models. With a bit of tape, you can instantly create a hinge, or bind different pieces together. With a little imagination, the rough forms you can fold together make it a great rapid prototyping tool – something that your team (or best friend/guinea pig) can lay their hands on and understand what you’re trying to achieve.

paper-prototyping

The other essential ingredient in this approach is color film – translucent plastic, often used to place in front of lights to change their color. Much like old-fashioned 3D glasses, each colored film blocks out its own color, while allowing others to show. With a red film and blue film, and a red marker and a blue marker, you can demonstrate state changes in real time.

vr-iot-design

Designing in three dimensions can be a real challenge, but with the right tools, you can move beyond flat thinking. Whether you’re building a digital experience for an analog world, or an analog experience for a digital world – go forth and fold!

The post Break Out Your Scissors: The Secret of Rapid 3D Prototyping for AR/VR & IoT appeared first on Leap Motion Blog.

Live from Berlin! VR Workshops for Unity & JavaScript

$
0
0

Hey everyone! As part of our global tour for the Leap Motion 3D Jam, we’re at Berlin’s Game Science Centre to take developers through our SDK and building with the latest VR tools. Registrations for the workshops and meetup are still open. The livestream is happening today from 8am–1pm PT (5–10pm CET) at the top of this post – jump into our Twitch channel to join the chat session!

Ahead of the event, we thought we’d give you a quick overview of what to expect. Let’s take a light-speed look at VR development with Leap Motion in Unity and JavaScript.

Why Hands in VR? Escaping from Flatland

We believe that if virtual reality is to be anything like actual reality, then fast, accurate, and robust hand tracking will be absolutely essential. With the Leap Motion Controller, you can quickly bring your hands into almost any virtual reality experience. Our plugins and resources for Unity, Unreal, and WebVR include fully interactive virtual hands that can interact with objects in 3D scenes.

Before you start building, it’s important to know that designing for motion control involves a whole new way of thinking about interactions. Physics engines aren’t designed with hands in mind, and traditional UIs are built for 2D screens. Here are some key resources that will help you build compelling experiences that feel natural:

Unity3D

One of the world’s most popular game engines, Unity makes it easy to rapidly build and develop VR projects. Due to recent changes to the Oculus plugin in Unity, we currently recommend using Unity 5.0 and Oculus 0.5 for your project.

Cockpit4

Along with a full Leap Motion + Oculus integration and a variety of demo scenes, our Unity 5 core assets include several additional features that really stand out:

  • Image Passthrough: This gives you access to the raw infrared camera feed from the controller, letting you see the world in ghostly infrared.
  • Image Hands: These bring your real hands into virtual reality, using the live cameras instead of rigged models.
  • UI Widgets: Buttons, sliders, scrollers, and dials that provide the fundamental building blocks for your VR experience.

To get started, download the Core Assets package and dig into the included demo scenes. You can also explore a variety of Unity demos on our Developer Gallery.

JavaScript

The Leap Motion software also includes support for modern browsers through a WebSocket connection. LeapJS, our JavaScript client library, is hosted on a dedicated CDN using versioned URLs to make it easier for you to develop web apps and faster for those apps to load. You also have access to a powerful and flexible plugin framework to share common code and reduce boilerplate development. In particular, the rigged hand lets you add an onscreen hand to your web app with just a few lines of code.

Recently, we’ve been using experimental browsers to play around with virtual reality on the web. Mozilla provides the Oculus integration out of the box with a special VR Firefox build, while the latest Chrome builds are available here. For a quick boilerplate, be sure to check out our VR Quickstart demo, or reach into VR Collage to see a more complex project. Each of these projects is fully documented, and you can find a deep dive into the boilerplate on the Leap Motion blog.

Feeling inspired? Be sure to tune into today’s livestream from 8am–1pm PT (5–10pm CET) and register for the 3D Jam! We can’t wait to see what you’ll build.

The post Live from Berlin! VR Workshops for Unity & JavaScript appeared first on Leap Motion Blog.

6 Kickass Unity Assets for Your Leap Motion VR Projects

$
0
0

Looking for the perfect Unity assets for the 3D Jam? Today on the blog, we’ve handpicked six assets that will take your Leap Motion VR demo to the next level.

Avatar Hand Controller for Leap Motion – $5

An extension of the rigged hands and forearms in Leap Motion’s core asset package, this asset allows you to control the actual hands of your properly rigged humanoid character avatar. This can be very useful for certain first-person games (e.g. where the player’s body position can be anticipated) as well as multiplayer games where others will see your entire avatar.

playmaker

Playmaker – $65

A must-have for designers, artists, or those coming from a non-coding background, Playmaker uses a huge library of prewritten snippets of code to let you start creating interactions and behaviors in a Leap Motion VR scene straight away. Martin Schubert used this asset (along with the next one on our list) when building Weightless.

iTween

iTween – Free

Bringing your demo to life shouldn’t be difficult. iTween is a simple, powerful, and easy to use animation system for Unity. It’s great for getting objects moving quickly to create a dynamic, living VR scene.

shader-forge

Shader Forge – $90

For absolutely gorgeous visual effects, you can’t go wrong with this node-based shader editor that lets you create your very own shaders without any code. With tons of options you’ll find everything you need to build unique materials for your Leap Motion VR scenes. The asset includes support for physically based lighting (PBL) and image-based lighting (IBL).

Particle Playground – $70

A framework for extending the capabilities of the Shuriken particle system in Unity. This asset has a huge feature set that lets you create any kind of particle system you can imagine, and with its built-in events system, they can be physically interacted with using Leap Motion hands.

glass

Breakable Glass – Free

One of the great things about VR is that it can take you to fantastic new places of the imagination. On the other hand, it also lets you destroy things! Breakable Glass is a simple free asset containing a glass gameobject that can be broken by a punch from your hands. One of many physics-based assets that can be combined with Leap Motion to create physics-fueled fun that’s impossible with standard controllers.

What are your favorite Unity assets? Let us know in the comments!

The post 6 Kickass Unity Assets for Your Leap Motion VR Projects appeared first on Leap Motion Blog.

Video Series: Taking VR Guitar to a Whole New Depth

$
0
0

As the 3D Jam approaches, developers around the globe are already getting a headstart on their projects. Zach Kinstner, the creator behind Hovercast and Firework Factory, has been sharing his latest project through a series of videos – a virtual reality guitar! We caught up with Zach this week to talk about his design process, especially the guitar’s unique combination of visual depth cues.

DevUp-2015-08-20b-864

Stage 1: Building the Guitar

In this first video, Zach dives quickly into Unity, having set up the MIDI guitar sounds and attached them to some simple visual “strings.” He adds a visual indicator to the fingertips to help show the user where the hand is in 3D space.

What’s the importance of these visual indicators?

Visual indicators are very helpful for understanding where your hands are in virtual space. They can provide a good sense of depth, show which parts of your hand are being used for input, and help you discover which objects in the scene are interactive. (I wrote about this in more detail in my Hovercast blog post.)

For the guitar project, there’s a “strum zone,” which is basically a 3D rectangle. To strum the guitar, your finger has to be within that zone. In that scenario, I thought it was important – necessary, really – to give the user a strong sense of depth. The visual indicators are helpful for keeping your strumming finger inside of the zone when you want to hit the strings, and outside of the zone when you don’t.

Screen Shot 2015-08-18 at 12.38.19 PM
These twinkles are the first in his visual clue experiments.

Why not just allow the hands at any depth to interact with the strings?

Without some depth restrictions, the guitar strings would make noise with just about any hand movement. While I’m not looking for total realism, I do want the strumming to feel somewhat natural. I play “real” guitar, so I’m using that experience as a general guideline. Sometimes you want to strum downward, or to strum upward, or to hit individual strings, or to move your hand without hitting the strings at all. The “strum zone” is a good way to achieve those goals.

Stage 2: Chord Selection

In his second update video, Zach added the ability to select chords using input from the user’s left hand.

What’s the thinking behind the chord selection design?

Working with 3D input devices like the Leap Motion, I try to find the simplest ways to accomplish a task, and also to utilize the strengths of the device. I have to consider which movements, poses, and gestures will work most reliably with the hardware, and how easily they can be learned by new users. I’ve done a significant amount of exploration with the “hover” interaction, and found that it works well, so I decided to try it for the chord selectors.

The layout of the chord selectors should seem familiar to guitar players. The selectors are arranged in a grid to match the first five notes of the first three strings. Essentially, you’re selecting the bass note of the chord, and the other strings update to form the full chord. I may also add the ability to switch between major and minor chord formations – possibly using the orientation of your hand or the “spread” of your fingers.

Stage 3: Additional Depth Cues for VR

When it comes to visual indicators in VR, there’s a delicate balance between being distracting and being easy to overlook. In the third video, Zach has added a few new types of visual indicators that hit this crucial balance.

zach-guitar

Are you concerned that visual indicators on the edge of the screen risk causing distraction in the periphery of your vision?

I see it the other way – placing them at the edges of vision helps avoid distraction. My first attempt at a depth indicator (in the second video) placed graphics on the front and back sides of the “strum zone.” This worked well for slow, deliberate tests, but not as well in an actual guitar-playing scenario. The indicators were too subtle to see clearly when moving quickly, and making them brighter or bolder meant more clutter in front of the strings and selectors.

You made several “layers” of indicators in this update video. Red/yellow/green ones to show depth and whether the hands are in the “strum” space. White highlight blocks to help show you where your chord hand was in space. And light grey blocks to show on the sides where the strings lined up.

That’s a somewhat complicated combo, yet it seems to work beautifully. What was your thought process here?

Thanks! So far, I agree – I think I’m on the right track with this latest concept. Wrapping the visual indicators around the “strum zone” allows them to be easier to see – or maybe, easier to perceive – without obstructing your view of the main interactions.

My goal is for the user to be aware of these visual indicators, and find them helpful, without really paying attention to them. For example, you might be focused on your chord selections, but with the flash of red near the edge of your vision, you immediately know when, and where, you have moved outside the “strum zone”.

Of course, the design of these indicators is still in an early phase. As I refine them, I anticipate that certain colors or shapes or sizes will be more effective than others, and that each “layer” will retain distinct visual cues. All of these elements need to be balanced properly to make this “complicated combo” work well.

For the latest on Zach’s VR Guitar, be sure to watch his 3D Jam project thread on our community forums. What do you think of the demo so far? Let us know in the comments!

The post Video Series: Taking VR Guitar to a Whole New Depth appeared first on Leap Motion Blog.


Controlling the Physical World with Leap Motion and Raspberry Pi

$
0
0

When the Leap Motion Controller made its rounds at our office a couple of years ago, it’s safe to say we were blown away. For me at least, it was something from the future. I was able to physically interact with my computer, moving an object on the screen with the motion of my hands. And that was amazing.

Fast-forward two years, and we’ve found that PubNub has a place in the Internet of Things… a big place. To put it simply, PubNub streams data bidirectionally to control and monitor connected IoT devices. PubNub is a glue that holds any number of connected devices together – making it easy to rapidly build and scale real-time IoT, mobile, and web apps by providing the data stream infrastructure, connections, and key building blocks that developers need for real-time interactivity.

With that in mind, two of our evangelists had the idea to combine the power of Leap Motion with the brains of a Raspberry Pi to create motion-controlled servos. In a nutshell, the application enables a user to control servos using motions from their hands and fingers. Whatever motion their hand makes, the servo mirrors it. And even cooler, because we used PubNub to connect the Leap Motion to the Raspberry Pi, we can control our servos from anywhere on Earth.

Raspberry-Pi-Leap-Motion-Servos-Gif_smaller

In this post, we’ll take a general look at how the integration and interactions work. Be sure to check out the full tutorial on our blog, where we show you how to build the entire project from scratch. If you want to check out all the code, it’s available in its entirety in our project GitHub repository and on the Leap Motion Developer Gallery.

raspberry-pi-leap-motion-controller-servos

Detecting Motion with Leap Motion

We started by setting up the Leap Motion Controller to detect the exact data we wanted, including the yaw, pitch, and roll of the user’s hands. In our tutorial, we walk through how to stream data (in this case, finger and hand movements) from the Leap Motion to the Raspberry Pi. To recreate real-time mirroring of the user’s hands, the Leap Motion software publishes messages 20x a second with information about each of your hands and all of your fingers via PubNub. On the other end, our Raspberry Pi is subscribed to the same channel and parses these messages to control the servos and the lights.

Controlling Servos with Raspberry Pi

In the second part of our tutorial, we walk through how to receive the Leap Motion data with the Raspberry Pi and drive the servos. This part looks at how to subscribe to the PubNub data channel and receive Leap Motion movements, parse the JSON, and drive the servos using the new values. The result? Techno magic.

raspberry-pi-leap-motion-controller-1024x585

Wrapping Up

We had a ton of fun building this demo, using powerful and affordable technologies to build something really unique. What’s even better about this tutorial is that it can be repurposed to any case where you want to detect motion from a Leap Motion Controller, stream that data in realtime, and carry out an action on the other end. You can open doors, close window shades, dim lights, or even play music notes (air guitar anyone?). We hope to see some Leap Motion, PubNub, and Raspberry Pi projects in the future!

The post Controlling the Physical World with Leap Motion and Raspberry Pi appeared first on Leap Motion Blog.

3D Jam: Now with Over $75K in Prizes!

$
0
0

Our second annual 3D Jam kicks off in just a few weeks, and it’s bigger than ever! Today we’re excited to announce new prizes for competitors, bringing up our prize total to over $75,000. And we’re just getting started.

Beginning September 28th, developers around the world will compete to build the most amazing motion-controlled experiences for desktop, AR/VR, the Internet of Things, and beyond. The competition runs for 6 weeks, with registration open now. Everyone who signs up for the 3D Jam gets a special hardware discount code when they register, and teams who complete their submission by the November 9th deadline get their hardware cost refunded. See our updated official rules for details.

Thanks to the generous teams at Unity, OSVR, and NVIDIA, jammers now have the chance to win the following along with $50,000 in cash prizes:

  • 2 Unity Suites
  • 9 Unity Pro licenses
  • 6 OSVR Hacker Dev Kits
  • 6 NVIDIA GeForce GTX 980 Ti graphics cards

3djam-2015-prizes

Prize Breakdown

AR/VR TRACK
Augmented and virtual reality experiences built on tethered HMDs

1st Prize
$10,000
Unity Suite
2 OSVR HDKs
NVIDIA GeForce GTX 980 Ti

2nd Prize
$7,500
Unity Pro
OSVR HDK
NVIDIA GeForce GTX 980 Ti

3rd Prize
$5,000
Unity Pro
OSVR HDK
NVIDIA GeForce GTX 980 Ti

4th Prize
$2,500
Unity Pro
OSVR HDK

5th Prize
$1,000
Unity Pro
OSVR HDK

Community Favorites (2)
$500
Unity Pro

OPEN TRACK
All other platforms, from desktop and mobile to the Internet of Things

1st Prize
$10,000
Unity Suite
NVIDIA GeForce GTX 980 Ti

2nd Prize
$7,500
Unity Pro
NVIDIA GeForce GTX 980 Ti

3rd Prize
$5,000
Unity Pro
NVIDIA GeForce GTX 980 Ti

Community Favorite (1)
$500
Unity Pro

Unityunity-logo is an incredible game development engine that lets you build for almost any platform. Our Unity Core Assets make it easy for developers to get started with desktop and VR/AR, including image passthrough, Image Hands, and UI Widgets. Imagine what you could build with a one-year professional license and the power of Unity at your fingertips.

osvr-hacker-dev-kitOSVR is both an open source VR development platform and an upcoming development kit. Their goal is to create an open framework that brings input devices, games, and output devices together.

nvidia-logoFinally, whether you want to experience the future of VR, or you just want a kickass gaming rig, the GeForce GTX 980 Ti graphics card from NVIDIA is the way to go.

The 3D Jam Tour

This month, we’re also hitting up DC, Philly, New York, Boston, and Toronto as part of our global 3D Jam Tour. Our European tour in August packed meetups and workshops in Cologne, Berlin, and London – with lots of developers geared up and ready for the competition. Check out our Meetup page for more details!

leap-motion-3d-jam-events

Are you ready to take your place in the 3D Jam? Register for the 3D Jam online now to gear up and get started, and stay tuned for more announcements in the coming weeks!

The post 3D Jam: Now with Over $75K in Prizes! appeared first on Leap Motion Blog.

From Objects to Scenes to Stories: The Magic of 3D

$
0
0

What makes a collection of pixels into a magic experience? The art of storytelling. At the latest VRLA Summer Expo, creative coder Isaac Cohen (aka Cabbibo) shared his love for the human possibilities of virtual reality, digital experiences, and the power of hugs.

Isaac opens the talk by thinking about how we create the representation of 3D space in the digital world of ones and zeros – a place where nothing really exists, but everything is possible. Just connecting a series of one-dimensional dots can create a line, a plane, a fractal, or even things completely outside our everyday understanding.

objects-scenes-stories

He then dives into the dimension of storytelling through crafting and chaining together imaginary objects, and how perspective can be emotionally powerful. Like climbing to the top of a mountain and seeing how everything in your world is interconnected, depth and perspective can take experiences to an emotional, visceral level.

Isaac’s imagination is synesthetic, combining music and visuals in multiple dimensions. Pulsing space creatures with shimmering tendrils. Psychedelic jellyfish created from the structure of sound. Living comets around a dying star. It’s possible to give these creatures life within a graphics card, and expression through a web browser, but it’s the connections between them which gives them meaning.

“This allows the opportunity to tell more in that story. To provide more depth. To provide more perspective. To let people rise above the void that separates them from other people, walk around that, and give their homie a hug. That’s what we have to strive for – let humans be more human with other humans in a more real way.”

At this point, Isaac travels to the desolate world of Pulse, where users can connect points and create dimensions themselves as the story progresses. The world starts dark, with a rigid circuit board city and a distant moon, but springs to incredible life. (Isaac’s journey through the world of Pulse starts at 18:21.)

image01

“It’s like giving someone the opportunity to participate in that movement between dimensions, because it is so, so, so much more magical… to be inside there. The object is used to provide a context to other objects, to create a scene. But then somehow you can use a bunch of scenes to provide context for each other to make a story.”

During the second half of the talk, he turns to one of his latest projects – Enough, a children’s storybook in WebGL. From the foreword:

“It’s difficult to describe the joy that I found from picking up a picture book and reading it cover to cover. They let me explore galaxies, ride dinosaurs, slay dragons. They let me dig deep down into my own being as I wished upon a magic pebble, boarded a train bound for the north, or soared through the sky on a plane made from dough.

“I know I can never recreate the splendor, magnificence, or beauty that I found in these majestic works, but I hope that this project will still remind you of the wonder you found in these moments. Those times when you could be anything, go anywhere, and find magic in the most fragile of places.”

Enough

Whether it’s a movie, a game, or a story around a campfire, storytelling works by building and bridging scenes to create a narrative thread. And when everything comes together, it’s nothing short of magic.

The post From Objects to Scenes to Stories: The Magic of 3D appeared first on Leap Motion Blog.

The Essential 3D Jam Development Guide

$
0
0

With the 3D Jam just around the corner, we thought we’d give you a headstart – with a full guide to the very latest resources to bring your to life. In this post, we’ll cover everything you need to know about our integrations and best practices for augmented and virtual reality, desktop, and the Internet of Things.

A quick note: VR/AR is a rapidly emerging ecosystem, and many of the engine tools and features that we use to build our Unity and Unreal assets are constantly shifting. We have major updates for these assets in the works, so stay tuned!

Getting Started Checklist

  1. Create a developer account to download the SDK and integrations you’ll need to start building
  2. Check out the 3D Jam official rules
  3. Get inspired by the 2014 3D Jam and our Developer Gallery (now with tags for VR, open source, and more)
  4. Join the discussion on our developer forums
  5. Get connected on Facebook, Twitter, Instagram, and Twitch
  6. Share your project ideas with the hashtag #3DJam!
  7. Add developers@leapmotion.com to your email contacts list to make sure you receive important updates

Design 101: Escaping from Flatland

Whatever platform you’re building on, it’s important to know that designing for motion control involves a whole new way of thinking about interactions. Physics engines aren’t designed with hands in mind, and traditional UIs are built for 2D screens. Here are some key resources that will help you build compelling experiences that feel natural:

Introduction to Platforms & Integrations

With APIs for six programming languages and dozens of platform integrations, the Leap Motion SDK has everything you need to get started. In this section, we’ll cover our community’s three most popular environments for deskop and VR/AR: Unity, Unreal, and JavaScript. You can find more platforms for artists, creative coders, designers, and more on our Platform Integrations & Libraries.

See all integrations

To get started with VR/AR development, make sure you also check out our VR Getting Started page. Along with a setup guide, it includes links to more resources, including demos and documentation.

cockpitgif

Unity3D

Unity is a powerful game engine that makes it easy to rapidly build and develop VR and desktop projects. Here’s a four-minute guide to building your first Unity VR demo:

Along with a full Leap Motion + Oculus 0.7 integration and a variety of demo scenes, our core assets include several additional features that really stand out:

  • Image Passthrough: This gives you access to the raw infrared camera feed from the controller, letting you see the world in ghostly infrared.
  • Image Hands: Bring your real hands into virtual reality using the live cameras instead of rigged models.
  • Photorealistic Rigged Hands: Use these to bring realism into your desktop projects.
  • UI Widgets: Buttons, sliders, scrollers, and dials that provide the fundamental building blocks for for menus and interfaces.

Get started with Unity

Unreal

Right now, we recommend that everyone working with Unreal Engine build with getnamo’s community plugin, which includes Unreal 4.9 and VR support. It’s important to know that we’re still building out the full feature set for the Unreal plugin, so be sure to watch this forum thread in the coming weeks as we continue to bring our Unreal integration up to speed!

Get started with Unreal

LeapJS and WebVR

The Leap Motion software also includes support for modern browsers through a WebSocket connection. LeapJS, our JavaScript client library, is hosted on a dedicated CDN using versioned URLs to make it easier for you to develop web apps and faster for those apps to load. You also have access to a powerful and flexible plugin framework to share common code and reduce boilerplate development. In particular, the rigged hand lets you add an onscreen hand to your web app with just a few lines of code.

Recently, we’ve been using experimental browsers to play around with virtual reality on the web. Mozilla provides the Oculus integration out of the box with a special VR Firefox build, while the latest Chrome builds are available here. For a quick boilerplate, be sure to check out our VR Quickstart demo, or reach into VR Collage to see a more complex project. Each of these projects is fully documented, and you can find a deep dive into the boilerplate on the Leap Motion blog.

Get started with JavaScript

iothero-blog

Internet of Things

For hardware hackers, boards like Arduino and Raspberry Pi are the essential building blocks that let them mix and mash things together. And while these devices don’t have the processing power to run our core tracking software, there are many ways to bridge hand tracking input on your computer with the Internet of Things.

Note: If you’re looking to submit an IoT hack to the 3D Jam, please check out our preliminary approved hardware thread. While we’re open to expanding our hardware support based on your requests, please note that not all requests may be granted.

On our blog, we cover a couple of platforms that can get you started right away (along with some open source examples):

Cylon.js

For wireless-enabled controllers, it’s hard to beat the speed and simplicity of a Node.js setup. Cylon.js takes it a step further with integrations for (deep breath) Arduino, Beaglebone, Intel Galileo and Edison, Raspberry Pi, Spark, and Tessel. But that’s just the tip of the iceberg, as there’s also support for various general purpose input/output devices (motors, relays, servos, makey buttons), and inter-integrated circuits.

On our Developer Gallery, you can find a Leap Motion + Arduino example that lets you turn LEDs on and off with just a few lines of code, plus an AR.Drone integration. Imagine what you could build!

Get started with Cylon.js

Vuo

Vuo is a visual scripting platform that features the ability to connect a wide variety of inputs and outputs. The latest version includes support for Serial I/O, which opens up access to a range of devices, including Arduino boards.

Get started with Vuo

The 3D Jam is fast approaching, so be sure to start your project early! We’ll keep you posted with the latest 3D Jam news and platform updates.

The post The Essential 3D Jam Development Guide appeared first on Leap Motion Blog.

Welcome to the 2015 3D Jam!

$
0
0

On your mark, get set, GO! This morning, our second annual 3D Jam kicks off with developers around the world competing for over $75,000 in cash and prizes – building brand new experiences for virtual reality, desktop, mobile, and beyond. Submissions are now open at itch.io/jam/leapmotion3djam.

With over 150 complete experiences submitted to last year’s 3D Jam, we saw everything from sci-fi space stations to the inner workings of the human body. Virtual reality experiences dominated the field, representing 14 of the top 20 and taking all three finalist spots. This year, developers have registered from over 80 countries around the world – twice the number from last year! We’ve also switched up the 2015 competition with two tracks: AR/VR and Open. The AR/VR track covers experiences built on tethered HMDs like the Oculus Rift, while the Open track covers desktop, hardware hacks, and the Internet of Things.

Over the next six weeks, developers will be racing the clock to get their projects on itch.io/jam/leapmotion3djam by November 9th at 11:59:59 pm PST (full contest rules here). Registrations will remain open until the submission deadline. If you haven’t already, we encourage competitors to register and get their hardware as early as possible. Everyone who registers gets a special discount code for our web store, and teams with complete submissions get refunds for the cost of their hardware.

prizes

Prizes

AR/VR Track

  • 1st Prize: $10,000, Unity Suite, 2 OSVR HDKs, NVIDIA GeForce GTX 980 Ti
  • 2nd Prize: $7,500, Unity Pro, OSVR HDK, NVIDIA GeForce GTX 980 Ti
  • 3rd Prize: $5,000, Unity Pro, OSVR HDK, NVIDIA GeForce GTX 980 Ti
  • 4th Prize: $2,500, Unity Pro, OSVR HDK
  • 5th Prize: $1,000, Unity Pro, OSVR HDK
  • Community Favorites (2): $500, Unity Pro

Open Track

  • 1st Prize: $10,000, Unity Suite, NVIDIA GeForce GTX 980 Ti
  • 2nd Prize: $7,500, Unity Pro, NVIDIA GeForce GTX 980 Ti
  • 3rd Prize: $5,000, Unity Pro, NVIDIA GeForce GTX 980 Ti
  • Community Favorite (1): $500, Unity Pro

logos-color

Development Resources

We’ve made some huge advances since the 2014 Jam, with new resources and integrations that will take your projects to the next level. (You can read our development guide for a full breakdown of our top resources and best practices.) Our Core Assets for Unity now feature:

On the Unreal side, we’re collaborating with the enormously talented getnamo to bring new assets to his community plugin. Right now, the plugin includes full support for Unreal 4.9.1 and VR, with Image Hands on the way. Stay tuned to our community forums for updates.

Hardware hackers also have access to more resources as the Internet of Things continues to grow. Integrations like Cylon.js and Vuo are making it easy for developers, designers, and artists to bridge the divide between people and technology in new and exciting ways. If you’re looking to submit a hardware project on the Open Track, be sure to check out our approved hardware list.

We can’t wait to see how you push the frontiers of technology with Leap Motion interaction. Touch base with your fellow jammers with the hashtag #3Djam, follow us @LeapMotion on Twitter and Facebook, or join the conversation on Reddit. Check out our community forum thread to find team members and get the latest updates. Good luck!

The post Welcome to the 2015 3D Jam! appeared first on Leap Motion Blog.

Infographic: Building Your 3D Jam VR Project

VR Interface Design and the Future of Hybrid Reality

$
0
0

Sci-fi movie interfaces are often breathtaking ways to tell a story, but the next generation of AR/VR interfaces will be clearer and easier to use – with a lot less visual clutter. This week, motion designer Mike Alger released an 18-minute video that digs into the cutting edge of VR interface design using the Leap Motion Controller and Oculus Rift.

As humans, we can use our existing instincts and ways of seeing the world to our advantage. In his video, Mike explores several beginning design considerations related to zones for content, types of interaction, and interface design methods. Moving from button interaction design to a proof-of-concept VR operating system, he carefully navigates the divide between reality and digital fiction.

colors

buttons

map

The video itself is just the tip of the iceberg, as Mike has also published an impressive paper that drives into a variety of interfaces, input and content design theories, and practical applications. He draws from a variety of VR research, demos, and whitepapers, including our Planetarium project and Widgets, Designing VR Tools: The Good, the Bad, and the Ugly, AR Screen, and What Would a Truly 3D Operating System Look Like? Zach Kinstner’s Hovercast VR menu also makes a cameo appearance.

Ultimately, Mike concludes that “as a community, we are discovering the [VR] medium’s unexpected strengths and weaknesses. In coming years the consumer market will run virtual reality through the refining crucible of ethics, etiquette, and social acceptance. Rating systems, legislation, and standards committees will form to ensure the mitigation of social risks. We will soon see the first VR related death, claims of head mounted displays causing cancer, blaming the medium for causing violence, social detachment, psychologically or physically melting the brains of its users.

“Alongside this will be the immersive storytelling, compelling experiences, and discussions of human bodily transcendence by way of technological augmentation. And, of course, there is the prospect of heightened productivity and happiness which I so editorially focused on in context of opportunity for the workplace. It is VR’s medium defining process.”

The post VR Interface Design and the Future of Hybrid Reality appeared first on Leap Motion Blog.


Hack the World: Reaching into the Internet of Things

$
0
0

Over the next few years, billions of devices are going to spill onto the Internet and rewire our world in ways never before thought possible. Alongside augmented and virtual reality, the Internet of Things has the potential to change the world and how we see it.

That’s why with this year’s 3D Jam we created an Open track for desktop and hardware projects – opening the doors to experiments that build on the bleeding edge of this emerging space. In this post, we’ll look at some incredible past projects, plus some key resources and tutorials that will take your hardware hack to the next level.

Before we dive in, there are two things you should know. First, before you start building for the 3D Jam, please check out our approved hardware list. We’re open to hardware requests, but we want to make sure that we can judge your submission fairly. Second, you’ll need a computer to run the Leap Motion core software. This is because there’s a lot of image processing and math happening under the hood, and popular boards like the Raspberry Pi or Arduino just don’t have the necessary horsepower. With that out of the way, let’s have some fun!

Getting Started

Starting your journey into the world of hardware hacks can be tricky, especially if you’re used to the abstract world of ones and zeros, or your background is in music or design. Fortunately, communities like Hackster, Maker Faire, and Instructables have emerged to make getting started with hardware hacks easier than ever.

This week, Hackster’s Alex Glow hosted a quick workshop showing how you can create a motion-controlled LED sign with Cylon.js and an Arduino board. Cylon.js is a great library that abstracts away a lot of the irritating details of hardware coding, so you can focus on the fun stuff.

At the end of this video, you just need to wave your hand to activate a not-so-subtle GO AWAY sign – perfect for shooing away annoying co-workers! The full project and setup guide is available on Hackster.

PubNub is another type of glue that holds any number of connected devices together, with the ability to access them from anywhere on Earth. In the video above, they show how they combined the power of Leap Motion with the brains of a Raspberry Pi to create motion-controlled servos. You can find the entire codebase and building tutorial on PubNub’s blog. Both Cylon.js and PubNub lean on our JavaScript library, so you may also want to check out our getting started guide for LeapJS.

Finally, for all you multimedia designers out there, Vuo combines a number of hardware integrations (everything from stage lighting to an Arduino board) with a stellar suite of visual and audio tools. Currently, it’s for Mac users only, but if you want a visual programming environment that lets you make connections in a snap, Vuo is the way to go.

Mobile Phones

Sometimes the key to a great hardware hack is to solve a problem you never knew you had. Patrick Catanzariti was tired of being interrupted by his phone in the middle of an inspiration, so he decided to do something about it. Using on{X}, an amazing app that lets you control your Android phone/tablet and respond to events that happen on it, he wrote a script that brought silence with the twirl of a finger.

Here’s how it works. When you wave your hand above the Leap Motion Controller, it tells your phone to stop ringing. At the same time, it sends a text message to the person calling you, letting them know that you’ll call them back. Patrick posted a full guide to the project on SitePoint.

The Drone Revolution

The skies are about to get a lot more interactive. Just ask Amazon, whose upcoming drone delivery system is about to revolutionize the shipping industry. Drones are a great fit for motion controls because they operate in three dimensions, and they intuitively map to the pitch, yaw, and position of your hand. From Node.js and Faye and a mere 77 lines of code with Cylon.js to ingenious radio hacks, there’s no end to the possibilities of drone hacking.

Robots of All Shapes and Sizes

Speaking of Amazon, a major keynote at Amazon Web Services re:Invent on Thursday showcased a robotic arm being controlled by Leap Motion interaction, with the technology on display in the Maker area of the re:Invent expo floor.

reinvent

This is just the latest example of bringing a new level of interaction with our future synthetic overlords. Robotic arms, humanoids, Lego Mindstorm robots, Spheros, hexapod spiders, and even massive NASA rover prototypes – if it has to navigate our 3D universe, it needs 3D input.

Interactive Installations and Exhibits

Whether you’re designing an interactive kiosk, museum exhibit, or art installation, there are a few best practices you should follow so that your visitors can get the most out of the experience. Our post How to Build Your Own Leap Motion Art Installation features everything you need to know, including:

  • Interaction design: Giving people freedom to explore
  • Physical design: Mounting and positioning the controller
  • Watch out for surrounding objects
  • Consider the lighting environment
  • Covering the controller

It’s important for 3D Jammers to know that, at a certain scale, interactive art installations go beyond the scope of our jury’s ability to judge. Our goal is to personally judge each project on its own, and we don’t necessarily have access to industrial robots or Australian universities. As always, make sure that you check the approved hardware list, and make requests based on the scope of your project.

Next up, let’s take a look at two of the most striking art installations we’ve seen using Leap Motion technology.

Aether: Industrial Origami and Organic Architecture

Technology is the story of how humans have embedded mind into matter, and architecture is no exception. This art installation from a team of students at the UCLA Department of Architecture and Urban Design brought together a pair of KUKA KR150–2 robots with projection mapping to create a kind of industrial origami. Ultimately, their goal was to create “an immersive interactive environment that gives a glimpse into the near future of artificial intelligence and its effects on human existence in an environment that bridges the physical and the digital.”

Contact: Any Surface Can Be a Musical Instrument

Electric guitars, pianos, digital orchestras, massive virtual bell towers – there’s no shortage of musical projects using Leap Motion technology. But in terms of cross-platform complexity, this next project has a lot happening under the surface.

Contact was an exhibition at the Royal Academy of London that let people touch an interactive surface and build cascading patterns of light and sound. Bridging together contact microphones, a projector, loop pedal, and a Leap Motion Controller, creator Felix Faire combined  Arduino boards, piezoelectric sensors, and music programs like Ableton Live and MAX/MSP to bring Contact to life. Processing was the rug that tied the whole installation together.

The world is yours to hack – what will you build? Register for the 3D Jam, check in on the approved hardware thread, and bring your hardware dreams to life.

The post Hack the World: Reaching into the Internet of Things appeared first on Leap Motion Blog.

Changing How People Look at Physical Therapy

$
0
0

In the tech world, “making the world a better place” has become a bit of a cliché. But with over a billion people living with some form of disability or impairment, medical technology can make a huge difference in people’s everyday lives. That’s why Virtualware is using Leap Motion technology to help people recovering from strokes, Parkinson’s Disease, and more.

Put simply, VirtualRehab Hands is a mini-gaming platform that lets doctors monitor the progress of patients from anywhere in the world. The games are fun and simple, using Leap Motion’s highly responsive hand tracking technology to let patients control game elements on the screen. According to Virtualware, their system is the very first virtual rehabilitation software to be classified as a medical device, under the EU’s Medical Device Directives. It joins TedCas and MotionSavvy in bringing Leap Motion technology to the assistive healthcare space.

virtualrehab

The system has already been tested in installations in Europe, Latin America and the Middle East, according to David Fried, the company’s Director of International Business Development. Right now, it’s being used in the National Hospital for Neurology & Neurosurgery at Queen Square in London. Over the next few weeks, it’s slated to be installed in two more London hospitals – including one where it will be used for telerehabilitation (remote treatment) with stroke patients.

“We want to help make telerehabilitation a reality around the world. This involves a truly affordable technology solution that makes hand rehabilitation a more engaging experience for people of all ages in clinical settings as well as at home,” said David.

minigames

“One of the most interesting things that became evident when people first started using VirtualRehab Hands is the real demand for such solutions from the actual patients,” he continued. “People who suffer from neurological disorders and diseases are really motivated to get better, and are looking for new ways to do so, no matter what age they are.

“Leap Motion brings real independence for patients in the rehabilitation process – with its size and affordability, it allows us to provide a new method of telerehabilitation that can be used anywhere and anytime.”

IMG_4870

In the future, Virtualware plans to add more more therapeutic games for a variety of neurological and physical disorders. Each game is based on their work with neurologists and physical and occupational therapists. Beyond that, they also plan on expanding support to children with physical and developmental problems, and adding an assessment module for therapists.

Want to follow the progress of VirtualRehab Hands? Follow the creators on Twitter @virtualrehab_en! Patients and researchers can learn more by emailing the team at virtualrehab@virtualwaregroup.com.

The post Changing How People Look at Physical Therapy appeared first on Leap Motion Blog.

Escape Virtual Reality with Telekinetic Powers

$
0
0

Much like sketching the first few lines on a blank canvas, the earliest prototypes of a VR project is an exciting time for fun and experimentation. Concepts evolve, interactions are created and discarded, and the demo begins to take shape.

Competing with other 3D Jammers around the globe, Swedish game studio Pancake Storm has shared their #3DJam progress on Twitter, with some interesting twists and turns along the way. Pancake Storm started as a secondary school project for Samuel Andresen and Gabriel Löfqvist, who want to break into the world of VR development with their project, tentatively dubbed Wheel Smith and the Willchair.

In their first video, they begin by exploring a telekinesis-like manipulation mechanic, combined with a simple locomotion choice of a motorized wheelchair. (With any luck, it will turn out looking like one of these wheelchairs!) The interaction loop is fun and simple – look at an object and lift it with a telekinetic gesture, take aim, then push out to fire the object at the target.

Locomotion is one of the biggest challenges in VR development, with solutions ranging from omni-directional treadmills and Blink, to Superman-like flight in Leap Motion demos like Weightless. Pancake Storm’s demo is explicitly designed as a seated experience where your locomotion is controlled by leaning with the Oculus positional tracker – an approach that reinforces the user’s sense of body presence.

With the darker mood of the second video, we can see the seeds of a darker narrative that will drive the gameplay forward. Samuel and Gabriel found themselves thinking about a classic dungeon crawler combined with telekinetic powers and antagonistic AI. “When you put on the VR headset, you’re stuck in the game. We’re going to have a voice in the background, pretty much bullying you.”

You’ll also notice that this version includes Image Hands, now available in our Unity Core Assets for Oculus SDK 0.7. If you’re building with Unity, this is definitely the way to go.

In this latest video, the core concept comes more clearly into view. The lighting is less dark and moody, and now feels more like an exploratory puzzle game. As Pancake Storm keeps iterating on the project, we can’t wait to see how it evolves from here.

How is your 3D Jam project evolving? Share your progress on Twitter @LeapMotion with the hashtag #3DJam! Remember to post early demos and videos on our itch.io site ahead of the November 9th deadline for valuable community feedback.

The post Escape Virtual Reality with Telekinetic Powers appeared first on Leap Motion Blog.

Happy #ScreenshotSaturday! 3D Jam Mid-Progress Roundup

$
0
0

It’s #ScreenshotSaturday, and you know what that means – time to take a look at the very latest projects for the 3D Jam. We’re almost at the halfway mark, which means that developers are starting to share early glimpses of their builds. There are already three early entries on our itch.io site and we can’t wait to see what you have in store as the jam progresses. Here’s the latest and greatest from around the web:

The post Happy #ScreenshotSaturday! 3D Jam Mid-Progress Roundup appeared first on Leap Motion Blog.

Reach into the Digital World: Getting Started with Leap Motion @ HackingEDU

$
0
0

The world is changing – can you hack it? At Leap Motion, we believe that the next wave of technological interfaces will rely on the original human operating system: your hands. Whether you’re giving people the power to grab a skeleton, reaching into a human heart, or teaching anyone how to program, hands are powerful.

With HackingEDU just around the corner, Leap Motion is sponsoring the world’s largest education hackathon with over 100 Leap Motion Controllers for attendees to use. In the past, our community has built some incredible educational projects that bring a new level of interaction (and fun) to classroom activities. This is your time to hit the ground running and build an awesome project like:

Learning Earth Science through Gaming

Defend Against Zombies, Learn How to Code

LA Hack Finalists Armateur: Robotic Arm + Leap Motion + Bluetooth

RadioHacktive: Filling an Analog Drone with Digital Goodness

While you can find all of our platforms for artists, creative coders, designers, and more on our Platform Integrations & Libraries, this post is only going to cover some of the most popular hackathon platforms. After all, with just 36 hours to build, you need to ramp up fast!

Getting Started with Leap Motion

The Leap Motion Controller is a small USB sensor that tracks how you naturally move your hands, so you can reach into the world beyond the screen – in virtual reality, augmented reality, Mac or PC. The hardware itself is fairly simple, with three LEDs and two infrared cameras. It can track your hands to about two feet, converting the raw image feed into a rich array of tracking data. You even have access to the raw infrared camera feed, letting you create augmented reality experiences.

Once you have your controller plugged in and the Leap Motion SDK installed, you’re ready to begin. Our Unity, Unreal, and JavaScript integrations already include model hands that you can quickly drop into any project. But before you dig into development, here’s what you need to know about designing for the Leap Motion Controller.

Design 101: Escaping from Flatland

As a new way of interacting with technology, designing for motion control also involves new ways of thinking about interactions. Physics engines aren’t designed with hands in mind, and traditional UIs are built for 2D screens. Here are some tips that will help you build compelling experiences that feel natural:

Don’t settle for air pokes. Imagine how you would control your computer with your bare hands. Rather than simply using them in the place of a mouse or touchscreen, you can push, pull, and manipulate the digital world in three dimensions!

The sensor is always on. Motion control offers a lot of nuance and power, but unlike with mouse clicks or screen taps, your hand doesn’t have the ability to disappear at will. Avoid the “Midas touch” by including safe poses and zones to allow users to comfortably move their hands around without interacting.

Use easily tracked poses. Whenever possible, encourage users to keep their fingers splayed and hands perpendicular to the field of view. Grab, pinch, and pointing gestures tend to perform well, as long as they’re clearly visible to the controller.

For more tips, check out our Introduction to Motion Control, VR Best Practices Guidelines, and 4 Design Problems for VR Tracking (And How to Solve Them).

Building a 3D Desktop App with Unity

Unity is a powerful game engine that makes it easy to rapidly build and develop desktop and VR projects. Here’s a quick video that shows you how to make a VR demo from scratch in just four minutes:

You can also check out our Unity setup guide to see how you can start building.

Building a Web App

Want to build a web application? Leap Motion makes it easy with LeapJS, our JavaScript client library. Like Unity, it includes a rigged hand asset that lets you add an onscreen hand to your web app with just a few lines of code. To get started, check out these Hello World demos and learn how you can design VR experiences with WebVR.

Visual Programming for Artists and Musicians

Available on Mac, Vuo is a visual programming language that lets you easily prototype, mix, and mash up multimedia experiments. By using code like building blocks, artists and designers can quickly create amazing experiences that mash together visuals and sound. You can weave music from the air or create a physics simulation like this gravity mesh example:

vuo-gravity

Hardware Hacks

For hardware hackers, boards like Arduino and Raspberry Pi are the essential building blocks that let them mix and mash things together. And while these devices don’t have the processing power to run our core tracking software, there are many ways to bridge hand tracking input on your computer with robots, drones, and more. Check out this quick getting started tutorial for Cylon.js, which lets you connect just about any device you can imagine:

We can’t wait to see what you build at HackingEDU 2015! Tweet us @LeapMotion #hackingEDU and share your projects.

The post Reach into the Digital World: Getting Started with Leap Motion @ HackingEDU appeared first on Leap Motion Blog.

Viewing all 481 articles
Browse latest View live