Quantcast
Channel: Leap Motion Blog
Viewing all 481 articles
Browse latest View live

6 Pinchy Projects: Sword Art Online, Planetary Genesis, 3D Art and More

$
0
0

Last month, we released our Pinch Utilities Module, making it easier to create experiences based on how we naturally use our hands in the real world. Here are six community projects that are using this fundamental interactive building block for 3D creativity, menu design, and godlike solar system powers.

Triangulate

triangulate2

Scott Kuehnert’s Triangulate is an augmented reality art program that lets you fill your space with colorful triangles by pinching them out of the air. Using a Hovercast menu on your left palm, you can toggle passthrough, activate a snap grid, clear the canvas, and more.

Graffiti 3D

Recently updated for Oculus 1.3, Scott’s Graffiti 3D lets you doodle in 3D space with the colors and materials of your choice, now using a core pinch mechanic. You can also use a “crimp” gesture (with your thumb meeting the side of your hand).

Using another Hovercast menu, you can control brush color, size, material (cartoon, metal, porcelain, clay, neon, wireframe), and perform a variety of utility functions (such as export/import meshes, turn on augmented reality mode, undo strokes, and clear the canvas).

Sword Art Online GUI

SAO V2

Inspired by the near-future world of Sword Art Online, this simple tech demo is an experiment in menu design and interactions. One of the options allows you to draw in 3D space, while the menu can be grabbed and moved around the scene.

Notice Me Senpai (aka Sloth)

Fulfill your dream of interacting with the world’s cutest sloth. He reacts to three simple hand gestures – thumbs up, peace sign, and (naturally) the middle finger. Pinch in the air to create drawings for your new friend.

VR Solar System Playground

Imagine having the power to bring planets into existence and fling them into orbit. Shared last month on /r/leapmotion, this video also features an early arm menu.

Draw and Scale

This quick project from Mike Harris combines the move and draw utilities to enable a radical shift in perspective. Draw something that can fit in the palm of your hand, then stretch it out and walk inside your creation.

What’s your favorite pinch project – and what new resources would you like to see? Let us know in our 2016 developer survey and get the chance to win one of five $100 Unreal/Unity asset credits (full details).

The post 6 Pinchy Projects: Sword Art Online, Planetary Genesis, 3D Art and More appeared first on Leap Motion Blog.


Scaffolding in VR: Interaction Design for Stacking and Assembly

$
0
0

There’s something magical about building in VR. Imagine being able to assemble weightless car engines, arrange dynamic virtual workspaces, or create imaginary castles with infinite bricks. Arranging or assembling virtual objects is a common scenario across a range of experiences, particularly in education, enterprise, and industrial training – not to mention tabletop and real-time strategy gaming.


Imagine being able to assemble weightless car engines, arrange dynamic virtual workspaces, or create imaginary castles with infinite bricks.
Click To Tweet


For our latest interaction sprint, we explored how building and stacking interactions could feel seamless, responsive, and stable. How could we place, stack, and assemble virtual objects quickly and accurately while preserving the nuance and richness of full physics simulation? Check out our results below or download the example demo from the Leap Motion Gallery.

The Challenge

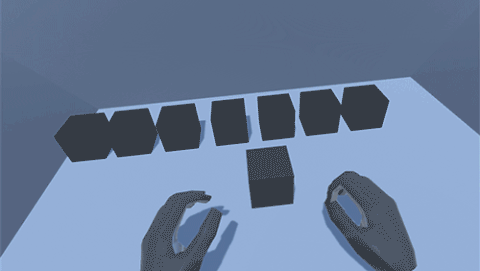
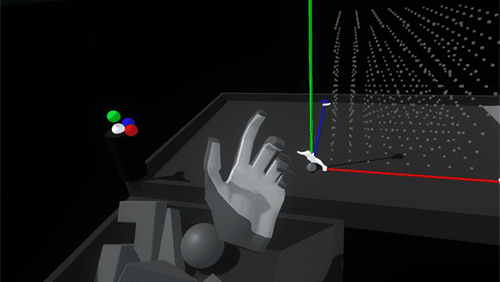
Manipulating physically simulated virtual objects with your bare hands is an incredibly complex task. The advanced hand-based physics layer of the Leap Motion Interaction Engine makes the foundational elements of grabbing and releasing virtual objects feel natural. In itself this is already a feat of engineering and interaction design.

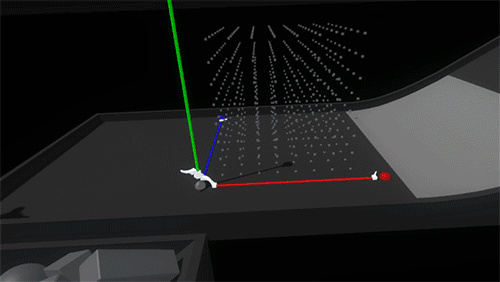
Nonetheless, the precise rotation, placement, and stacking of physics-enabled objects – while very much possible – takes a deft touch. Stacking in particular is a good example.


Stacking in VR shouldn’t feel like bomb defusal.

When we stack objects in the physical world, we keep track of many aspects of the tower’s stability through our sense of touch. Placing a block onto a tower of objects, we feel when and where the held block makes contact with the structure. In that instant we feel actual physical resistance. This constant stream of information lets us seamlessly adjust our movements and application of force in a feedback loop – so we don’t unbalance the tower.

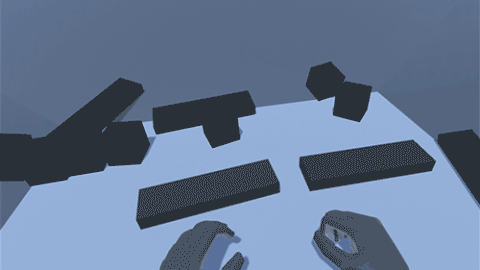
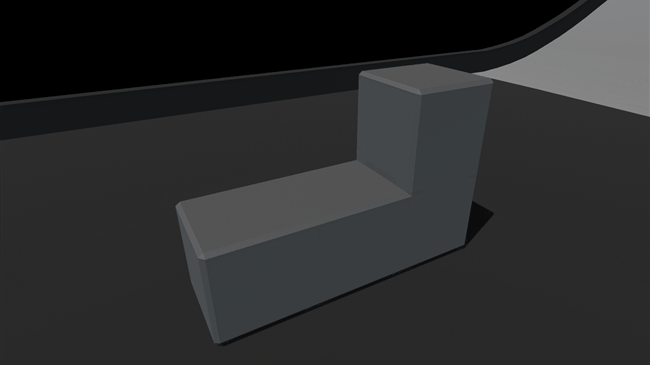
The easiest way to counteract these issues in VR is to disable physics and simply move the object meshes around. This successfully eliminates unintended collisions between the held object and others, as well as accidental nudges.


With gravity and inertia disabled, we can assemble the blocks however we want. But it still looks weird!

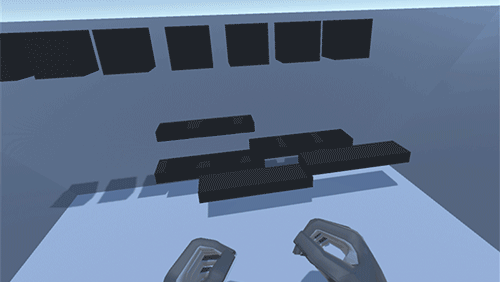
However, this solution is far from ideal, as precise rotation, placement, and alignment are still challenging. Moreover, disabling physics on virtual objects makes interacting with them far less compelling. There’s an innate richness to physically simulated virtual interactions in VR/AR that’s only amplified when you can use your bare hands.

A Deployable Scaffold

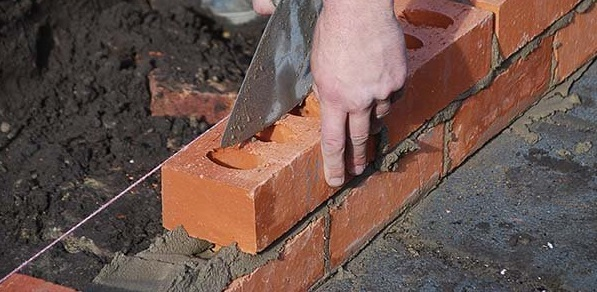
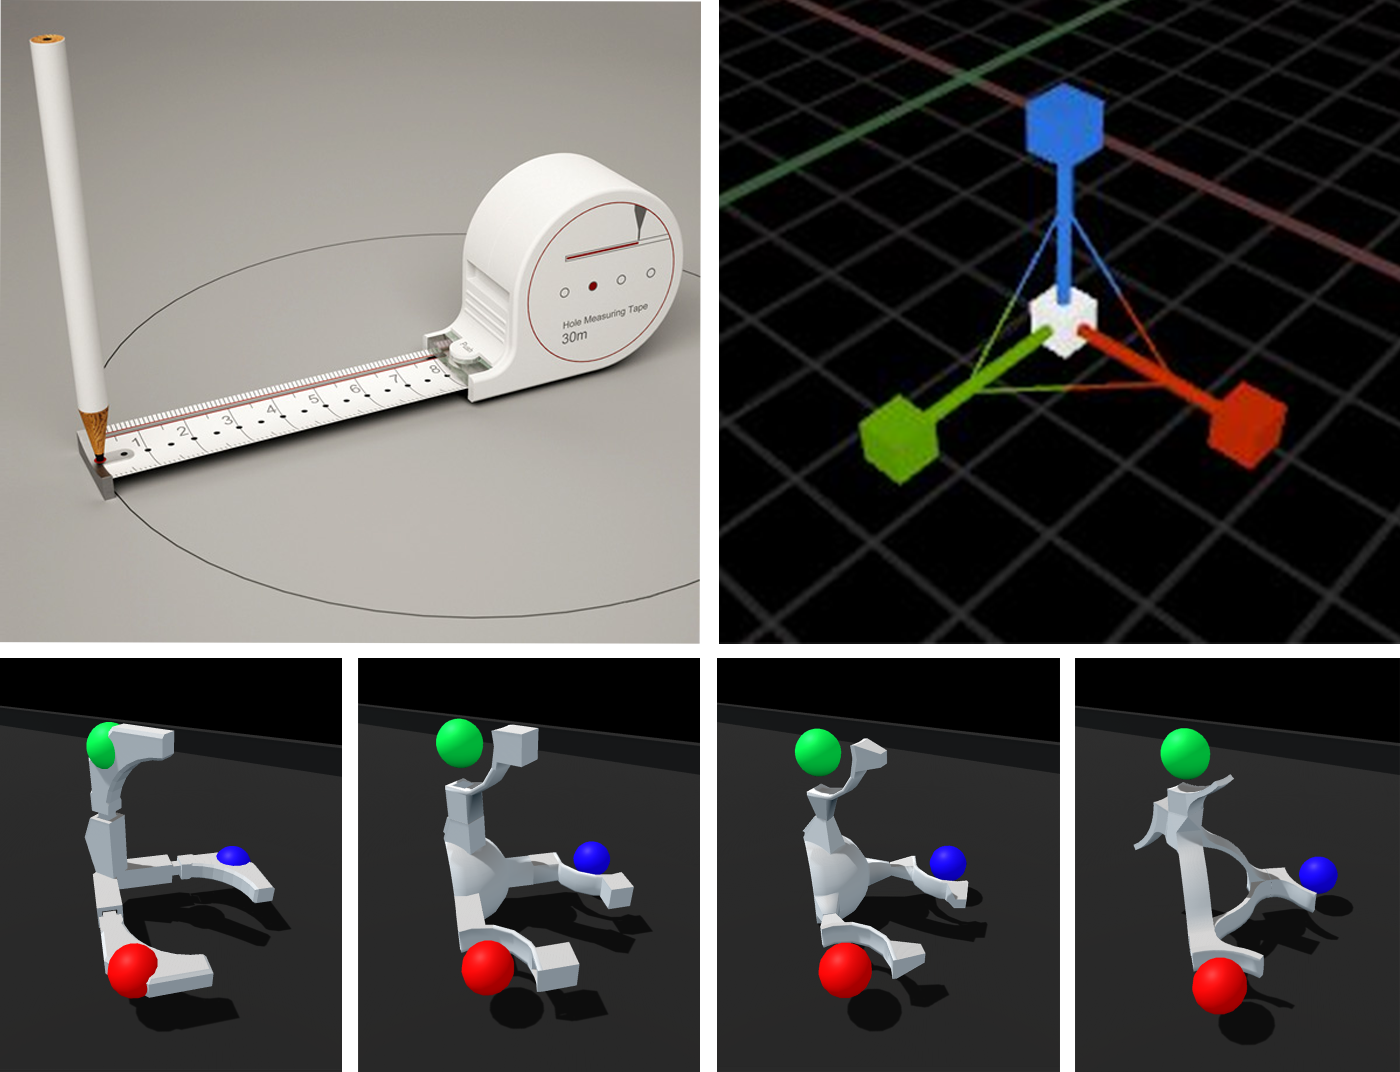
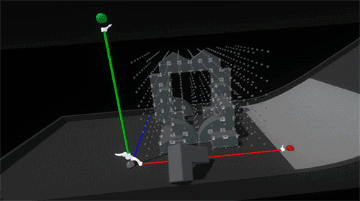
The best VR/AR interactions often combine cues from the real world with the unique possibilities of the medium. Investigating how we make assembling things in the physical world easier, we looked at things like rulers and measuring tapes for alignment and the concept of scaffolding – a temporary structure used to support materials in aid of construction.


Snappable grids are a common feature of flat-screen 3D applications. Even in VR we see early examples like the very nice implementation in Google Blocks.


Deployable scaffolding in VR lets you rapidly create interactive spaces where the rules of physics (temporarily) don't apply.
Click To Tweet


However, rather than covering the whole world in a grid, we proposed the idea of using them as discrete volumetric tools. This would be a temporary, resizable three-dimensional grid which would help create assemblies of virtual objects – a deployable scaffold! As objects are placed into the grid, they would snap into position and be held by a physics spring, maintaining physical simulation throughout the interaction. Once a user was done assembling, they could deactivate the grid. This releases the springs and returns the objects to unconstrained physics simulation.

To create this scaffolding system we needed to build two components: (1) a deployable, resizable, and snappable 3D grid, and (2) an example set of objects to assemble. As we investigated this concept further it became clear that the grid itself would require quite a bit of engineering, especially for a sprint timeline.

Generating A 3D Grid

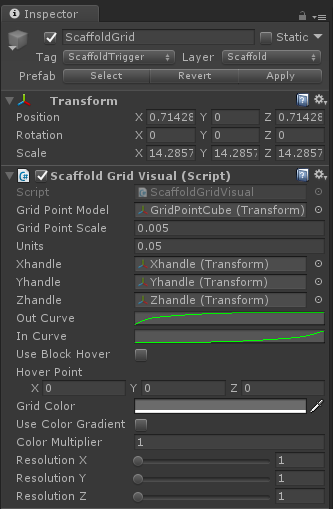
Building the visual grid around which Scaffold interactions are centered is straightforward – instantiate a 3D array of objects representing points of the grid using a simple prefab as a template. For this we created a ScaffoldGridVisual class. We keep the visual grid features of the Scaffold separate from the interactive features for flexibility and organization. Here we expose the basic parameters such as the scale for the point meshes and the size of each grid unit expressed in world units.

But while the array of grid points is easy to create, it’s also clear that we need to optimize at the outset. Since we want to be able to change the dimensions of a Scaffold dynamically, we may have many of them per Scaffold (and potentially multiple Scaffolds per scene). So simple static batching isn’t an optimization path in this case.

This made it worthwhile to create a custom GPU-instanced shader to render the points in our Scaffold grid. This type of repetitive rendering of identical objects is great to put onto the GPU – it saves CPU cycles and keeps our framerate high. For setup, we only need to ensure that the prefab for your grid point mesh has a material that uses our GPU instanced shader.

In the early stages of development it was helpful to color-code the dots. Since the grid will be dynamically resized, colors are helpful to identify what we’re destroying and recreating or whether our dot order is orderly. (Also it was pretty and we like rainbow things.

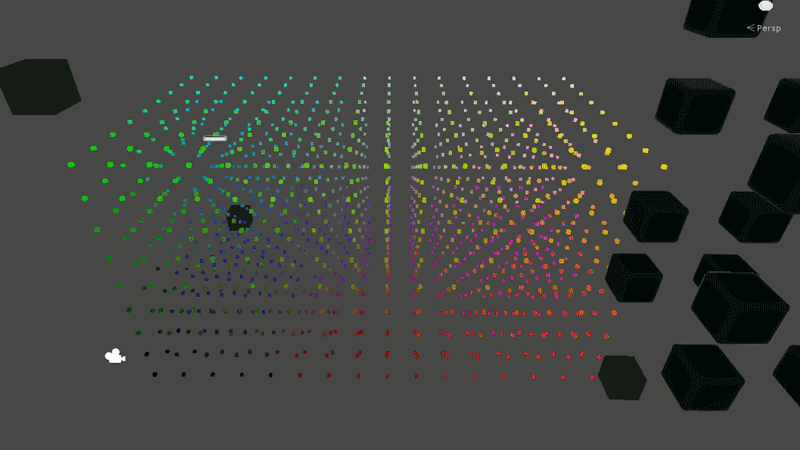
Shader-Based Grid Hover Affordance

In our work we strive to make as many things as possible reactive to our actions – heightening the sense of presence and magic that makes VR such a wonderful medium. VR lacks many of the depth cues that we rely on in the physical world, so reactivity is also important in boosting our proprioception (i.e. our sense of the relative positions of different parts of our body).

With that in mind, we didn’t stop at simply making a grid of cubes. Since we render our grid points with a custom shader, we could add features to our shader to help users better understand the position and depth of their hands.

In the shader, we add a 3D vector for a hover position. As we render each vertex of each cube in the grid array, we can scale out the position of each vertex based on its distance from our hover position. Then, in our ScaffoldGridVisual class, we can use the Leap Motion API to get a fingertip position, using it to set the value for our custom “_HoverPosition” variable in the material for our grid point cubes. We can also use the same hover position within the shader to ramp up the color of a vertex based on the same distance as well.

The result is that our grid points will grow and glow when your hand is near – making it more responsive and easy to use.

Saving Object Positions

With the visual portion of our grid underway, it’s time to build the interactive features. For this, we created a ScaffoldGridInteraction class to sit next to the ScaffoldGridVisual class in our prefab hierarchy. This class has two main duties: maintain a record of which objects have been placed in which grid locations, and find the nearest grid location to an object as it is hovered.

For a record of the objects current in the Scaffold and their grid positions, a simple Dictionary variable is created in the class. This holds a Vector3 to store which grid position the object occupies, and a ScaffoldBlockData data type. ScaffoldBlockData is a custom struct that holds what we need to know about each object:

  • its Transform
  • its local position relative to the grid’s parent transform
  • its local rotation

The cool part here is that when the Scaffold is empty, so is the Dictionary. It only needs an entry for each object – which means we don’t have to have a large empty data array when there are no objects in the Scaffold. Entries to the Dictionary are added when an object is placed and removed when it is grasped again.


Making Scaffold-Reactive Blocks & Their Ghosts

Creating objects that can be placed within (and aligned to) our new grid starts with adding an InteractionBehaviour component to one of our block models. Combined with the Interaction Engine, this takes care of the important task of making the object graspable. To empower the block to interact with the grid, we created and added another Monobehaviour component that we called ScaffoldBehaviour. This behavior handles as much of the block-specific logic as possible so the grid classes stay less complicated and remain wieldy (yes, it’s a word).

As with the grid itself, we’ve learned to think about the affordances for our interactions right along with the interactions themselves. The ScaffoldBehaviour handles interaction logic such as changing physics settings while we grab, place, and release/drop our blocks. But this class also creates and manages a ghost of the block when it’s within the grid. The ScaffoldBehaviour:

  1. Spawns the transparent ghost model when the block is grasped and enters the grid’s box collider
  2. Places the ghost at the grid location nearest to the grasping hand
  3. Rotates the ghost to the nearest orthogonal rotation to the block relative to the grid
  4. Checks to see if the ghost is intersecting any block already in the grid, and if so, changes the ghost color.

When the block is ungrasped within the grid, it is placed and rotated similarly to the grid and the ghost is destroyed. Additionally we add another class, ScaffoldBlockAffordance, to the block to handle the various appearance changes triggered – hovering, grasping, and placing the blocks. (More on this in a bit.)

Resizing The Grid with Interaction Engine Handles

By building handles to grasp and drag, a user can resize the Scaffold to fit within a specific area. We created spherical handles with Interaction Engine behaviors, which we constrained to the move in the axis they control. The ScaffoldGridVisual class has references to these handles. As they’re dragged, the ScaffoldGridVisual rebuilds the grid dynamically.

As this happens, the ScaffoldGridVisual checks the Dictionary from the ScaffoldGridInteraction class to see if there are blocks in grid point as the grid point is created or destroyed. If so, the AddBlockToGrid() or RemoveBlockFromGrid() methods in that block’s ScaffoldBehaviour class are called as needed.

This valuable functionality unlocks a nice variety of playful and emergent interactions. This way, if the user places blocks in the Scaffold and drags the handles to make the grid smaller, the blocks are released, dropping them. Conversely, if the handles are dragged to make the grid larger, and blocks had been placed at those grid points, then the blocks snap back into place!

Widget Stages, States, and Shapes

Now that we have a resizable 3D grid with the ability to show ghosted object positions before snapping them into place, it’s time to bundle this functionality into a widget. We wanted to be able to use multiple Scaffolds and to be able to let go of a Scaffold widget, have it animate to the nearest surface, auto-align, and auto-expand its handles on landing. (Phew!) To manage all of the state changes that come with this higher-level functionality, we created a Scaffold class to sit at the top of the hierarchy and control the other classes.

For this functionality, we have a simple state machine with four states:

  • Anchored: All of the Scaffold’s features are hidden expect for its graspable icon.
  • Held: The Scaffold’s grid and handles are shown. We run logic for finding a suitable surface.
  • Landing: When the Scaffold is let go, it animates and aligns to the closest surface.
  • Deployed: This is the main, active state for the Scaffold grid and its handles.

The top-level Scaffold class has references to three classes – ScaffoldGridInteraction, ScaffoldGridVisual, and ScaffoldHandle. Its finite state machine controls the activation and deactivation of all these classes as needed as the state change. The Scaffold component’s transform, along with all of its child transforms and their components, is then dragged to a prefab folder to become our Scaffold widget.

The hierarchy for the finished widget shows how the classes from the diagram above sit together in the Unity scene.

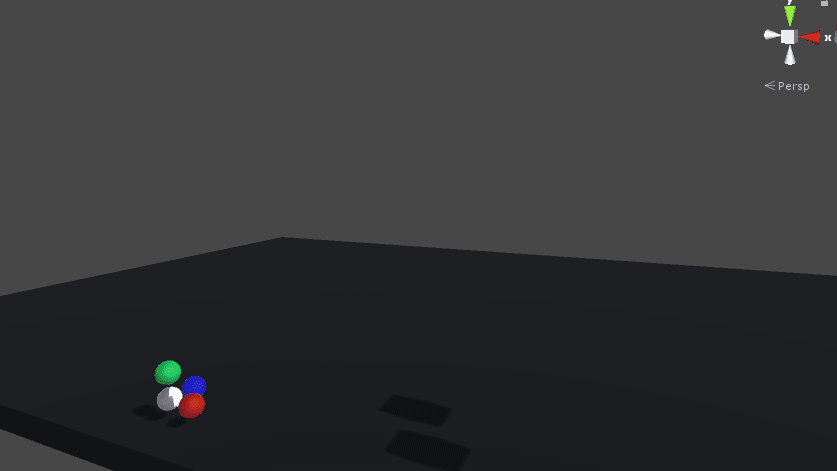
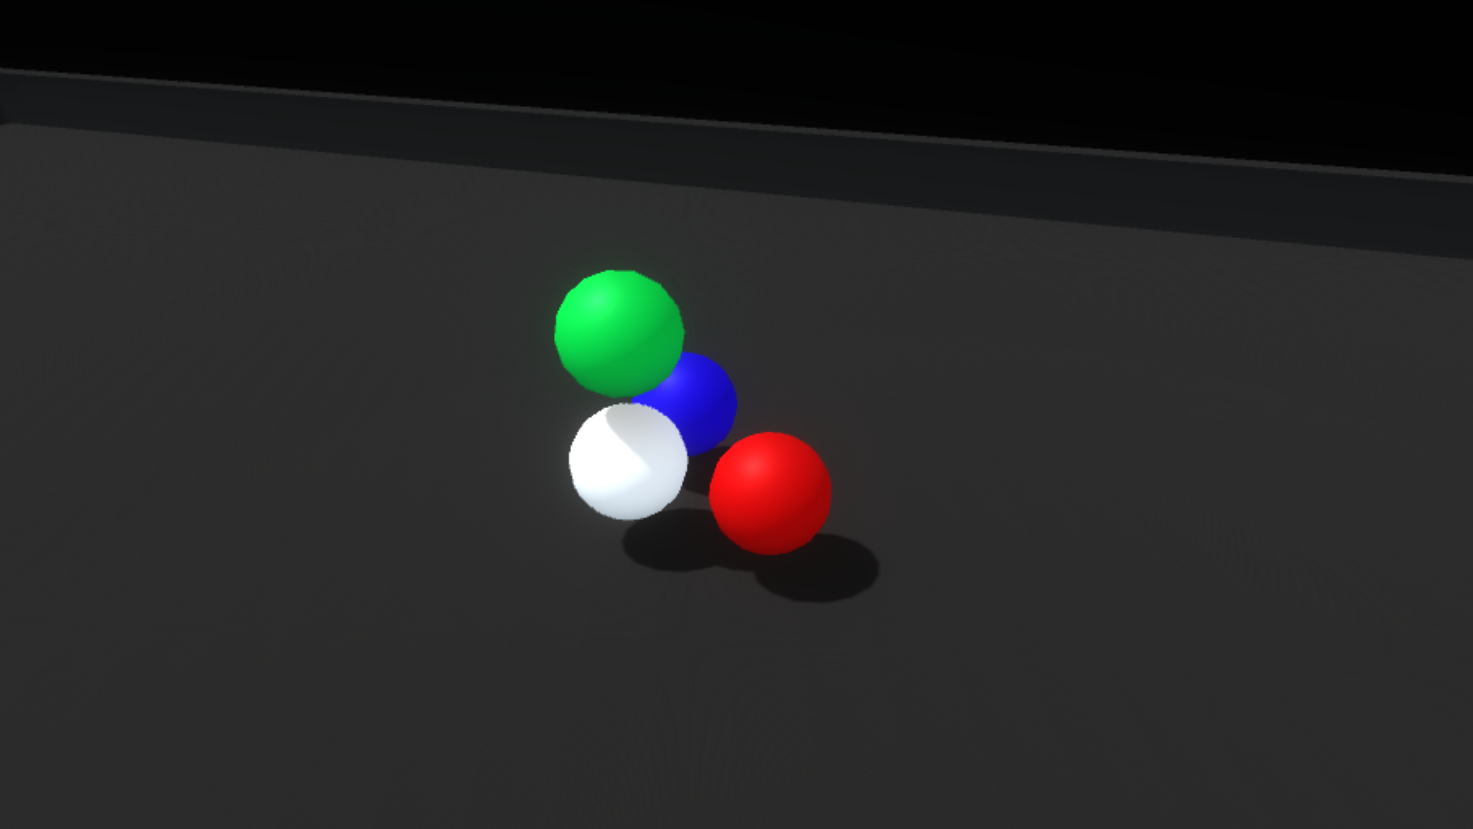
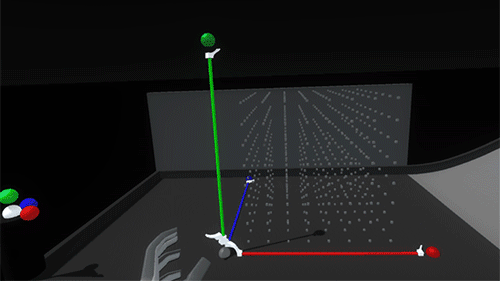
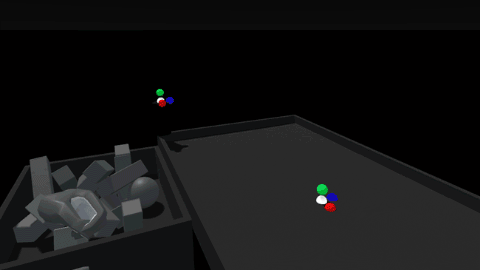
The pre-deployment anchor stage is the fully contracted state of the grid when it might be attached to a floating hand menu slot or placed somewhere in the environment, ready to be picked up. In this state we reduced the widget to a 3D icon, just three colored spheres and a larger white anchor sphere.

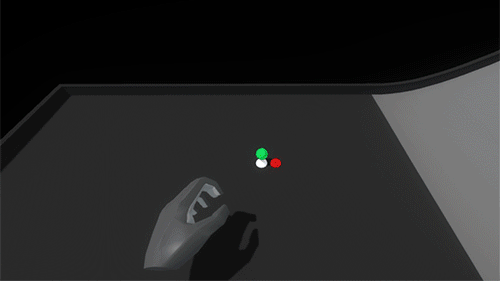
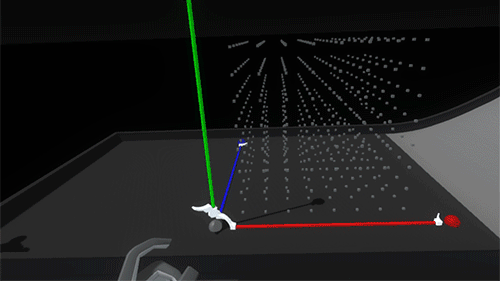
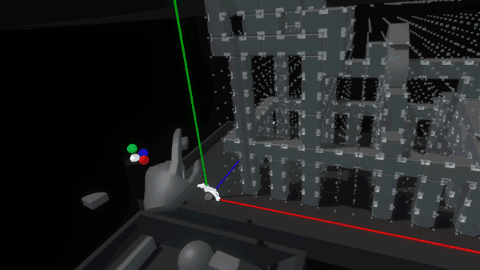
Once you pick up the icon widget, we move into the holding/placing state. The icon becomes the full featured widget, with its red, green and blue axis handles retracted. While holding it, we raycast out from the widget looking for a suitable placement surface (defined through layers). Rotating the widget lets you aim the raycast.

When a hit is registered, we show a ghosted version of the expanded widget, aligned to the target surface. Letting go of the widget while pointed toward a viable surface animates the widget to its target position and then automatically expands the axes, generating a 3D scaffold.

The deployed widget needed a few features: the ability to resize each axis by pushing or grabbing the axis handles, a way to pick up the whole scaffold and place it somewhere else, and the ability to deactivate/reactivate the scaffold.

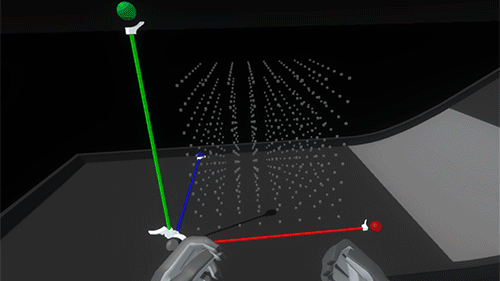
The shape of the widget itself went through a couple of iterations, drawing inspiration from measuring tapes and other handheld construction aids as well as software-based transform gizmos. We honed in on the important direct interaction affordances of the axis handles (red, green, and blue), the anchor handle (white), and the implied directionality of the white housing.


The colored axis handles can be pushed around or grabbed and dragged:

The whole widget and scaffold can be picked up and relocated by grabbing the larger white anchor handle. This temporarily returns the widget to the holding/placing state and raycasts for new viable target positions.

And with a flick of a switch the axes can be retracted and the whole scaffold deactivated:

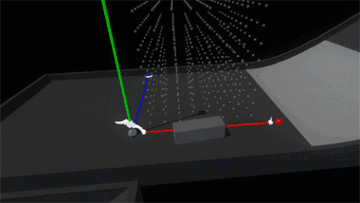
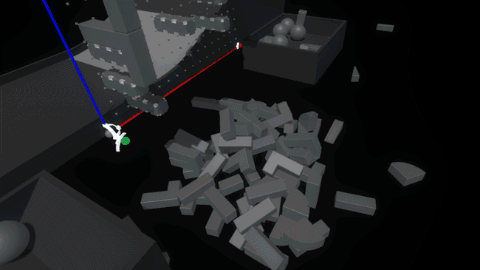
Now we finally get to the fun part – stacking things up and knocking them down! The grid unit size is configurable and was scaled to feel nice and manageable for hands – larger than Lego blocks, smaller than bricks. We modeled some simple shapes and created a little sloped environment to set up and knock down assemblies. Then we worked towards a balance of affordances and visual cues that would help a user quickly and accurately create an assembly without feeling overwhelmed.

When your hand approaches any block, its color lightens slightly, driven by proximity. When you pick one up it will glow brightly with an emissive highlight, making the ‘grabbed’ state very clear:

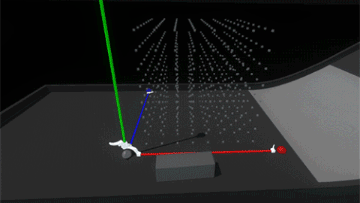
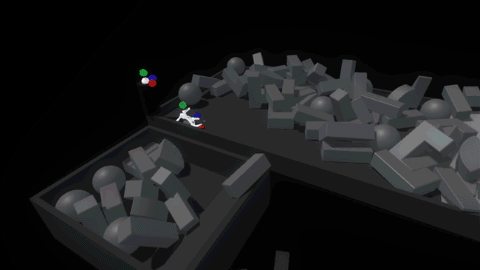
As you bring a held block into the grid, a white ghosted version of it appears, showing the closest viable position and rotation. Releasing the block when the ghost is white will snap it into place. If the ghost intersects with an occupied space, the ghost turns red. Releasing the block when the ghost is red simply won’t snap the block into the grid, letting it drop from your hand.

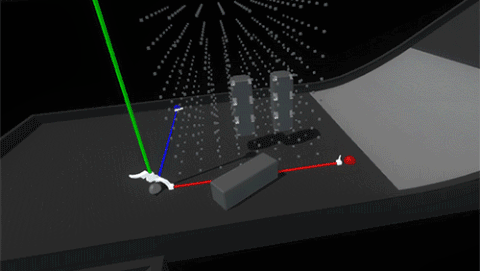
Once a block is snapped into the grid, notches animate in on their corners to emphasize the feeling that they’re being held in place by the scaffold. When the lever to deactivate the grid is flipped and the scaffold axes contract, the block’s notches fill in and the blocks return to their normal resting state.


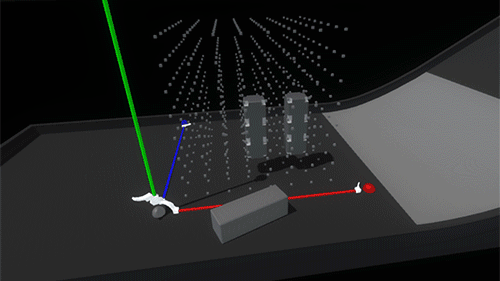
The last piece, and perhaps the most important, was tuning the feeling of physicality throughout the entire interaction. For reference, here’s what it looks like when we disable physics on a block once it’s snapped into the scaffold.

Interaction (or lack thereof) with the block suddenly feels hollow and unsatisfying. Suddenly switching the rules of interactivity from colliding to non-colliding feels inconsistent. Perhaps if blocks became ghosted when placed in the grid, this change wouldn’t be as jarring… but what would happen if we added springs and maintain the block’s collidability?

Much better! Now it feels more like the grid is a structured force field that holds the blocks in position. However, since the blocks also still collide with each other, when the assembly is strongly disturbed the blocks can fight each other as their springs try to push them back into position.

Luckily because we’re in VR we can simply use layers to set blocks in the grid to collide only with hands and not with each other.

This feels like the right balance of maintaining physicality throughout the interaction without sacrificing speed or accuracy due to collision chaos. Now it’s time to play with our blocks!


Photo credits: Leap Motion, CanStock, Medium, Google, Sunghoon Jung, Epic Games

An abridged version of this post was originally published on RoadtoVR. A Chinese version is also available.

The post Scaffolding in VR: Interaction Design for Stacking and Assembly appeared first on Leap Motion Blog.

Leap Motion’s Keiichi Matsuda at GDC: “Defining the Laws for a Parallel Reality”

$
0
0

With virtual and augmented reality on the rise, so is the number of available platforms, input standards, and design paradigms. To harness the force of this horizontal expansion, we have to fundamentally rethink how we interact with VR/AR, in ways that often violate how the physical world works, but align with human expectations on a more fundamental level.

On Monday at GDC’s UX Summit, visionary VR/AR filmmaker and Leap Motion VP Design and Global Creative Director Keiichi Matsuda will take the stage to discuss our explorations in this critical space. As the industry moves toward a unified design paradigm that brings together years of design research, there is a great need to define the laws of a new reality.

Keiichi’s artistic work, including HYPER-REALITY and the upcoming short film Merger, tends to explore the darker side of augmented reality. The future is bright and vibrant, but whether it will be oversaturated and impersonal, or open up new realms of human experience, depends on us. His team’s work at our London design research studio focuses on building a robust, believable and honest vision of a world elevated by technology, with human input at the center.

If you’re in San Francisco at GDC this week and would like to connect with a member of our team, we’d love to explore how we can build the future together. You can reach out via this Typeform.

The post Leap Motion’s Keiichi Matsuda at GDC: “Defining the Laws for a Parallel Reality” appeared first on Leap Motion Blog.

Unveiling Project North Star

$
0
0

Leap Motion is a company that has always been focused on human-computer interfaces.


The fundamental limit in technology is not its size or its cost or its speed, but how we interact with it.
Click To Tweet


We believe that the fundamental limit in technology is not its size or its cost or its speed, but how we interact with it. These interactions define what we create, how we learn, how we communicate with each other. It would be no stretch of the imagination to say that the way we interact with the world around us is perhaps the very fabric of the human experience.

We believe that this human experience is on the precipice of a great change.

The coming of virtual reality has signaled a great moment in the history of our civilization. We have found in ourselves the ability to break down the very substrate of reality and create ones anew, entirely of our own design and of our own imaginations.

As we explore this newfound ability, it becomes increasingly clear that this power will not be limited to some ‘virtual world’ separate from our own. It will spill out like a great flood, uniting what has been held apart for so long: our digital and physical realities.

In preparation for the coming flood, we at Leap Motion have built a ship, and we call it Project North Star.

North Star is a full augmented reality platform that allows us to chart and sail the waters of a new world, where the digital and physical substrates exist as a single fluid experience.

The first step of this endeavor was to create a system with the technical specifications of a pair of augmented glasses from the future. This meant our prototype had to far exceed the state of the art in resolution, field-of-view, and framerate.


North Star is a full augmented reality platform that allows us to chart and sail the waters of a new world, where the digital and physical substrates exist as a single fluid experience.
Click To Tweet


Borrowing components from the next generation of VR systems, we created an AR headset with two low-persistence 1600×1440 displays pushing 120 frames per second with an expansive visual field over 100 degrees. Coupled with our world-class 180° hand tracking sensor, we realized that we had a system unlike anything anyone had seen before.

All of this was possible while keeping the design of the North Star headset fundamentally simple – under one hundred dollars to produce at scale. So although this is an experimental platform right now, we expect that the design itself will spawn further endeavors that will become available to the rest of the world.

To this end, next week we will make the hardware and related software open source. The discoveries from these early endeavors should be available and accessible to everyone.

We’ve got a long way to go still, so let’s go together.

We hope that these designs will inspire a new generation of experimental AR systems that will shift the conversation from what an AR system should look like, to what an AR experience should feel like.

Over the past month we’ve hinted at some of the characteristics of this platform, with videos on Twitter that have hit the front page of Reddit and collected millions of views from people around the world.

Over the next few weeks we will be releasing blog posts and videos charting our discoveries and reflections in the hope that this will create an evolving and escalating conversation around the nature of this new world we’re heading towards.


It's time to shift the conversation from what an AR system should look like, to what an AR experience should feel like.
Click To Tweet


We’re going to take a bit of time to talk about the hardware itself, but it’s important to understand that, at the end of the day, it’s the experience that matters most. This platform lets us forget the limitations of today’s systems; it lets us focus on the experience, the software and the interface, which is the core of what Leap Motion is about.

The journey towards the hardware of a perfect AR headset is not complete and will not be for some time, but Project North Star gives us perhaps the first glimpse that we’ve ever had. It helps us ask the right questions, find the right answers and start to chart the course to a future we all want to live in, where technology empowers humanity to solve the problems of today and those to come.

The post Unveiling Project North Star appeared first on Leap Motion Blog.

Our Journey to the North Star

$
0
0

When we embarked on this journey, there were many things we didn’t know.

What does hand tracking need to be like for an augmented reality headset? How fast does it need to be; do we need a hundred frames per second tracking or a thousand frames per second?

How does the field of view impact the interaction paradigm? How do we interact with things when we only have the central field, or a wider field? At what point does physical interaction become commonplace? How does the comfort of the interactions themselves relate to the headset’s field of view?

What are the artistic aspects that need to be considered in augmented interfaces? Can we simply throw things on as-is and make our hands occlude things and call it a day? Or are there fundamentally different styles of everything that suddenly come out when we have a display that can only ‘add light’ but not subtract it?

These are all huge things to know. They impact the roadmaps for our technology, our interaction design, the kinds of products people make, what consumers want or expect. So it was incredibly important for us to figure out a path that let us address as many of these things as possible.

To this end, we wanted to create something with the highest possible technical specifications, and then work our way down until we had something that struck a balance between performance and form-factor.

All of these systems function using ‘ellipsoidal reflectors’, or sections of curved mirror which are cut from a larger ellipsoid. Due to the unique geometry of ellipses, if a display is put on one side of the curve and the user’s eye on the other, then the resulting image will be big, clear, and in focus.

We started by constructing a computer model of the system to get a sense of the design space. We decided to build it around 5.5-inch smartphone displays with the largest reflector area possible.

Next, we 3D-printed a few prototype reflectors (using the VeroClear resin with a Stratasys Objet 3D printer), which were hazy but let us prove the concept: We knew we were on the right path.

The next step was to carve a pair of prototype reflectors from a solid block of optical-grade acrylic. The reflectors needed to possess a smooth, precise surface (accurate to a fraction of a wavelength of light) in order to reflect a clear image while also being optically transparent. Manufacturing optics with this level of precision requires expensive tooling, so we “turned” to diamond turning (the process of rotating an optic on a vibration-controlled lathe with a diamond-tipped tool-piece).

Soon we had our first reflectors, which we coated with a thin layer of silver (like a mirror) to make them reflect 50% of light and transmit 50% of light. Due to the logarithmic sensitivity of the eye, this feels very clear while still reflecting significant light from the displays.

We mounted these reflectors inside of a mechanical rig that let us experiment with different angles. Behind each reflector is a 5.5″ LCD panel, with ribbon cables connecting to display drivers on the top.

While it might seem a bit funny, it was perhaps the widest field of view, and the highest-resolution AR system ever made. Each eye saw digital content approximately 105° high by 75° wide with a 60% stereo overlap, for a combined field of view of 105° by 105° with 1440×2560 resolution per eye.

The vertical field of view struck us most of all; we could now look down with our eyes, put our hands at our chests and still see augmented information overlaid on top of our hands. This was not the minimal functionality required for a compelling experience, this was luxury.

This system allowed us to experiment with a variety of different fields of view, where we could artificially crop things down until we found a reasonable tradeoff between form factor and experience.

We found this sweet spot around 95° x 70° with a 20 degree vertical (downwards) tilt and a 65% stereo overlap. Once we had this selected, we could cut the reflectors to a smaller size. We found the optimal minimization amount empirically by wearing the headset and marking the reflected displays’ edges on the reflectors with tape. From here, it was a simple matter of grinding them down to their optimal size.

The second thing that struck us during this testing process was just how important the framerate of the system is. The original headset boasted an unfortunate 50 fps, creating a constant and impossible to ignore slosh in the experience. With the smaller reflectors, we could move to smaller display panels with higher refresh rates.

At this point, we needed to make our own LCD display system (nothing off the shelf goes fast enough). We settled on a system architecture that combines an Analogix display driver with two fast-switching 3.5″ LCDs from BOE Displays.

Put together, we now had a system that felt remarkably smaller:

The reduced weight and size feel exponential. Every time we cut away one centimeter, it felt like we cut off three.

We ended up with something roughly the size of a virtual reality headset. In whole it has fewer parts and preserves most of our natural field of view. The combination of the open air design and the transparency generally made it feel immediately more comfortable than virtual reality systems (which was actually a bit surprising to everyone who used it).

We mounted everything on the bottom of a pivoting ‘halo’ that let you flip it up like a visor and move it in and out from your face (depending on whether you had glasses).

Sliding the reflectors slightly out from your face gave room for a wearable camera, which we threw together created from a disassembled Logitech (wide FoV) webcam.

All of the videos you’ve seen were recorded with a combination of these glasses and the headset above.

Last we want to do one more revision on the design to have room for enclosed sensors and electronics, better cable management, cleaner ergonomics and better curves (why not?) and support for off the shelf head-gear mounting systems. This is the design we are planning to open source next week.

There remain many details we feel that would be important to further progressions of this headset. Some of which are:

  1. Inward-facing embedded cameras for automatic and precise alignment of the augmented image with the user’s eyes as well as eye and face tracking.
  2. Head mounted ambient light sensors for 360 degree lighting estimation.
  3. Directional speakers near the ears for discrete, localized audio feedback
  4. Electrochromatic coatings on the reflectors for electrically controllable variable transparency
  5. Micro-actuators that move the displays by fractions of a millimeter to allow for variable and dynamic depth of field based on eye convergence

The field of view could be even further increased by moving to slightly non-ellipsoidal ‘freeform’ shapes for the reflector, or by slightly curving the displays themselves (like on many modern smartphones).

Mechanical tolerance is of the utmost importance, and without precise calibration, it’s hard to get everything to align. Expect a post about our efforts here as well as the optical specifications themselves next week.

However, on the whole, what you see here is an augmented reality system with two 120 fps, 1600×1440 displays with a field of view covering over a hundred degrees combined, coupled with hand tracking running at 150 fps over a 180°x 180° field of view. Putting this headset on, the resolution, latency, and field of view limitations of today’s systems melt away and you’re suddenly confronted with the question that lies at the heart of this endeavor:

What shall we build?

The post Our Journey to the North Star appeared first on Leap Motion Blog.

Project North Star is Now Open Source

$
0
0

At Leap Motion, we envision a future where the physical and virtual worlds blend together into a single magical experience. At the heart of this experience is hand tracking, which unlocks interactions uniquely suited to virtual and augmented reality. To explore the boundaries of interactive design in AR, we created Project North Star, which drove us to push beyond the limitations of existing systems.

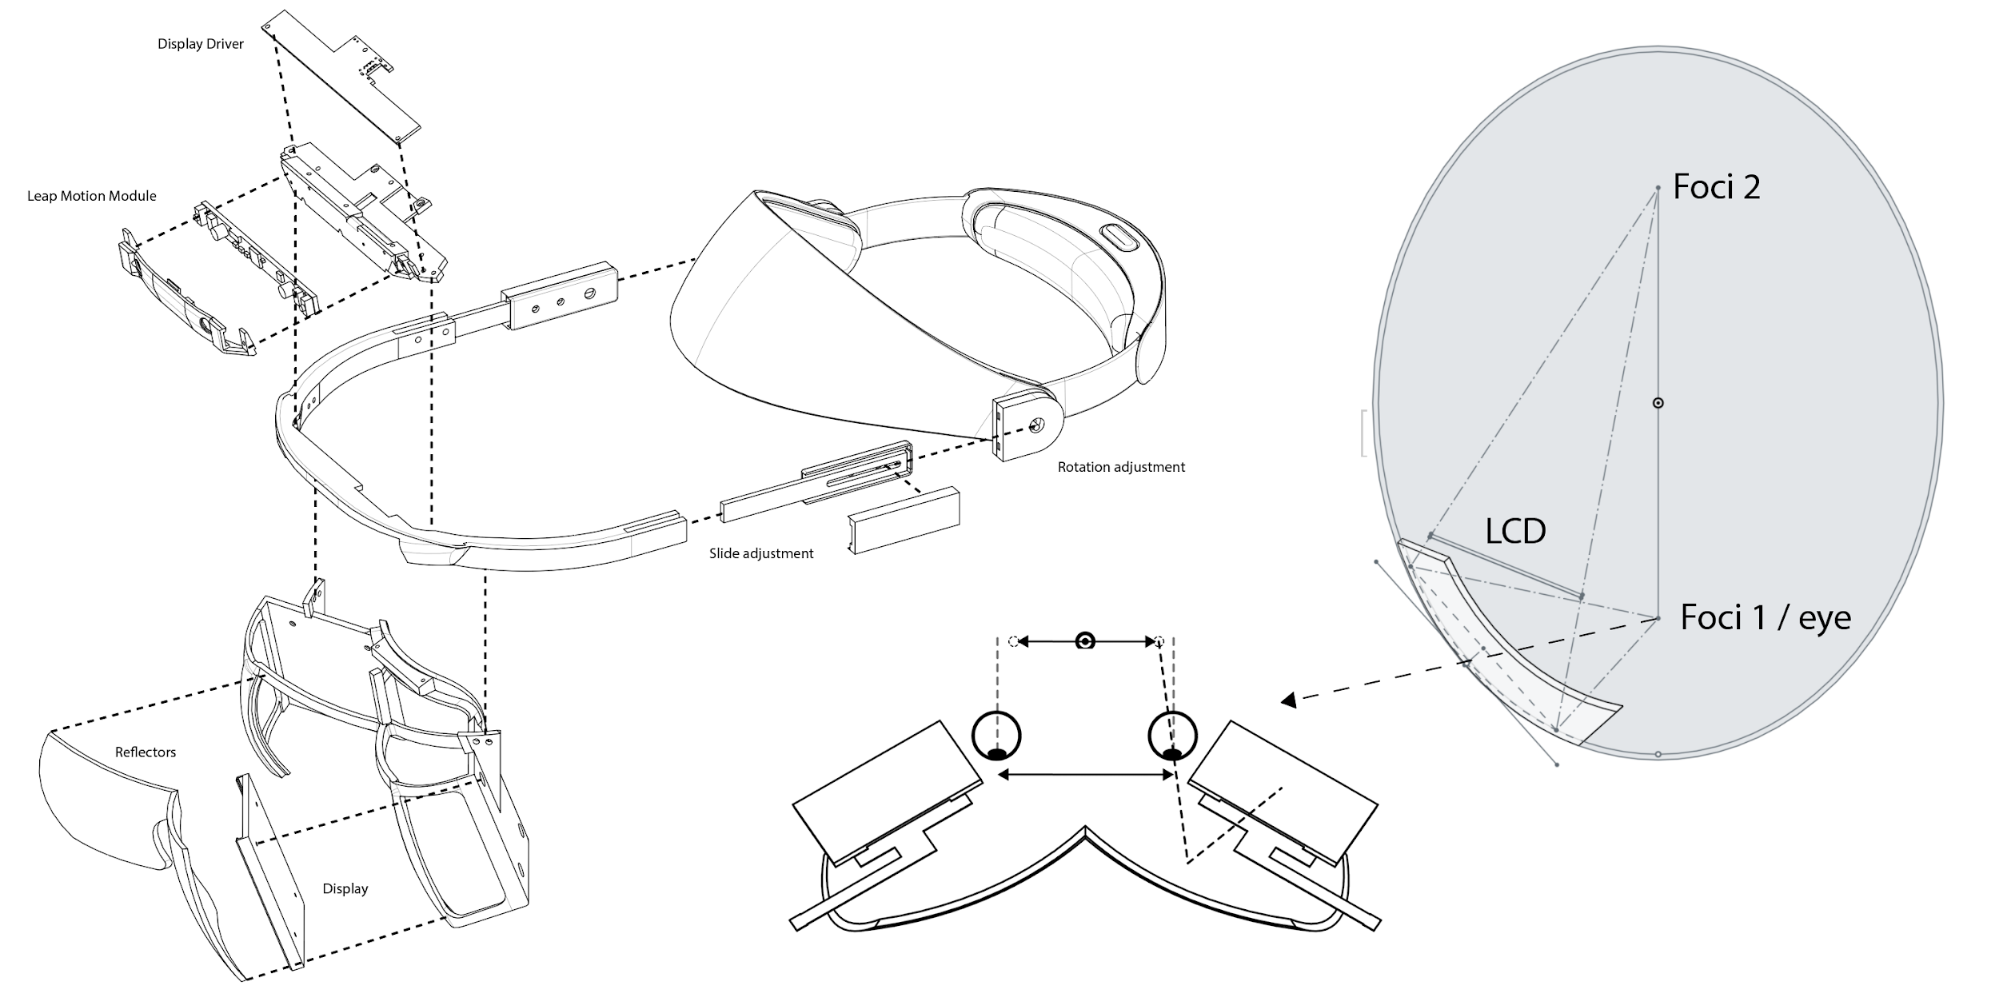
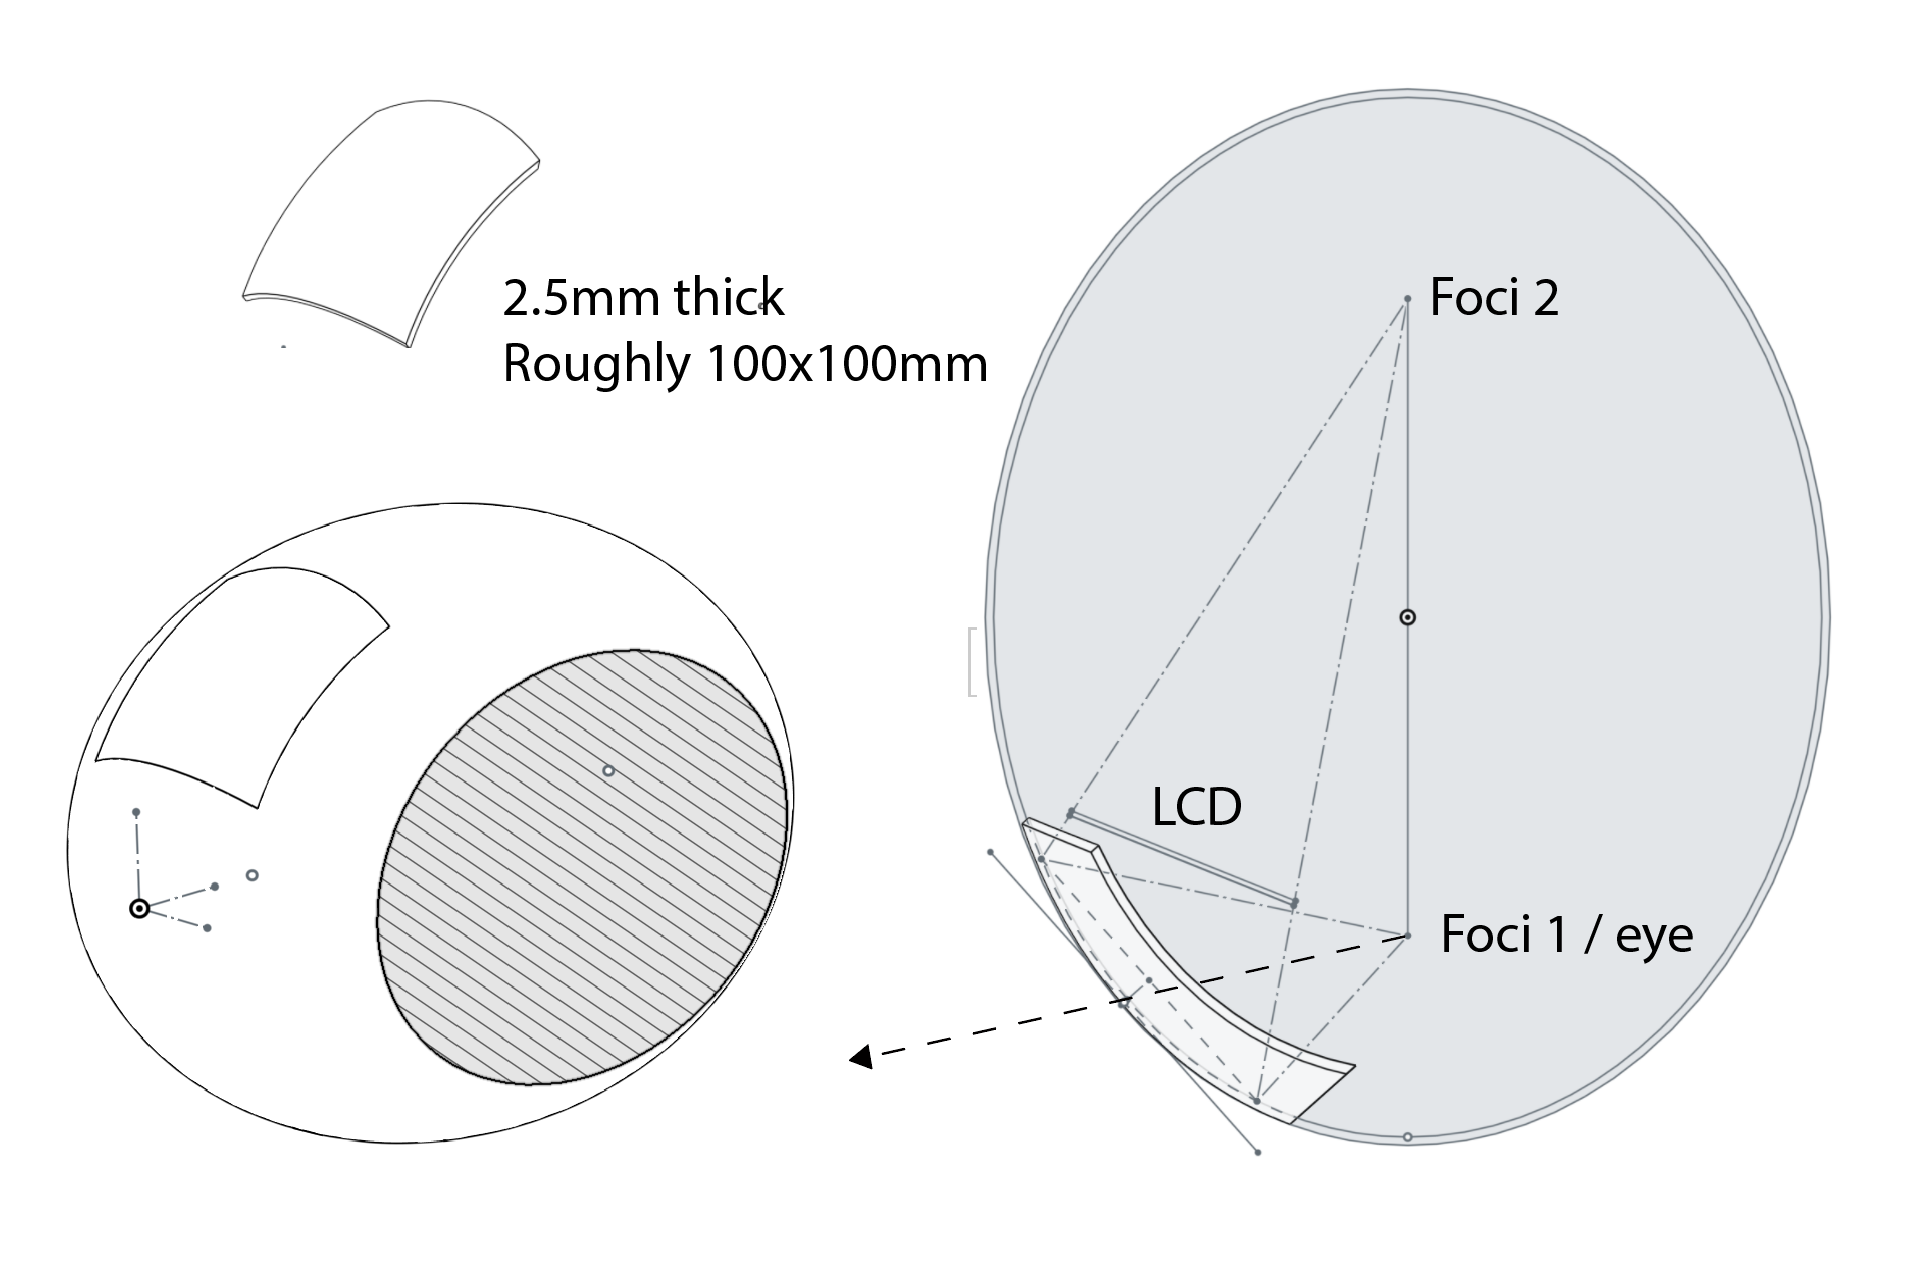
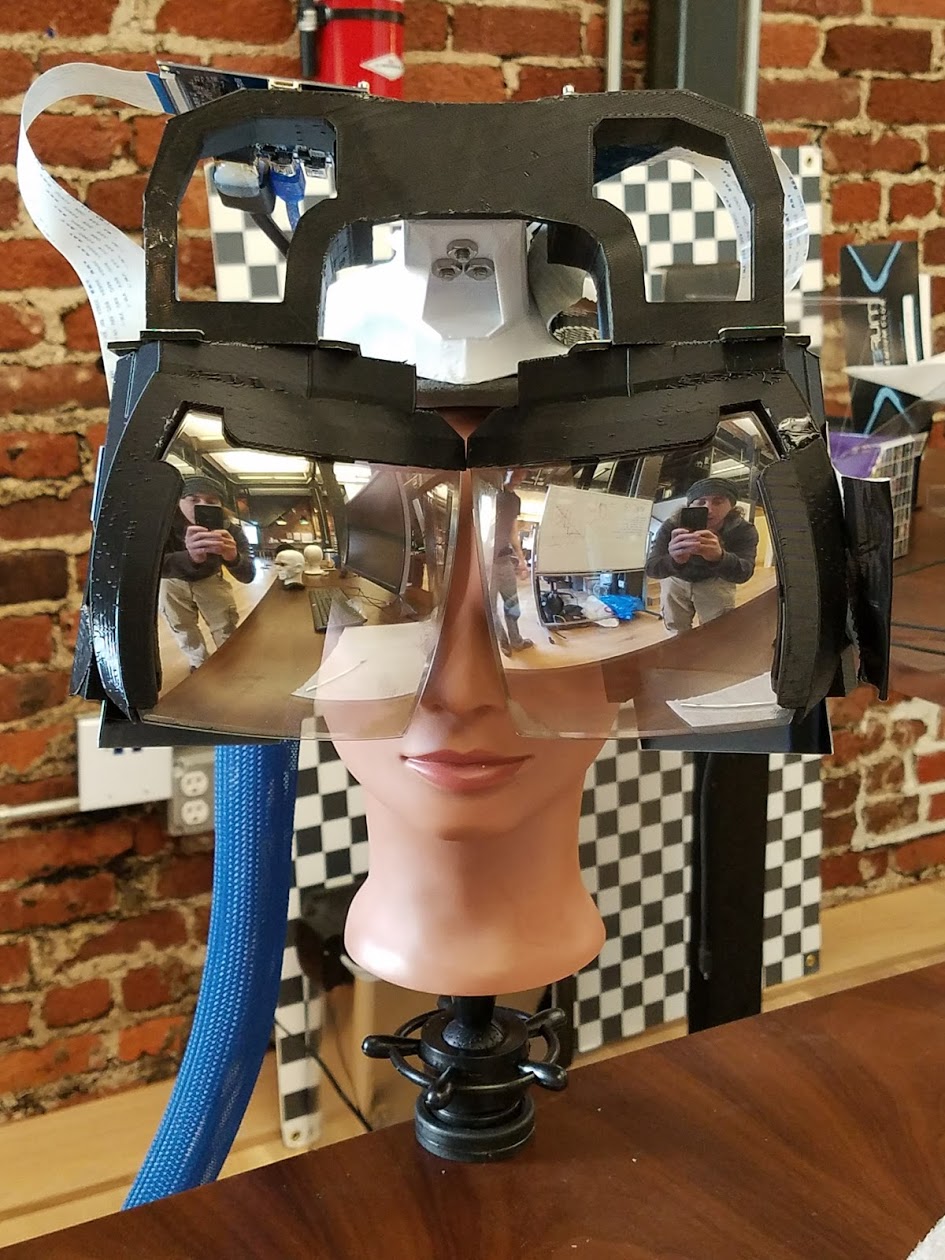
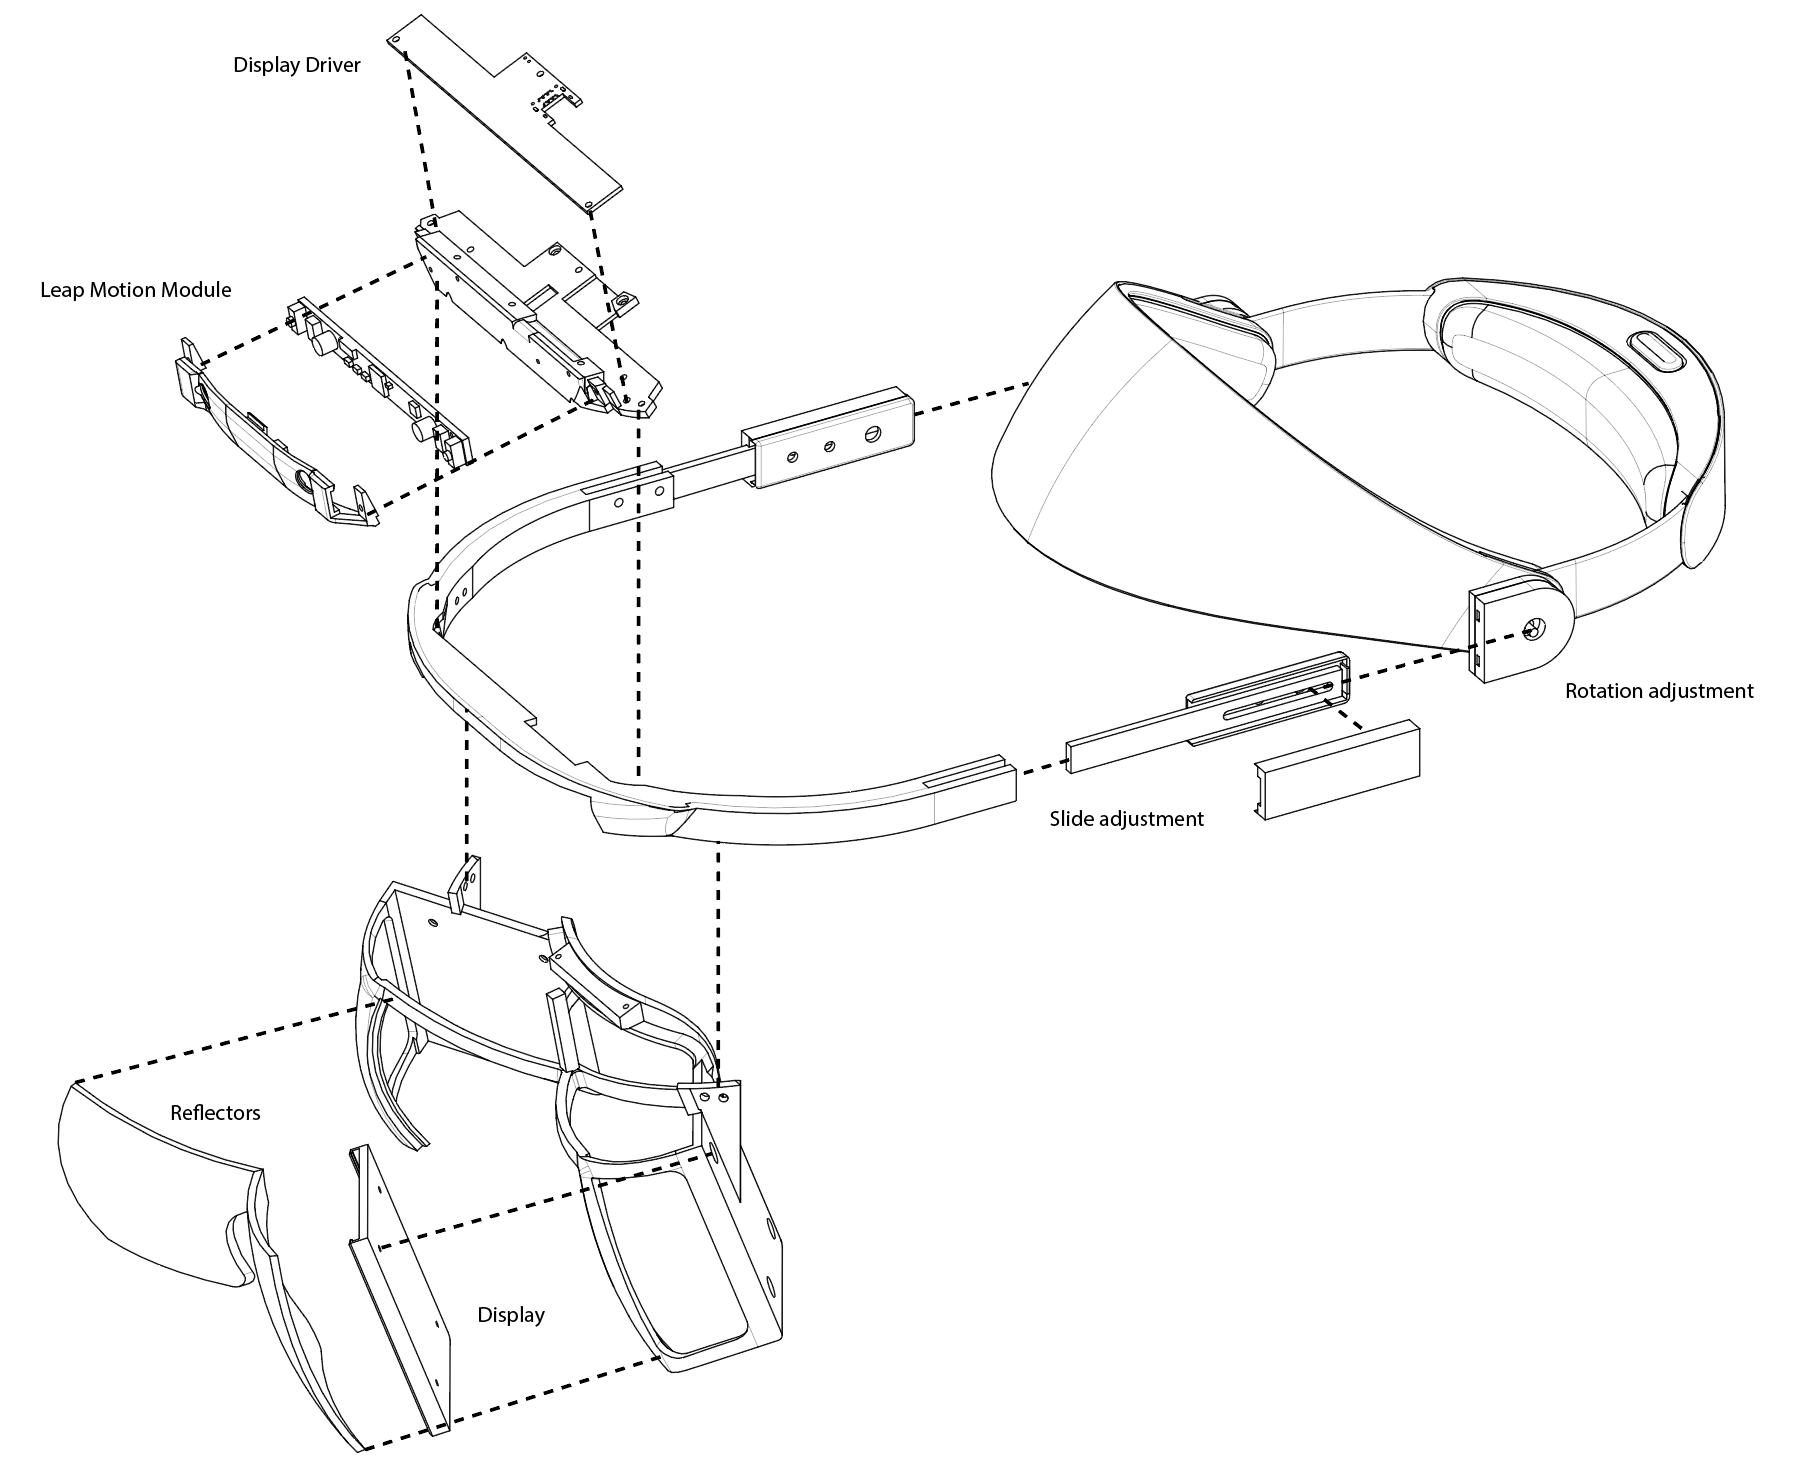
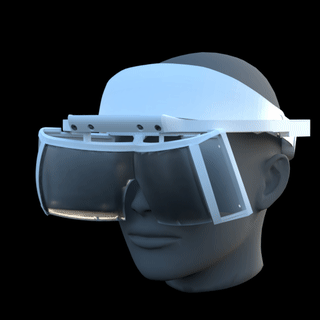
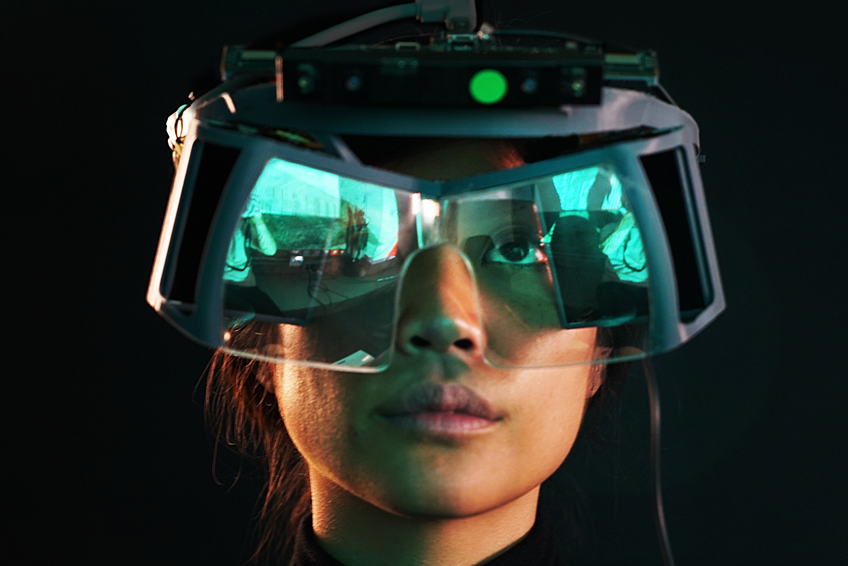
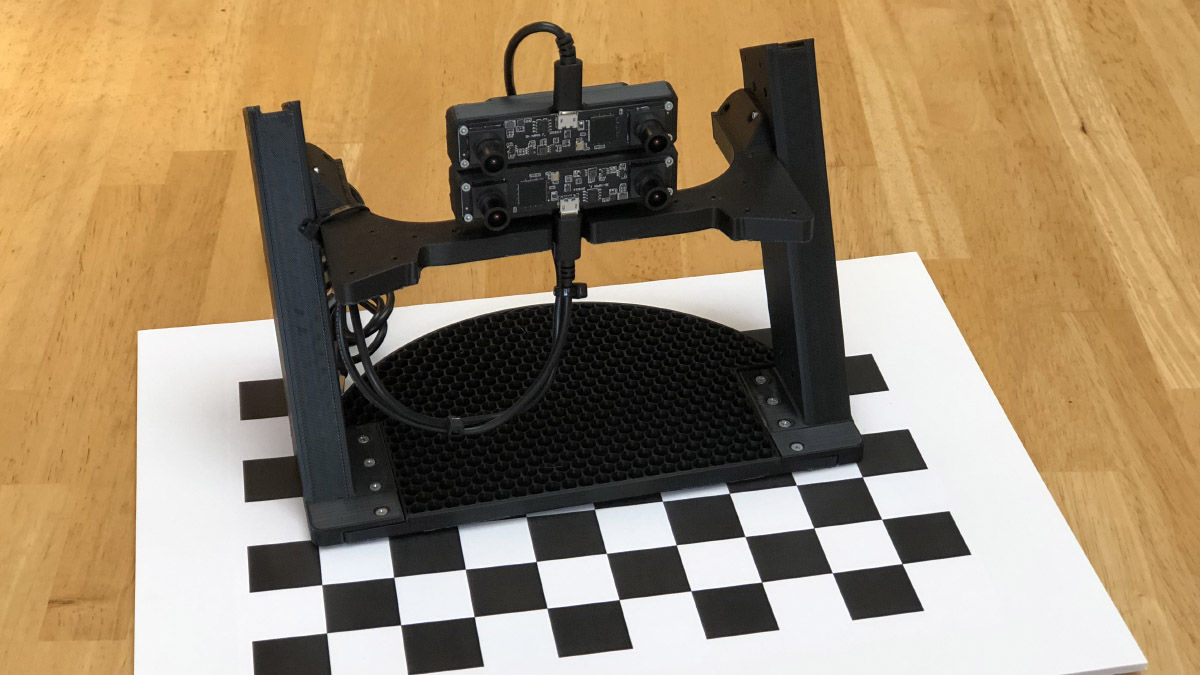
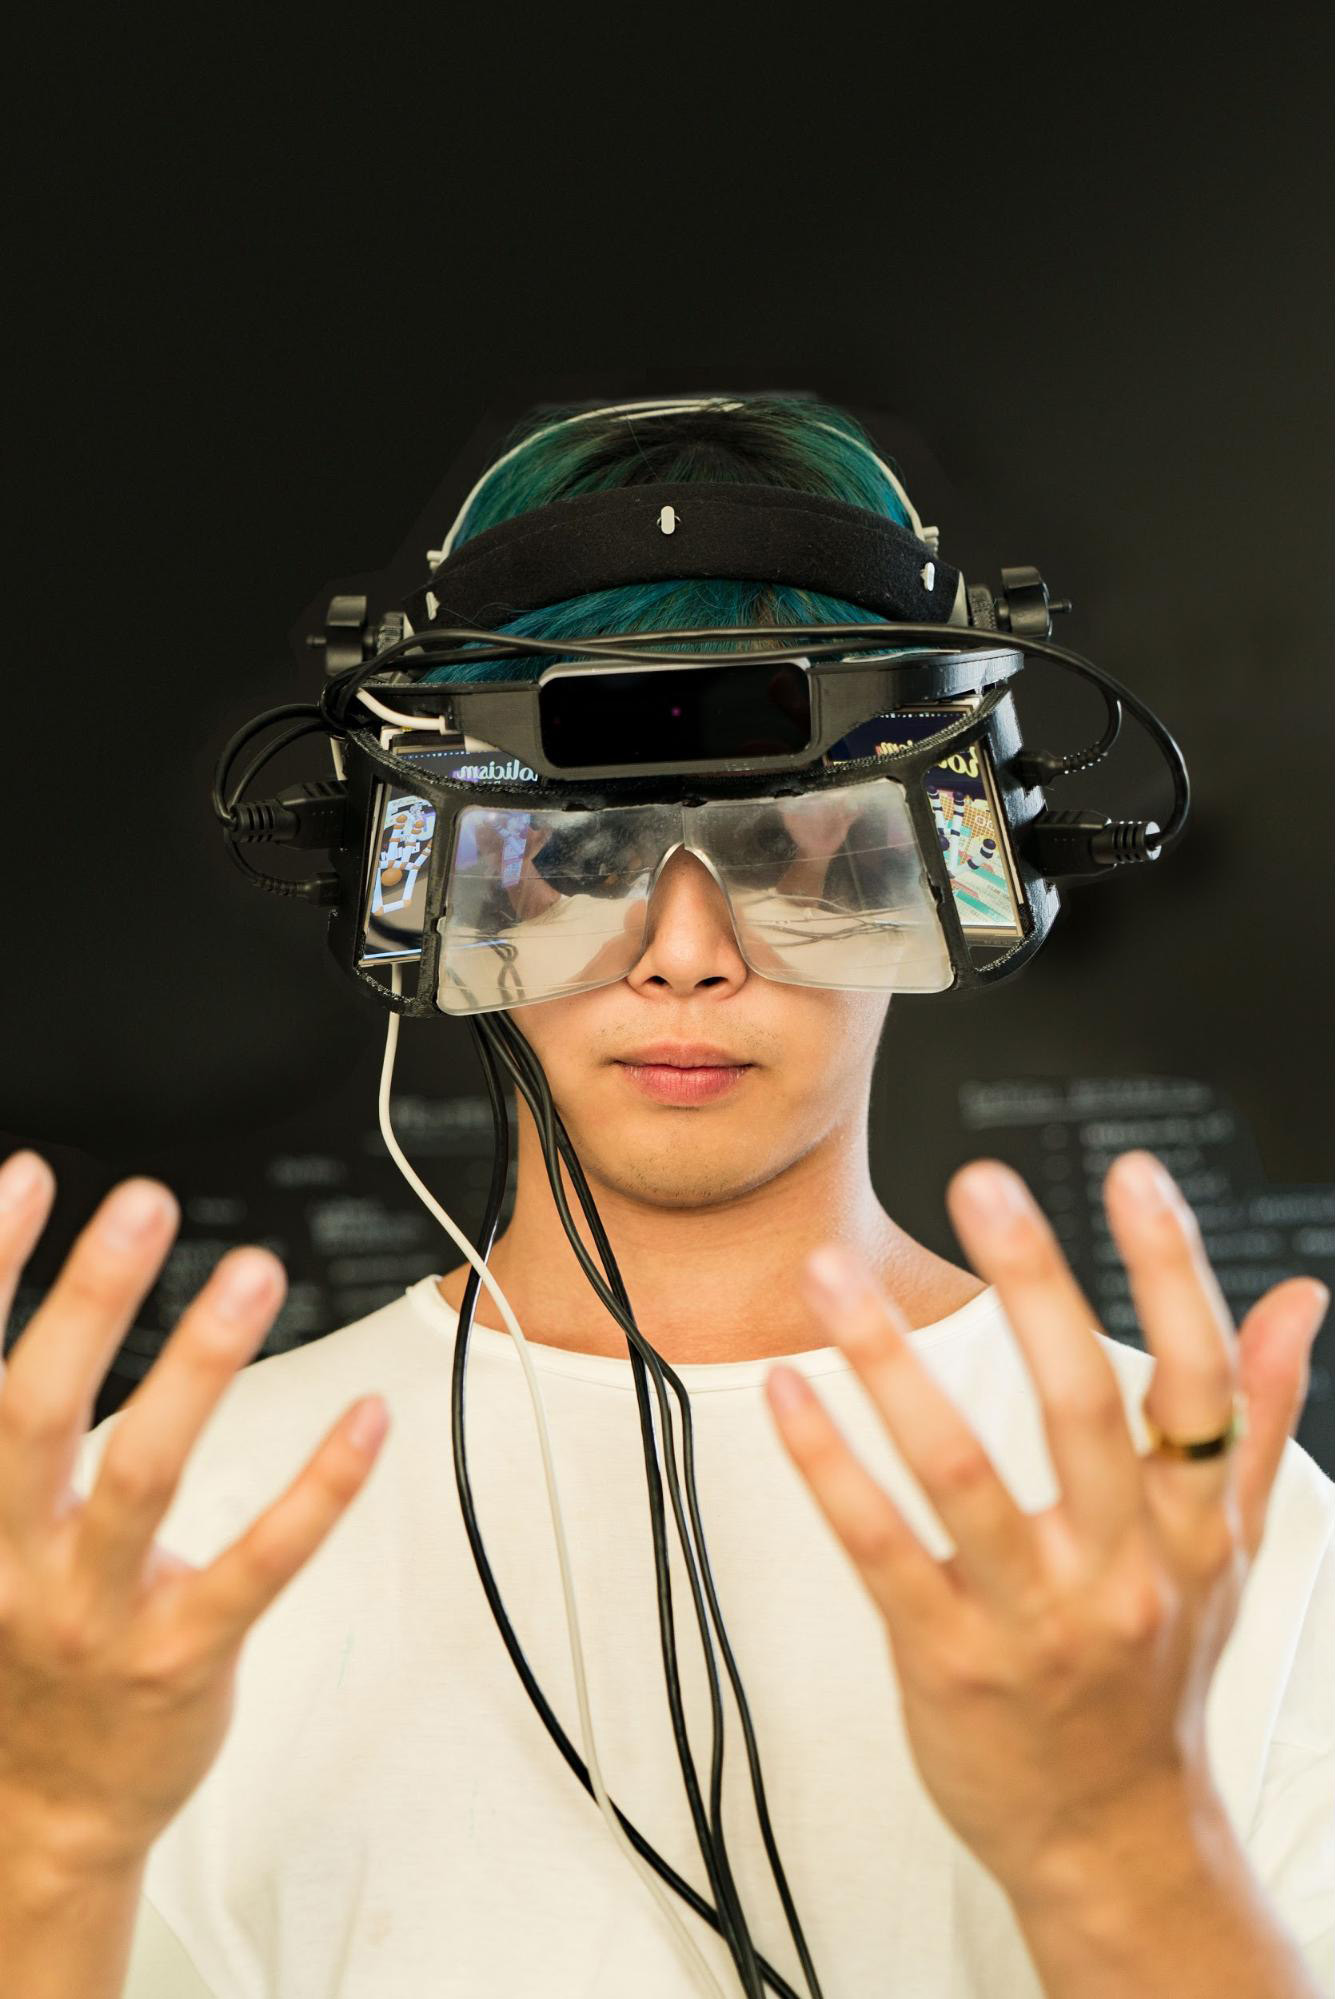
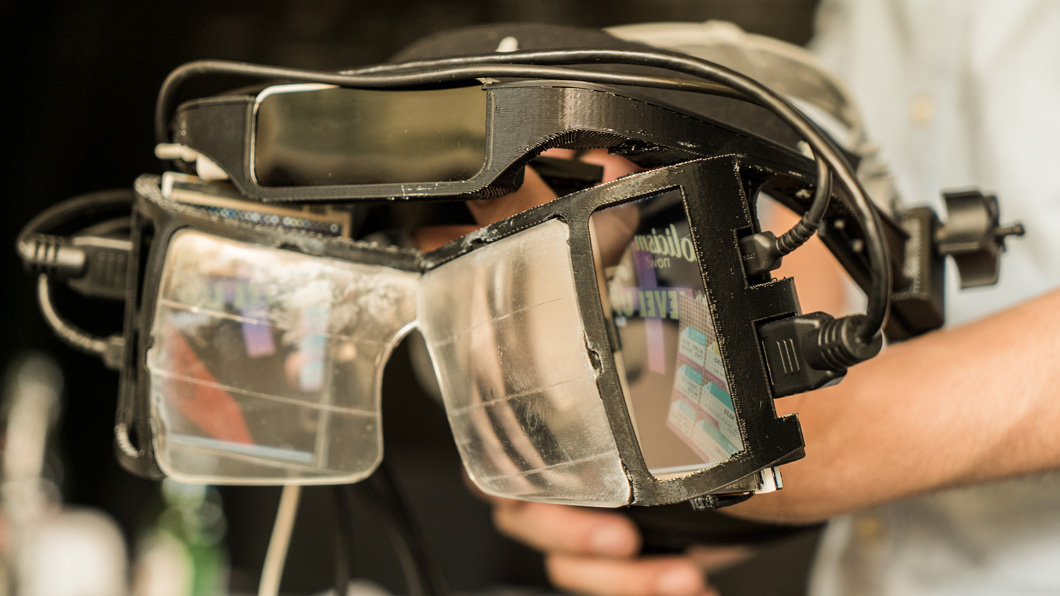
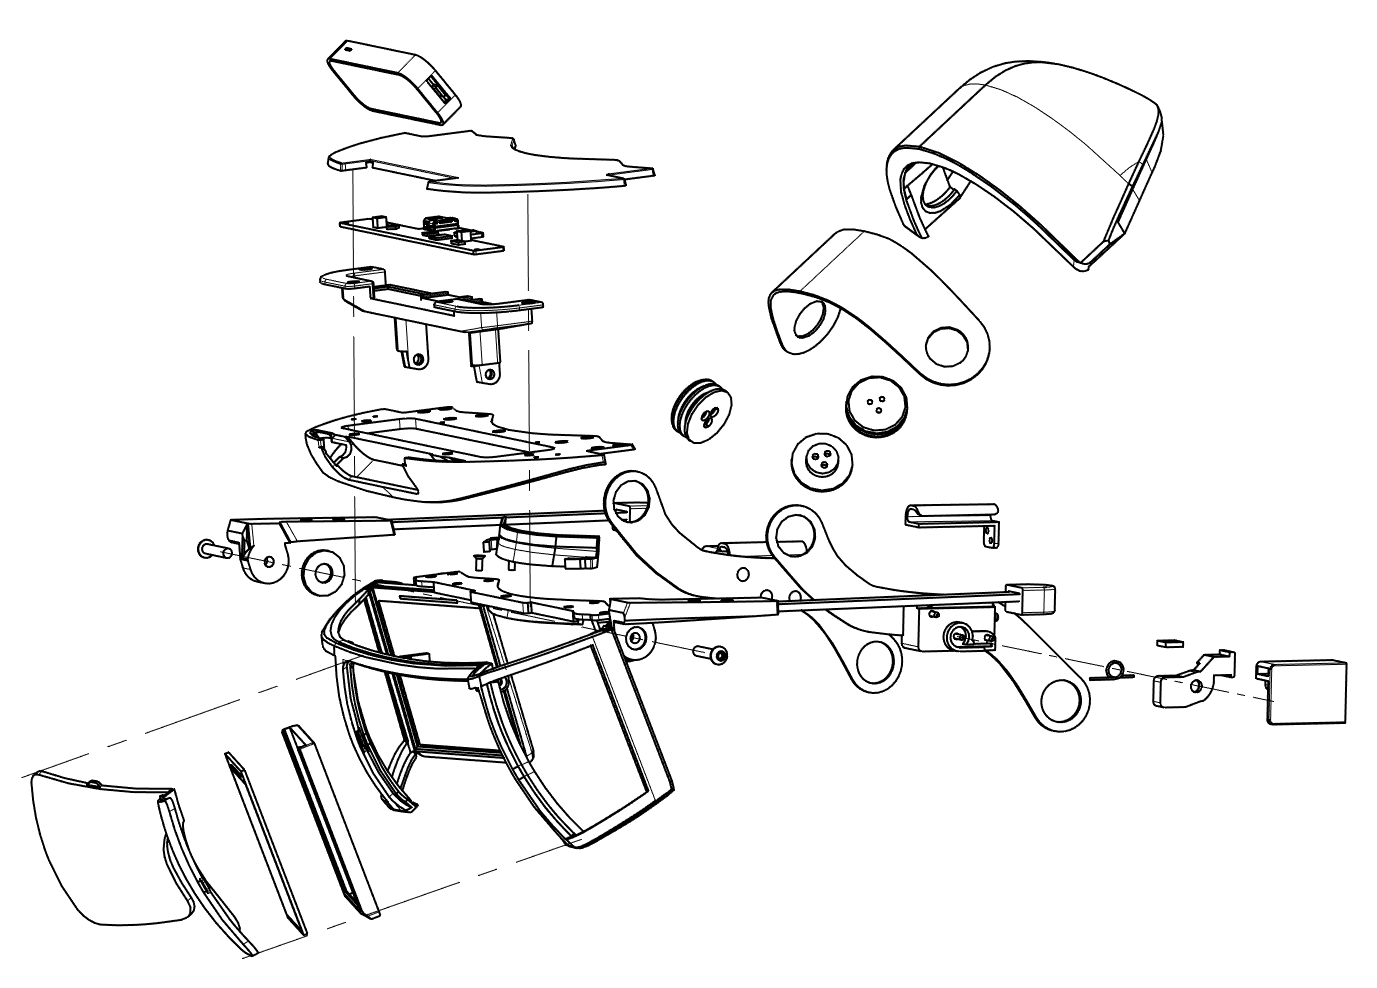
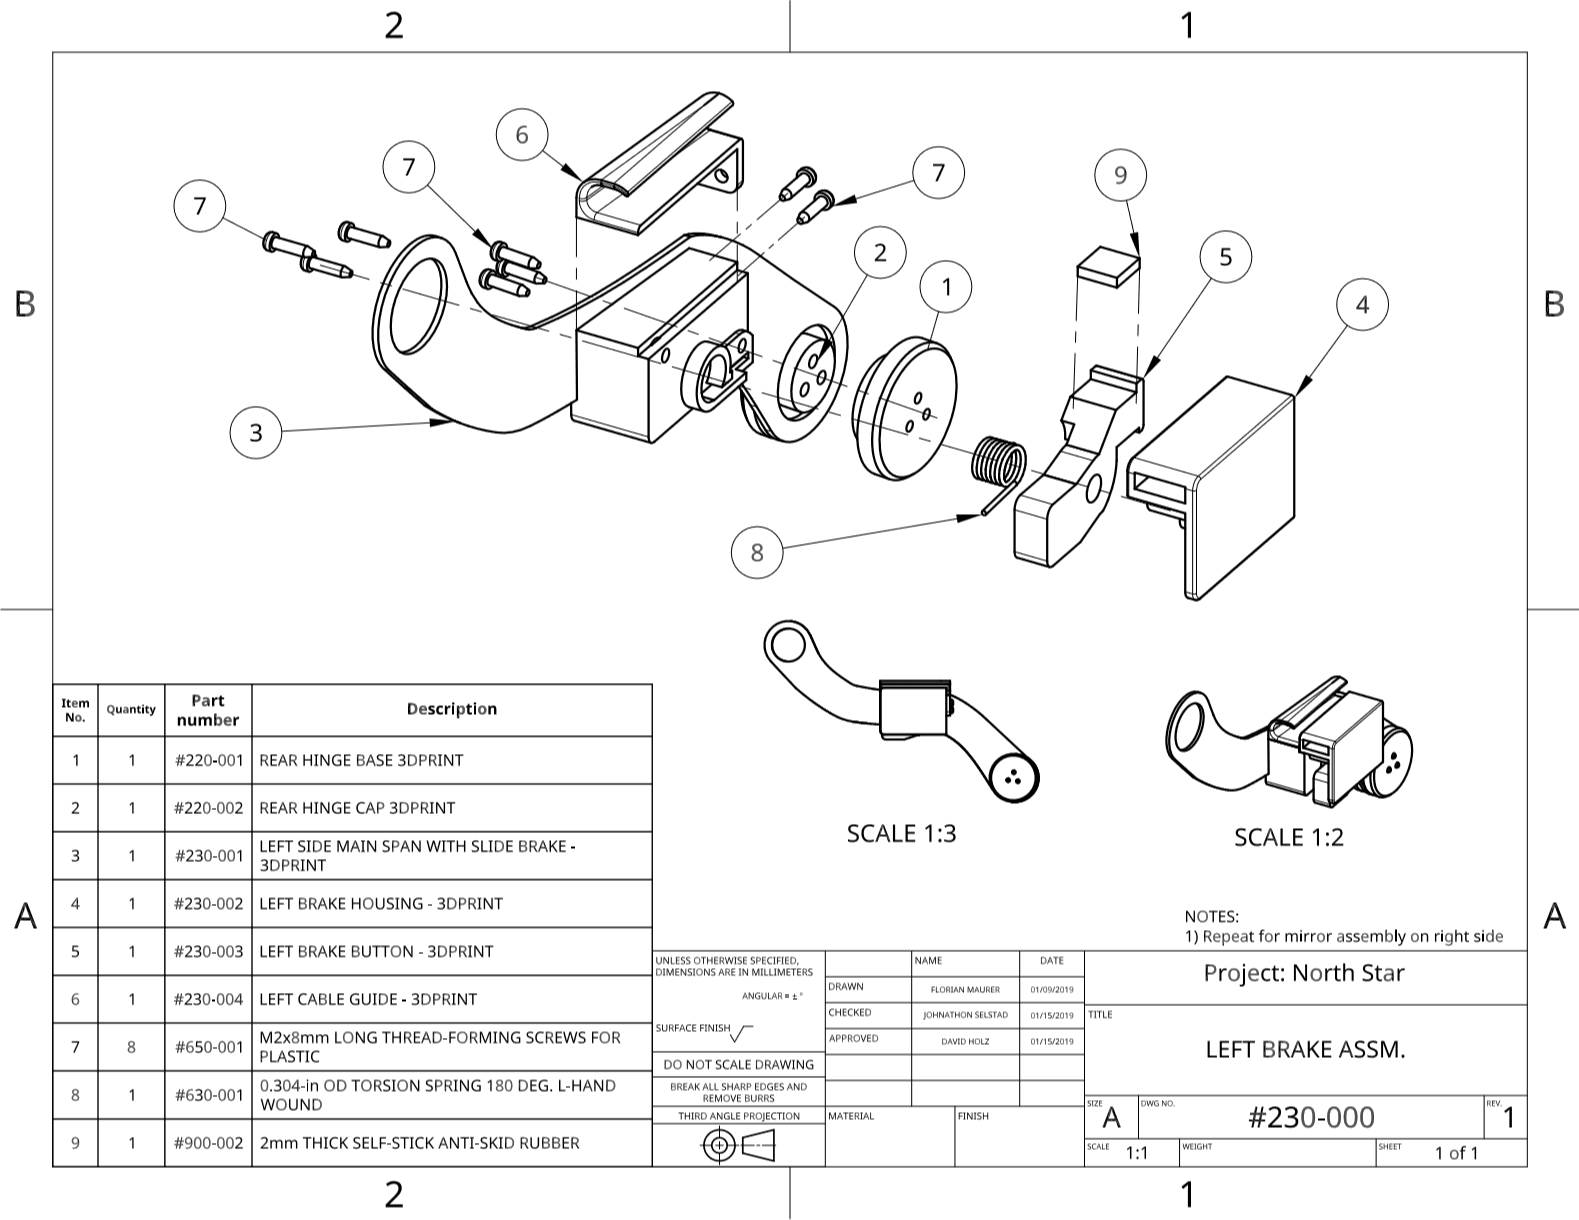
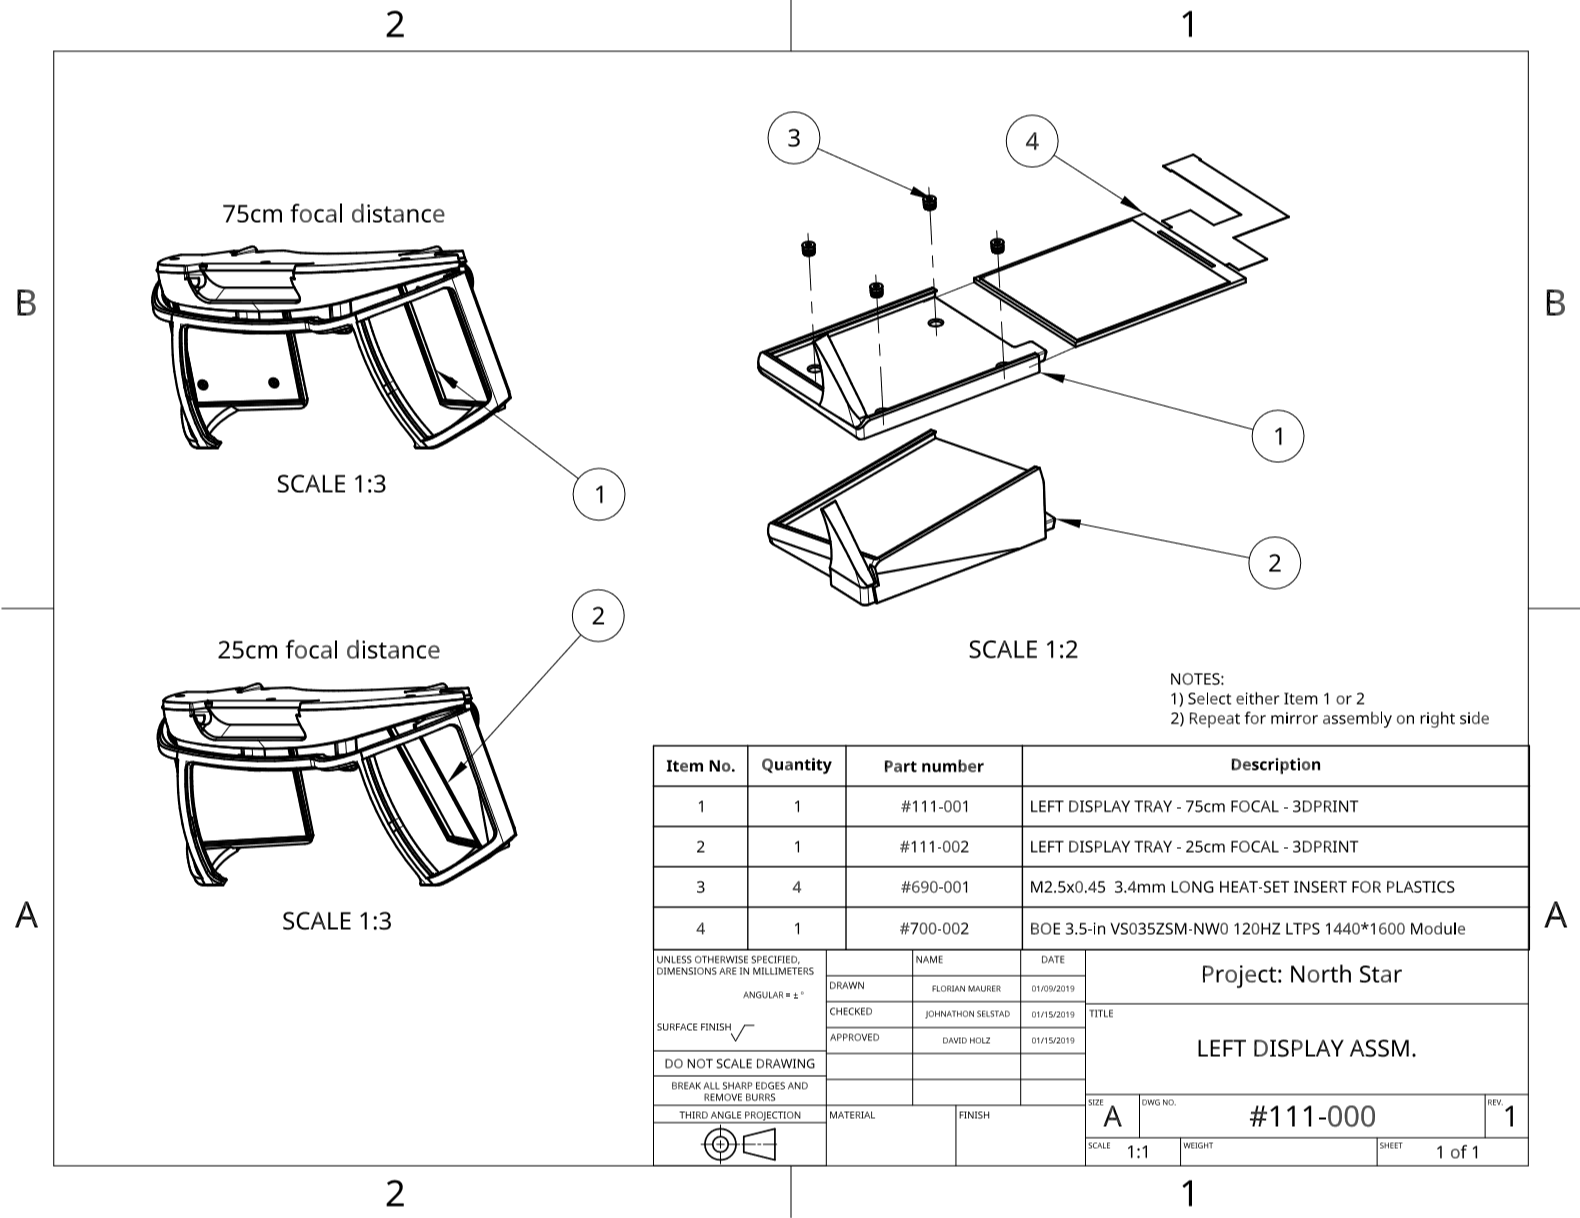
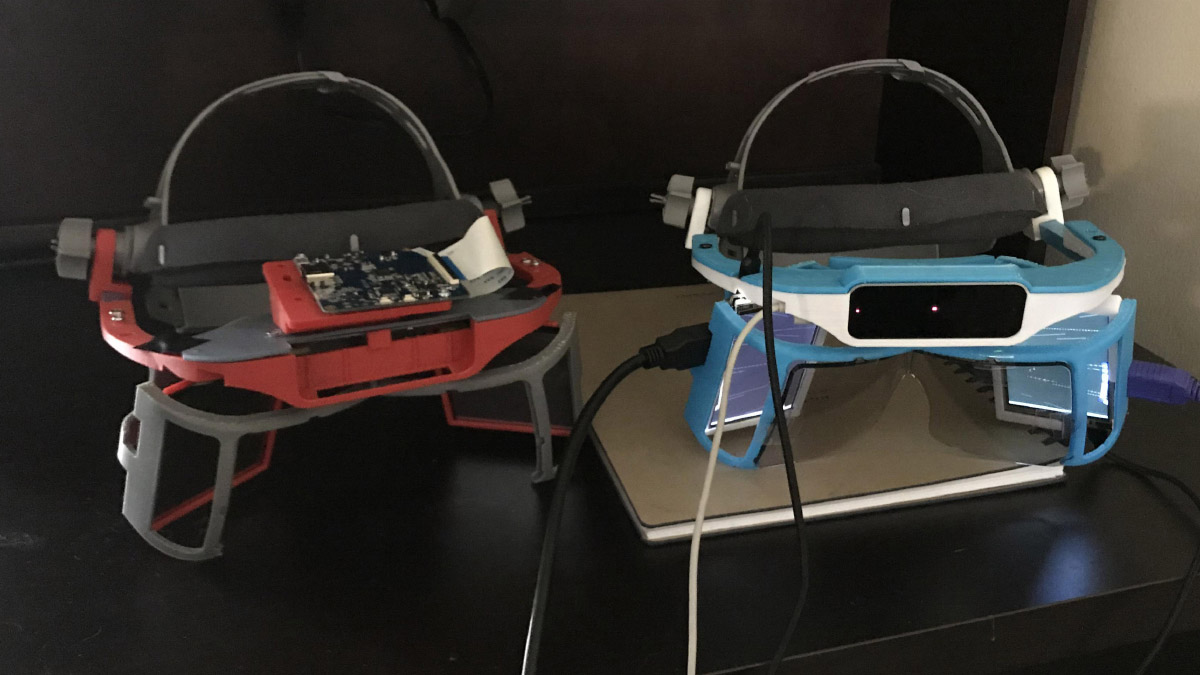
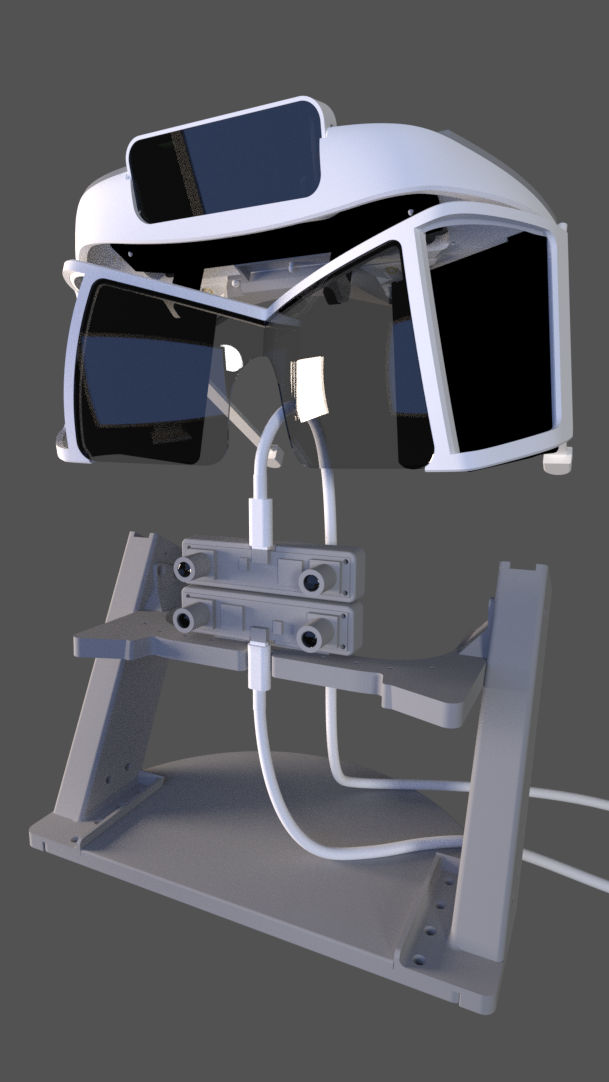
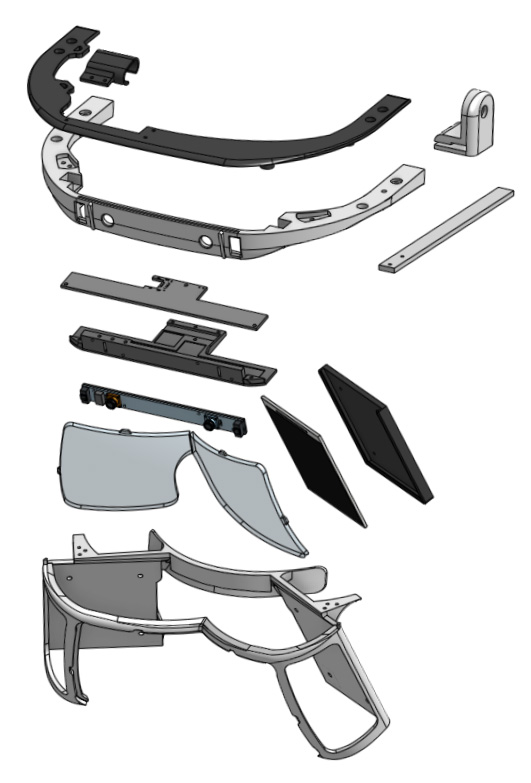
Today, we’re excited to share the open source schematics of the North Star headset, along with a short guide on how to build one. By open sourcing the design and putting it into the hands of the hacker community, we hope to accelerate experimentation and discussion around what augmented reality can be. You can download the package from our website or dig into the project on GitHub, where it’s been published under an Apache license.

Our goal is for the reference design to be accessible and inexpensive to build, using off-the-shelf components and 3D-printed parts. At the same time, these are still early days and we’re looking forward to your feedback on this initial release. The mechanical parts and most of the software are ready for primetime, while other areas are less developed. The reflectors and display driver board are custom-made and expensive to produce in single units, but become cost-effective at scale. We’re also exploring how the custom components might be made more accessible to everyone.


Project North Star points a future where the physical and virtual worlds blend together into a single magical experience.
Click To Tweet


The headset features two 120 fps, 1600×1440 displays with a field of view covering over a hundred degrees combined. While the classic Leap Motion Controller’s FOV is significantly beyond existing AR headsets such as Microsoft Hololens and Magic Leap One, it felt limiting on the North Star headset. As a result, we used our next-generation ultra-wide tracking module. These new modules are already being embedded directly into upcoming VR headsets, with AR on the horizon.

Project North Star is very much a work in progress. Over the coming weeks, we’ll continue to post updates to the core release package. Let us know what you think in the comments and forum thread. If your company is interested in bringing North Star to the world, email us at partnerships@leapmotion.com.

It’s time to look beyond platforms and form factors, to the core user experience that makes augmented reality the next great computing medium. Let’s build it together.

The post Project North Star is Now Open Source appeared first on Leap Motion Blog.

Introducing the Latest Generation of Orion Tracking

$
0
0

Today we’re excited to announce the latest milestone of our journey with a major release of our Orion VR tracking software, now available for public beta on Windows. This is the fourth generation of our core software overall, featuring a range of feature improvements across the board:

  • Better finger dexterity and fidelity
  • Significantly smoother hand and finger tracking, with motions that look and feel more natural
  • Faster and more consistent hand initialization
  • Better hand pose stability and reliability
  • Improved tracking fidelity against complex backgrounds and extreme lighting
  • More accurate shape and scale for hands

With this release we’ve also developed an ensemble of demos that showcase hand-centric design principles across a range of interactions.

Cat Explorer

VR interactions have the potential to be easier and more intuitive than with any other technology. Cat Explorer is a fun demo that points to the transformative potential of VR and natural interaction in fields as diverse as education, training, healthcare, and entertainment. Instead of learning how to use a controller, Cat Explorer encourages you to learn through play and experimentation. Get exploring!

Particles

How can combinations of four simple rules result in complex and lifelike behavior at scale? Particles is an interactive 3D simulation of this question – letting you interactively explore the emergent behaviors of that stem from basic mechanics. It’s fun, experimental, and may give a new perspective on the the rigid underpinnings of everything from atoms to cell life and celestial movements.

Paint

Paint is an application developed to remove as many barriers between ideas and creation as possible. Simply reach out your hand and pinch your fingers together to create a ribbon in mid-air. Switching colors, undoing a stroke, or changing the brush thickness is equally accessible with just a tap of a wearable interface.

This release also includes several changes to our SDK, including newly updated Unity and Unreal engine integrations, and the deprecation of older APIs. Learn more about it in our second blog post.

The post Introducing the Latest Generation of Orion Tracking appeared first on Leap Motion Blog.

Orion SDK Updates: Unity, Unreal, and APIs

$
0
0

This morning, we released the latest generation of Orion tracking alongside major updates to our Unity and Unreal integrations. We’ve also taken several steps to streamline the developer experience, reflecting deeper changes in our SDK over time. Beyond the tracking updates, here’s a quick overview of the latest changes in our SDK.

Unity

Unity Core Assets 4.4.0 features a wide range of optimizations and improvements. Major changes include:

  • VR rig simplification. The number of scripts required to construct a Leap Motion-enabled VR rig has been greatly reduced, and the required rig hierarchy has been heavily simplified. Hand data that is adjusted correctly for an XR headset and device latency can now be obtained by adding a single component to the Main Camera.
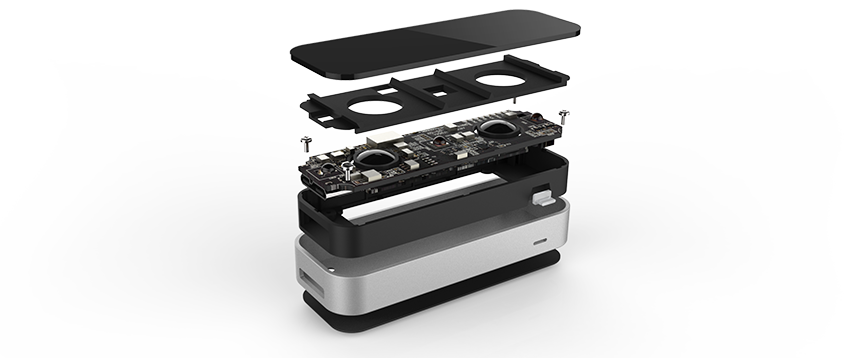
  • SDK window. We’ve added a new window that lets you scan and upgrade old Leap Motion rigs, check settings for the Interaction Engine, and adjust module preferences for the Graphic Renderer.
  • VectorHand. One of many potential lightweight encodings of a Leap Hand, this lossy yet expressive encoding is suitable for lightweight recording and playback or network transmission.
  • Auto-upgrade. If you’re upgrading from an older project that incorporated Leap rigs from Core 4.3.4 or earlier, the SDK Window includes a utility to auto-upgrade these rigs.

We’ve also made significant changes to the Interaction Engine, including:

  • a new component that lets Colliders be ignored by the Interaction Engine
  • improved small-object grasping
  • more consistent grasping of an object that was held by the other hand.
  • new grasp callbacks in the InteractionController
  • modified Basic UI example scene demonstrating how a InteractionButton UI panel can be moved without causing the attached physical buttons to wobble

You can see the full list of changes, including minor changes and fixes to the Graphic Renderer and Hands Modules, on our releases page.

Unreal

We’ve massively updated the Leap Motion Unreal Engine integration with the plugin version 3.0 release. The new plugin features:

  • Major performance optimization. A fully optimized LeapC integration, timewarp support for lowest possible latency, and a fully multi-threaded backend with no-copy data handling that allows many hands driven by the same data with no penalty.
  • Simplified rigging support. New deformable rigged hands that match the proportions of user hands are now standard. For custom rigs, a custom anim instance enables bone auto-mapping from Leap data to your rig – vastly reducing the complexity and time required to get a custom rig up and running.
  • Modules and examples. If you need examples to support a specific feature, these are available outside the plugin as optional modules. Here you’ll find examples for:
    • Touching UMG UI
    • Physics interaction with boxes and buttons
    • Rigging examples for custom rigs
    • And more! Check out the examples at the LeapUnrealModules repo
  • Interaction Engine. An early release of the Leap Motion Interaction Engine for Unreal Engine with hover and grasp support.

Download the new plugin now for Unreal Engine 4.19.

LeapC and Legacy APIs

With this latest release, we are also officially moving away from older intermediate-level APIs and towards robust engine integrations built on our LeapC API.

Released in 2016, LeapC is a highly optimized C-style API designed to meet the performance demands of virtual reality. You can use LeapC directly in a C program, but the library is primarily intended for creating bindings to higher-level languages. Our integrations for Unity (and now Unreal Engine!) are built on this API.

With the V4 beta, we have formally deprecated support for Motions, Gestures, interactionBox, and tipVelocity, as these features are better handled through specific engine and IDE plugins. We are also deprecating our older bindings for C++, C#, Java, JavaScript, Python, and Objective-C. These language bindings remain available, but are no longer actively supported. Developers can access the older APIs through our version 3 releases and documentation, or build their own wrappers on top of LeapC.

These releases have been in the works for some time, and we’re excited to finally share them with you. Let us know what you think on our community forums and make your pull requests on the Unreal and Unity repos.

The post Orion SDK Updates: Unity, Unreal, and APIs appeared first on Leap Motion Blog.


Designing Cat Explorer

$
0
0

VR, AR and hand tracking are often considered to be futuristic technologies, but they also have the potential to be the easiest to use. For the launch of our V4 software, we set ourselves the challenge of designing an application where someone who has never even touched a VR headset could figure out what to do with no instructions whatsoever. That application became Cat Explorer, which you can download now for Oculus Rift and HTC Vive.

On the surface it’s a fun, slightly twisted tech demo. But it also serves as a proof of concept for intuitive interaction in training, education, visualisation and entertainment. Designer Eugene Krivoruchko digs into some of the decisions that went into its creation:

Cat Explorer is an experiment in spatial interaction design that focuses on using hands to explore the structural layout of a relatively complex object – in this case a loose anatomical model of a cat named Whiskey.

Modeling of cat and internal organs by Pablo Lopéz, based on Keiichi’s cat Donna.

Design Principles


Fun and slightly twisted, Cat Explorer is also a proof of concept for intuitive interaction in training, education, visualization and entertainment.
Click To Tweet


Perhaps the most important issue to consider when designing hand interactions with virtual objects is the lack of tactile perception and material support. In the physical world, we rely on tangible things to dissipate tremors and inaccuracies, offer mechanical constraints that restrict erratic motion, provide high fidelity feedback at the points of contact, and serve as a rest, allowing some of the arm muscles to relax while staying productive over longer periods of time.

The medium of intangible digital things doesn’t offer these luxuries from the material world. Instead it has different inherent properties that need to be recognized in order for the interaction to feel rich and complete. Unlike the physical world, the digital environment is dynamic and can effortlessly display any behavior we want. Every part of the environment can be aware of everything that’s happening in all other parts, so we can design interactive elements that anticipate the user’s intentions providing unambiguous and precise controls.

These considerations define a lot of the design in Cat Explorer, starting from the visual aesthetic – from interactive controls that look lightweight enough that it’s easier to accept the absence of haptic response – to animations and behavior, so that most things try to be context-aware when it adds to the user experience.

Scene Composition

The scene presents the cat located at about chest height in front you, within an ergonomic area for both seated and standing hand manipulation. Having everything located comfortably within arm’s reach makes this “object on a pedestal” type of scene composition well-suited for any kind of close-range interaction.

The cat and her associated interfaces dynamically follow the optimal height at all times, except when you lean in to inspect the detail. This makes the transition from seated to standing experience seamless, but requires environmental references to fade in, making the vertical movement evident and maintaining the orientation.

The main UI panel rotates to follow you as you move around the pedestal, only stopping once hovered.

Interface

Productivity interactions tend to happen at the tips of our fingers – where there’s enough dexterity for small movements to be precise and expressive, while staying energy-efficient over longer periods of time. Fine finger control is at the base of our approach for Cat Explorer’s UI design.

The essential type of in-air finger input is pinch gesture—it provides much-desired haptic feedback, can be reliably repeated by most of the users, and is clearly intentional, as in it doesn’t happen by accident. Dynamic hand-aware affordances based on pinch gesture has allowed keeping the interface elements visually subtle without losing the ease of use and precision of control.

The sphere handle has gone through several iterations – from initially being a larger static handle to a reactive shape-shifting option, eventually becoming hand-aware. Each version of this affordance had to meet three conditions: (1) visually suggest that it can be pinched, (2) be reliable and forgiving with regards to inaccurate hand positioning, and (3) work well together with the aesthetic of the rest of the UI.

The pull-cord to control cat explosion borrows from the traditional light switch design, though it can be operated as a vertical slider as well. Additionally, this handle checks the vertical speed upon release and can be thrown down for quicker result.

In the early days of smartphone UI, designers used skeuomorphic physical-world aesthetics to help users build a new intuition for digital interfaces. Today’s users understand both physical and screen-based interfaces, so design can draw inspiration from both.


Today’s users understand both physical and screen-based interfaces. VR design can draw inspiration from both.
Click To Tweet


In Cat Explorer, we have a record-player turntable and a light switch, but also a minimal graphic style more associated with digital interfaces. We also have some new interactions that are native to immersive media: the sphere handle and the hand effector itself. The user has never seen any of these before, but they are familiar enough to require no instruction.

The importance of this should be obvious to those working in training, education and industry, where countless hours are lost to learning complicated software and byzantine interfaces. The essence of interface design is about trying to remove the barriers between the user, and the thing they are interacting with.

This is the core of our mission at Leap Motion. Immersive media, together with natural user interaction can be the most easy, friendly and intuitive form of interacting with computers, more so than smartphones or PCs. In fact, it doesn’t feel like you’re using a computer at all. The interface fades away, and it’s just you… in a space… exploring an exploded cat with your hands.

The post Designing Cat Explorer appeared first on Leap Motion Blog.

Mastering Reality with Project North Star

$
0
0

At Leap Motion, we’re always looking to advance our interactions in ways that push our hardware and software. As one of the lead engineers on Project North Star, I believe that augmented reality can be a truly compelling platform for human-computer interaction. While AR’s true potential comes from dissolving the barriers between humans and computers, I also believe that it can help improve our abilities in the real world. As we augment our reality, we augment ourselves.

With its best-in-class field-of-view, refresh rate, and resolution, the North Star headset has proven to be an exceptional platform for representing high-speed motions with small objects. So when David asked me to put together a quick demo to show off its ability to interact with spatial environments, I knew just what to build. That’s right – table tennis.


As we augment our reality, we augment ourselves.
Click To Tweet


With this demo, we have the magic of Leap Motion hand tracking combined with a handheld paddle controller. The virtual ball soars through the air and bounces on the real table. And, of course, an AI opponent to challenge you.

While augmented reality table tennis is a lot of fun, it also demonstrates a key concept that’s largely unexplored in mixed reality right now – artificial skills training for real-world scenarios. In VR, we can shape the experience to optimize learning a task or behavior. AR elevates this potential with familiar real-world environments, allowing us to contextualize learned skills. By overlaying virtual indicators and heuristics onto the user’s view, we can even help them develop a deeper intuition of the system.

What if you could see the future? Using parabolic equations of motion, our table tennis demo easily predicts where the ball will go. By showing this prediction in the form of a trajectory, we now have a superpower – without changing how the game itself behaves! By keeping the physics simulation authentic, the hand-eye coordination and muscle memory built up while training in AR can transfer directly to the real world.

Our AI opponent takes our training to the next level. Under the hood, the AI paddle uses the same action/reaction logic to calculate the reflected trajectory of the ball as your paddle. In other words, its motions must be physically correct to play the game. To this end, we implemented a kinematic formulation of the Cubic Bezier Curve to naturally drive the AI’s paddle to the correct position and velocity at the correct time.

A visualization of the Bezier Curves driving the opponent paddle.


What if you could see the future? #AR plus #AI can give you that ability – to some extent.
Click To Tweet


This special type of motion path allows us to specify that the paddle should hit the ball just after it’s reached the apex of its parabolic trajectory. A high level of physical accuracy is important, because it provides an example (or role model) for the user to learn from when starting to play the game. We didn’t want our users to become discouraged or frustrated if their opponent were to teleport to the ball or use some other unfair trickery to score a point.

The realism and physical reproducibility of this demo were built with the intent that the user should grow in their understanding of the system by interacting with it. As a medium, AR has the potential to improve how we learn about and interact with the real world. Simulations like this have the unique ability to adjust their difficulty downward to accommodate novices and upward to challenge experts in a whole new way – appealing to players at all skill levels.

Eventually, as AR systems become more advanced and lifelike, we will be able to practice against “impossibly difficult” artificial opponents and use that intuition in the real world like never before. Current and near-future professions may be aided by advanced AR training systems that allow us to casually achieve levels of skill that previously required months of determined practice.

With the advent of centaur chess and other collaborations between humans and AI, we’re just barely scratching the surface of what might be possible. We now have access to abilities that our ancestors could have scarcely imagined. Though the age of swords and their utility has long since been relegated to the distant past, it is my belief that the greatest swordsman of all time has not yet been born.

The post Mastering Reality with Project North Star appeared first on Leap Motion Blog.

Project North Star: Mechanical Update 1

$
0
0

This morning, we released an update to the North Star headset assembly. The project CAD files now fit the Leap Motion Controller and add support for alternate headgear and torsion spring hinges.

With these incremental additions, we want to broaden the ability to put together a North Star headset of your own. These are still works in progress as we grow more confident with what works and what doesn’t in augmented reality – both in terms of industrial design and core user experience.

Leap Motion Controller Support

If you’re reading this, odds are good that you already own a Leap Motion Controller. (If you don’t, it’s available today on our web store.) Featuring the speed and responsiveness of our V4 hand tracking, its 135° field of view extends beyond the North Star headset’s reflectors. The device can be easily taken in and out of the headset for rapid prototyping across a range of projects.

This alternate 3D printed bracket is a drop-in replacement for Project North Star. Since parts had to move to fit the Leap Motion Controller at the same origin point, we took the opportunity to cover the display driver board and thicken certain areas. Overall these updates make the assembly stiffer and more rugged to handle.

Alternate Headgear Option

When we first started developing North Star prototypes, we used 3M’s Speedglas Utility headgear. At the time, the optics would bounce around, causing the reflected image to shake wildly as we moved our heads. We minimized this by switching to the stiffer Miller headgear and continued other improvements for several months.

However, the 3M headgear was sorely missed, as it was simple to put on and less intimidating for demos. Since then we added cheek alignment features, which solved the image bounce. As a result we’ve brought back the earlier design as a supplement to the release headgear. The headgear and optics are interchangeable – only the hinges need to match the headgear. Hopefully this enables more choices in building North Star prototypes.

Torsion Spring Hinges

One of the best features of the old headgear was torsion hinges, which we’ve introduced with the latest release. Torsion hinges lighten the clamping load needed to keep the optics from pressing on users’ faces. (Think of a heavy VR HMD – the weight resting on the nose becomes uncomfortable quickly.)

Two torsion springs constantly apply twisting force on the aluminum legs, fighting gravity acting on the optics. The end result is the user can acutely suspend the optics above the nose, and even completely flip up the optics with little effort. After dusting off the original hinge prototypes, rotation limits and other simple modifications were made (e.g. using the same screws as the rest of the assembly). Check out the build guide for details.

We can’t wait to share more of our progress in the upcoming weeks – gathering feedback, making improvements, and seeing what you’ve been doing with Leap Motion and AR. The community’s progress so far has been inspirational. Given the barriers to producing reflectors, we’re currently exploring automating the calibration process as well as a few DIY low-cost reflector options.

You can catch up on the updated parts on the Project North Star documentation page, and print the latest files from our GitHub project. Come back soon for the latest updates!

The post Project North Star: Mechanical Update 1 appeared first on Leap Motion Blog.

Leap Motion + iClone 7 for Professional Animation

$
0
0


Animate from fingers to forearms with @LeapMotion and Reallusion iClone 7 for professional motion capture animation.
Click To Tweet


This week we’re excited to share a new engine integration with the professional animation community – Leap Motion and iClone 7 Motion LIVE. A full body motion capture platform designed for performance animation, Motion LIVE aggregates motion data streams from industry-leading mocap devices, and drives 3D characters’ faces, hands, and bodies simultaneously. Its easy workflow opens up extraordinary possibilities for virtual production, performance capture, live television, and web broadcasting.

With their new Leap Motion integration, iClone now gives you access to the following features:

Add Realistic Hand Motions to Body Mocap

 Most professional motion capture systems can capture perfect body movement; however, hand animation is always a separate challenging task. Now adding delicate hand animation is affordably streamlined with the Leap Motion Controller.

Enhance Communication with Hand Gestures

People use lots of hand gestures when talking. Adding appropriate hand and finger movement can instantly upgrade your talking animation with enhanced motions to convey the performance.

Animate with Detailed Hand Performance

Grab a bottle, open the lid, and have a drink. Even such a simple movement already causes sleepless nights for animators. With the Leap Motion Controller, playing a musical instrument is just a few moments of performance and motion layer tweaks.

Animate from Forearms to Fingers

Motion LIVE supports three hand capture options, from forearm (elbow twist and bend), to wrist rotation, all the way to detailed finger movements.

Desktop and Head Mount Modes

 Desktop mode (sensor view upward) gives you setup convenience, while the Head Mount VR mode (sensor view same as your eye level) gives you the best view coverage and freedom of movement.

One-Hand Capture

Besides using two hands for performance capture, set one hand free for mouse operation. Choose data from one hand to drive two-handed animation, or use the left hand to capture the right hand animation.

Gesture Mirror

A quick way to switch left and right hand data. This function is useful especially when you wish the virtual character to mirror motion data from screen view.

Free Mocap-ready Templates

Install the trial or full version of Leap Motion Profile and gain access to two pre-aligned pose templates calibrated for forearm, hand, and finger motion capture.

For a limited time you can get a full iClone 7 package on our web store. (Note that the engine uses features which may not work properly with the V4 beta software; for now we recommend using the V3 software.)

The post Leap Motion + iClone 7 for Professional Animation appeared first on Leap Motion Blog.

Mirrorworlds

$
0
0

Virtual reality. Augmented reality. Mixed, hyper, modulated, mediated, diminished reality. All of these flavours are really just entry points into a vast world of possibilities where we can navigate between our physical world and limitless virtual spaces. These technologies contain immense raw potential, and have advanced to the stage where they are pretty good, and pretty accessible. But in terms of what they enable, we’ve only seen a sliver of what’s possible.


Virtual, augmented, mixed, hyper, modulated, mediated, diminished reality. These are just entry points into a vast world of possibilities where we navigate between our physical world and limitless virtual spaces.
Click To Tweet


The cultural expectations for the technology, popularised by Hollywood, present our future as cities filled with holographic signage and characters, escapist VR sex-pods, or specially equipped ‘holodeck’ rooms that are used for entertainment or simulation. We can have relationships with virtual beings, or might give ourselves over completely to virtuality and upload our souls to the network.

Our actual future will be much stranger, subtler and more complex. These technologies will have a more profound impact on the way we interact with our environments and each other. We will spend our days effortlessly slipping between realities, connecting with others who may be physically or virtually present, dialling up and down our level of immersion. Creation will be fast, collaborative and inexpensive. Where it used to take years of hard labour and valuable resources to build a cathedral, we will be able to build and share environments in moments, giving birth to impossible new forms of architecture. We will warp time and space, bending or breaking the rules of physical reality to suit our needs. All of this will be normal and obvious to us.


VR isn't about features, it's about the kinds of experiences those features enable.
Click To Tweet


The current generation of VR is great for transporting you to far-off lands, trading up your physical environment for separate virtual worlds. Some let you exist in other times and places. Some put you in a blank canvas and encourage you to create. The latest VR devices to be announced have a host of new features: high resolution screens, untethered capabilities, inside-out tracking. Headsets are getting more comfortable, costs are coming down. These make VR more accessible and portable, which will undoubtedly help reach larger audiences. But VR isn’t about features, it’s about the kinds of experiences those features enable. We’re on a course toward a new set of possibilities that are tantalisingly close, and will open up huge new areas of VR for exploration – a whole new category of experience. It’s a space we’ve been exploring, that we call…

M I R R O R W O R L D S

Mirrorworlds are alternative dimensions of reality, layered over the physical world. Rather than completely removing you from your environment, they are parallel to reality, transforming your surroundings into refracted versions of themselves. Think Frodo when he puts on the One Ring, or the Upside Down in Stranger Things. These realities are linked to our own, and have strange new properties. Limited in some ways. Superpowered in others.

Physical obstacles like cabinets and chairs become mountains that can be moved to affect a weather system. Mirrorworlds transform aspects of the physical world into a new experience, rather than augmenting or replacing it.

Mirrorworlds immerse you without removing you from the space. You are still present, but on a different plane of reality. You will be able to see and engage with other people in your environment, walk around, sit down on a chair. But you can also shoot fireballs, summon complex 3D models, or tear down your walls to look out on a Martian sunrise. Mirrorworlds re-contextualise your space. They change its meaning and purpose, integrating with our daily lives while radically increasing the possibilities for a space.

Social Context

From command-lines to mobile interfaces, tech companies have made huge advances in making complex technology accessible to the masses. However, our relationship with technology is still largely based around an interaction between a human and a computer. When a person looks down at their smartphone, they are immediately disconnected from their social context – a phenomenon widely complained about by parents, friends and romantic partners around the world.

VR is perhaps the ultimate example of technological isolation, where our link with the physical environment is almost totally severed. This is fine if you’re alone in your bedroom, but can be a big limiting factor for its adoption in almost any other situation. People feel embarrassed, insecure or just unwilling to put themselves in such a profoundly vulnerable situation.


Our relationship with technology is still largely based around an interaction between a human and a computer. Mirrorworlds form new connections with the world around you.
Click To Tweet


Mirrorworlds don’t break social convention in the same way that conventional VR (or even mobile) does. Rather than cutting you off from the world, they form a new connection to it. At a basic level, we may just be aware of other people’s presence by making out their shape. In time, devices will be able to recognise these shapes as people, and replace them with avatars. In both cases, your social context is preserved.  You will be able to stay engaged with the people and environment around you. In fact, we could say that Mirrorworlds move us away from human-computer interfaces, and towards human-environment interfaces, with technology as a mediating filter on our perception.

Truly Mobile

This awareness also allows VR to be not just portable, but truly mobile. Currently, both tethered and untethered devices still require you to stay in a clear, relatively small area. Even then people often move around tentatively, worried about stubbing their toes, walking into a wall, or stepping on a cat. In Mirrorworlds, we will be able to walk out of the door, down the stairs, get on the train, all in VR.

Truly mobile VR: two friends battle it out in a mirrorworld, immersed but not removed from their physical environment.

This requires a big shift in thinking about how virtual environments are designed. In today’s VR, developers and designers build 3D models of rooms, landscapes and dungeons, and drop us into them. We then have to find ways to move around them. This is fine with small environments, but to be able to move around larger spaces, we either have to climb into a virtual vehicle, or invent new ways like flying or teleporting. VR is intuitive and compelling because it matches our physical movement to the virtual world; asking users to learn an additional set of controls just to be able to move around around could be confusing and alienating to many.

These kinds of environments give the developer a lot of control, but they can also feel isolated and self-contained. Mirrorworld environments are not predefined 3D models, they are procedural. They incorporate elements from your physical environment and transform them. Developers building Mirrorworlds will think in a different way. Turn the floor to water. Remove the ceiling. Change furniture into mountains. Make them snow capped if over 6ft tall. Apply these rules, and the whole world is reinvented.

As well as transforming our environments, Mirrorworlds can also transform the physical objects within it. We can pick up a pencil, and use it as a magic wand. We can turn our tables into touchscreens. We can access virtual control panels for our connected IoT devices. We will obviously want to use our hands, but we will also use our bodies, our voices. In some cases we might want specialist controllers.

Over time, more and more of the physical world becomes available to us. But unlike AR, the creators of Mirrorworlds can choose how much they bring into their experiences. Mirrorworlds aren’t additive, they’re transformative. They will be able to selectively draw from the physical world – to simplify, focus, or completely restructure reality. It will be up to developers and users to decide how deep they want to go.

A Design Framework for New Realities

The emergence of Mirrorworlds will give rise to new types of spatial and social relationships. We will need to figure out how to present spaces that can be shared by physically and virtually present people, invisible audiences, and virtual assistants. We will collide worlds, meshing together boardrooms that are separated by thousands of miles into a continuous space. We will need to establish a design language to understand who is visible to who, which objects are shared, and which are private.

A consultant uses overlaid scan data to advise a surgeon in a remote operating theatre. The virtual and physical scenes intersect, and physical tools and objects can be used in the virtual world.


Unlike AR, the creators of Mirrorworlds can choose how much they bring into their experiences. Mirrorworlds aren’t additive, they’re transformative.
Click To Tweet


We may also need to consider what an application is. Should we continue combining virtual tools, environments, and objects together into isolated worlds? Or should we allow users to bring tools and objects with them between worlds? Should we combine tools made by different developers?

We are being faced with what feels like limitless possibility, but over time rules and standards will emerge. A shared set of principles that start to feel intuitive, maybe even inevitable. Some of these rules might be migrated from mobile/desktop. Some might be drawn from the physical world. And some might be entirely new, native to the medium of immersive media. Conversely, these new limitations will allow more to happen. The structure of rules and conventions will act like a scaffold, allowing us to reach further in our colonisation of virtual space.

But we must be careful that our structure is built on the right principles. As with pioneering any new territory, the opportunities for exploitation are rife, and there are many interested parties with different priorities. Should we be locked into a single ecosystem? Do we have to sacrifice privacy for convenience? Can we turn consumers of these experiences into producers? How can we elevate people without compromising them?

AR and VR are often presented to the public as separate, even competing technologies. Ultimately though, devices will be able to span the entire continuum, from AR to VR and all of the rich shades of reality in between. In this future, we will be constantly moving between worlds, shifting between perspectives, changing the rules of reality to suit our purposes. We will be able to fluidly and intuitively navigate, build and modify our environments, creating spaces where physically present people and objects intersect seamlessly with their virtual counterparts. We will look back on the current era and try to remember what it was like being trapped in one place, in one body, obsessed with devices and squinting at our tiny screens.


AR and VR are often presented to the public as separate, even competing technologies. Ultimately though, devices will be able to span the entire continuum.
Click To Tweet


This future is closer than you might think. It’s largely possible on today’s hardware, and now the limitations are less about technical constraints, and more in our ability to conceptualise, structure and prioritise the aspects of the world we want to build. That’s the brief we’ve been working on at Leap Motion Design Research. As we continue to build this framework, we’ll be exploring all facets of virtuality, from its materials to its grammar and spatial logic. We are working to carve out a robust, believable and honest vision of a world elevated by technology, with people (and their hands) at the centre.

The post Mirrorworlds appeared first on Leap Motion Blog.

Japan Joins Project North Star

$
0
0

Earlier this summer, we open sourced the design for Project North Star, the world’s most advanced augmented reality R&D platform. Like the first chocolate waterfall outside of Willy Wonka’s factory, now the first North Star-style headsets outside our lab have been born – in Japan.

Several creative developers and open hardware studios are propelling open source efforts, working together to create a simplified headset based on the North Star design. Developer group exiii shared their experience on their blog along with a build guide, which uses off-the-shelf components. Psychic VR Lab, the developers of VR creative platform STYLY, took charge of the software.

Masahiro Yamaguchi (CEO, Psychic VR Lab), God Scorpion (Media artist, Psychic VR Lab), Keiichi Matsuda (VP Design, Leap Motion), Oda Yuda (Designer), Akihiro Fujii (CTO, Psychic VR Lab). Not pictured: Yamato Kaneko (COO, Product Lead, exiii), Hiroshi Yamaura (CEO, exiii).

Together, Psychic VR Lap and exiii have been showcasing their work at developer events in Tokyo. Recently we caught up with them.

Alex Colgan (Leap Motion): What inspired you to build a North Star headset?

Yamaura: Our company originally started from 3D printing a bionic hand, and we open-sourced that project. So we’re generally very passionate about open-source projects. Our main focus currently is to create really touchable virtual reality experiences, but of course what we see in the future is augmented reality in the world, where virtual objects and physical objects coexist together. We want to make everything touchable, just like real objects.

God Scorpion: I have a mixed reality team that is developing some ideas combining fashion, retail, performance and art. We’ve been working with Vive and Hololens, and wanted to see what else would be possible with North Star.

Akihiro Fujii: The North Star official demos and HYPER-REALITY film by Keiichi Matsuda gave us a huge inspiration about the future of AR. I’ve been using the Leap Motion hand tracker for six years and know its precision. I was excited when I saw the news about the AR headset with the hand tracker. We visited the exiii team who had already started building North Star and shared our excitement about the open source project.

Three weeks after the visit, we held the first North Star meetup with 50 XR enthusiasts in Tokyo with our very first North Star headset. I guess most of the participants were convinced the future is right before our eyes.

Alex: What changes do you think AR will have have on people’s lives?

Kaneko: We really like the idea of mirrorworlds. That’s the world we are trying to achieve on our side of development as well. If that kind of environment is possible, that’s where we want to touch virtual reality as well.

Yamaura: One of the biggest advantages to be in Japan is to work with car manufacturers, who are very eager to introduce new technology to their design and engineering process. They’ve invested a lot of money and effort for prototyping or making mockups in virtual reality, even before the Oculus/Vive era The next step for them is to be able to touch the model they designed in virtual reality. So naturally it will be mixed reality; it’s more seamless between the virtual and the physical world.


It is said that long-used tools acquire spirit, then become alive and self-aware in Japanese folklore. The concept, Tsukumogami, may be realized with AR in our everyday lives.
Click To Tweet


God Scorpion: It is said that long-used tools acquire spirit, then become alive and self-aware in Japanese folklore. The concept, Tsukumogami, may be realized with AR in our everyday lives. The relationship between objects and users will be changed. Objects may afford us actions as objects have self-awareness.

We also may use functions in a very different way with AR devices. Ninjutsu can be used with hand seals like the Japanese manga Naruto. Functions would be implemented based on actual coordinate space of the reality or based on actions, thus your ordinary behavior may trigger different functions in different layers. We will live in many over-wrapped layers even at a single moment. You could send 100 emails during a 5-meter walk from your desk to the resting sofa.

Alex: What was the most challenging part of putting the headset together?

Yamaura: The reflector took a lot of time. After CNC milling, we polished it by hand and added a half-mirror film for the window just to control the reflection and the transmitters.

Kaneko: Although it’s not close to the teaser video you guys released, we tried to emulate it. We really felt the potential of the device, like immediately the reaction was “alright, this is the future.” That was our first reaction

Fujii: Calibration was the difficult part and required a lot of patience with the current SDK.It took whole two days to make us satisfied with the calibration. Handmade North Stars have an individual difference, and our setup has some differences from the official North Star such as LCD resolution, so customized settings were needed. I posted the steps for the calibration on our blog, so that others don’t need to have the same patience. Besides, it’s an open source project, so it’s our great pleasure to contribute to the North Star project. I hope the next version of the SDK gets improved calibration functionalities.

Alex: What’s next for your teams?

Yamaguchi: We’re interested in applications which can be used outside of the room. Some experience which can be used for shopping and communicating with other people.

Kaneko: The natural next step for us is to include positional tracking so it can be used to see the world, and also interact with virtual objects in an AR environment. To me the wearable UI thing is something we want to try. It’s definitely the future of the user interface I think.

God Scorpion: We have a mixed reality lab that is researching and developing user interfaces, what is the best operating system, what is the best experience. The possibility of MR is equivalent to real rebuilding, re-recognition. The world makes an affordance to us and we will live in many layers. The augmented reality will change our perception of the world greatly.

If your team is looking to build the augmented future with North Star, get in touch! You can contact us here.

The post Japan Joins Project North Star appeared first on Leap Motion Blog.

Introducing LeapUVC: A New API for Education, Robotics and More

$
0
0

In 2014 we released the Leap Motion Image API, to unlock the possibilities of using the Leap Motion Controller’s twin infrared cameras. Today we’re releasing an experimental expansion of our Image API called LeapUVC.

LeapUVC gives you access to the Leap Motion Controller through the industry standard UVC (Universal Video Class) interface. This gives you low level controls such as LED brightness, gamma, exposure, gain, resolution, and more.

All of this data access works no matter how many Leap Motion Controllers you have plugged into your PC.

Discover the network of veins under your skin, revealed in infrared.

Track a physical object like this ArUco-markered cube.

The LeapUVC release features examples in C, Python, and Matlab, as well as OpenCV bindings that show how to stream from multiple devices, track ArUco markers, change camera settings, grab lens distortion parameters, and compute stereo depth maps from the images. Use the Leap Motion Controller to track physical objects, capture high-speed infrared footage, or see the world in new ways.

Control exposure time and capture images within 1/2000th of a second.

Play with different variables to accentuate different parts of the environment.

We hope this experimental release will open up entirely new use cases for the Leap Motion Controller in education, robotics, art, academic research, and more.

The post Introducing LeapUVC: A New API for Education, Robotics and More appeared first on Leap Motion Blog.


Experimental Release #2: Multiple Device Support

$
0
0

Earlier this week, we shared an experimental build of our LeapUVC API, which gives you a new level of access to the Leap Motion Controller cameras. Today we’re excited to share a second experimental build – multiple device support.

With this build, you can now run more than one Leap Motion Controller on the same Windows 64-bit computer. To get started, make sure you have sufficient CPU power and enough USB bandwidth to support both devices running at full speed.

The package includes an experimental installer and example code in Unity. The devices are not synchronized but are timestamped, and there’s example code to help you manually calibrate their relative offsets.

Multiple device support has been a longstanding feature request in our developer community, and we’re excited to share this experimental release with everyone. Multiple interactive spaces can be used for multiuser AR/VR, art installations, location-based entertainment, and more.

While there’s no out-of-the-box support for adjacent spaces (where a tracked hand retains the same ID when moving from one device to another) or overlapping spaces (where the same hand could be tracked from multiple angles), today’s build puts these possibilities into reach. To get started, download the experimental installer and multidevice Unity Modules, and create your project.

The post Experimental Release #2: Multiple Device Support appeared first on Leap Motion Blog.

Project North Star: Mechanical Update 3

$
0
0

Today we’re excited to share the latest major design update for the Leap Motion North Star headset. North Star Release 3 consolidates several months of research and insight into a new set of 3D files and drawings. Our goal with this release is to make Project North Star more inviting, less hacked together, and more reliable. The design includes more adjustments and mechanisms for a greater variety of head and facial geometries – lighter, more balanced, stiffer, and more inclusive.

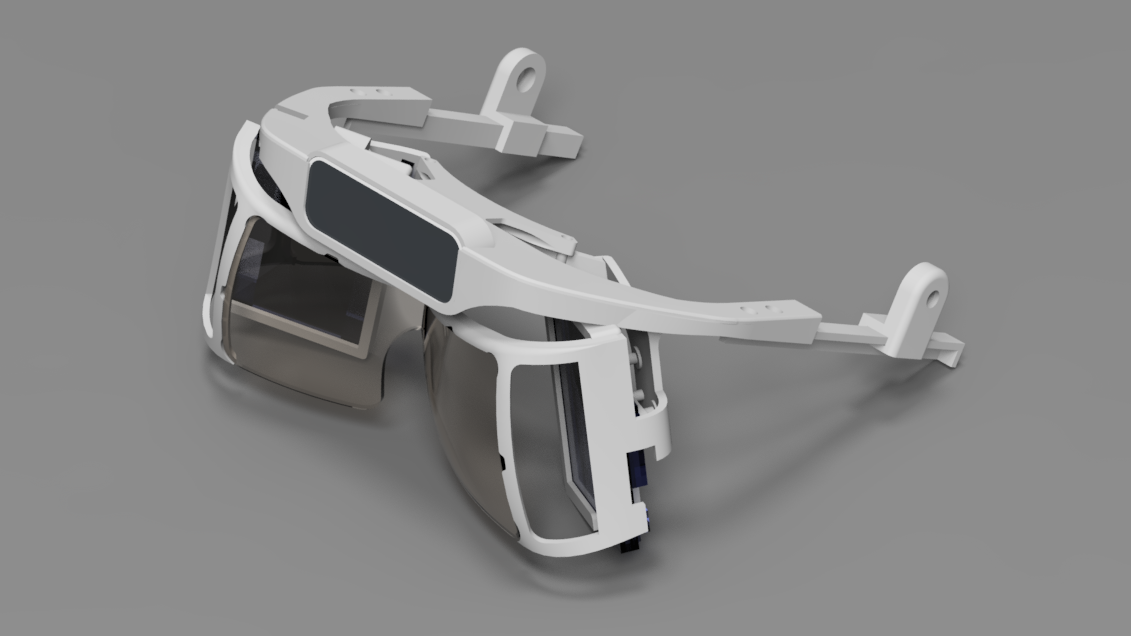
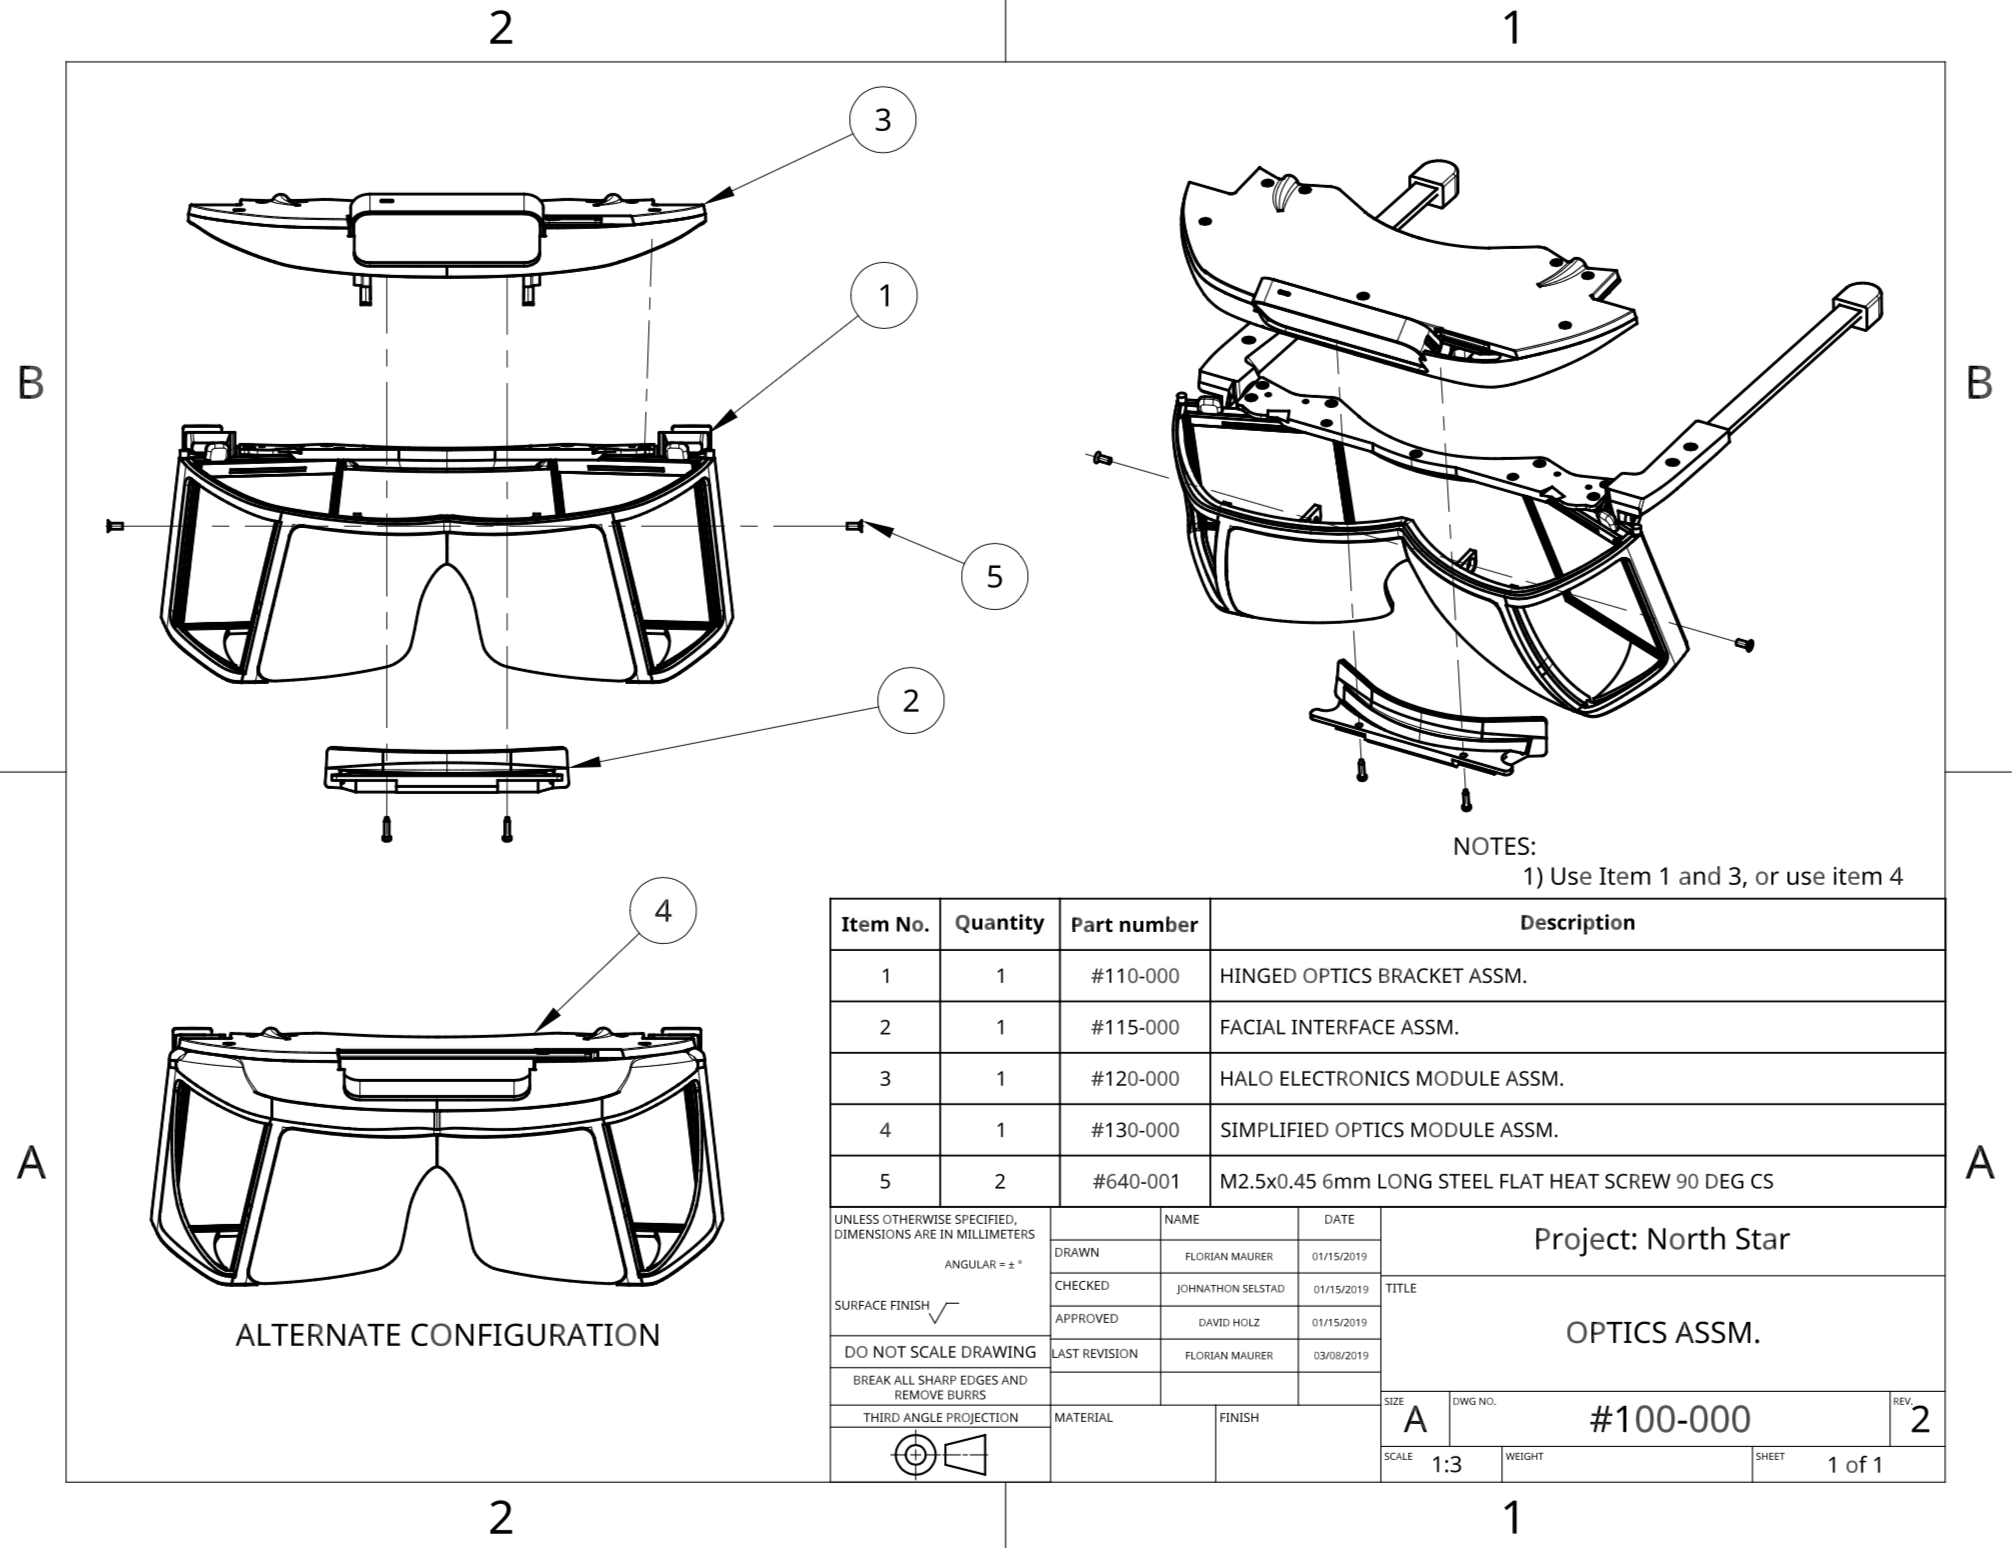
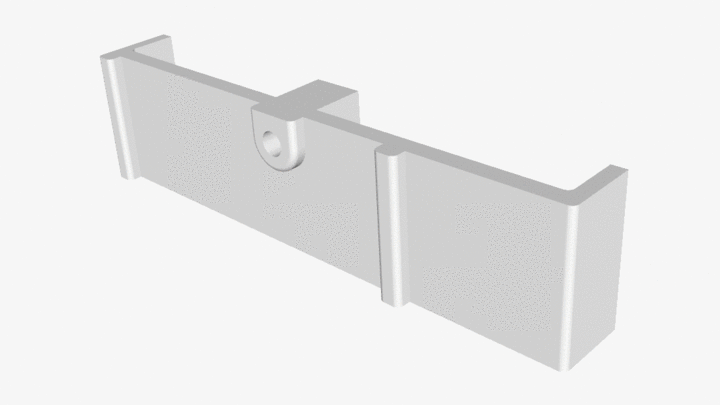
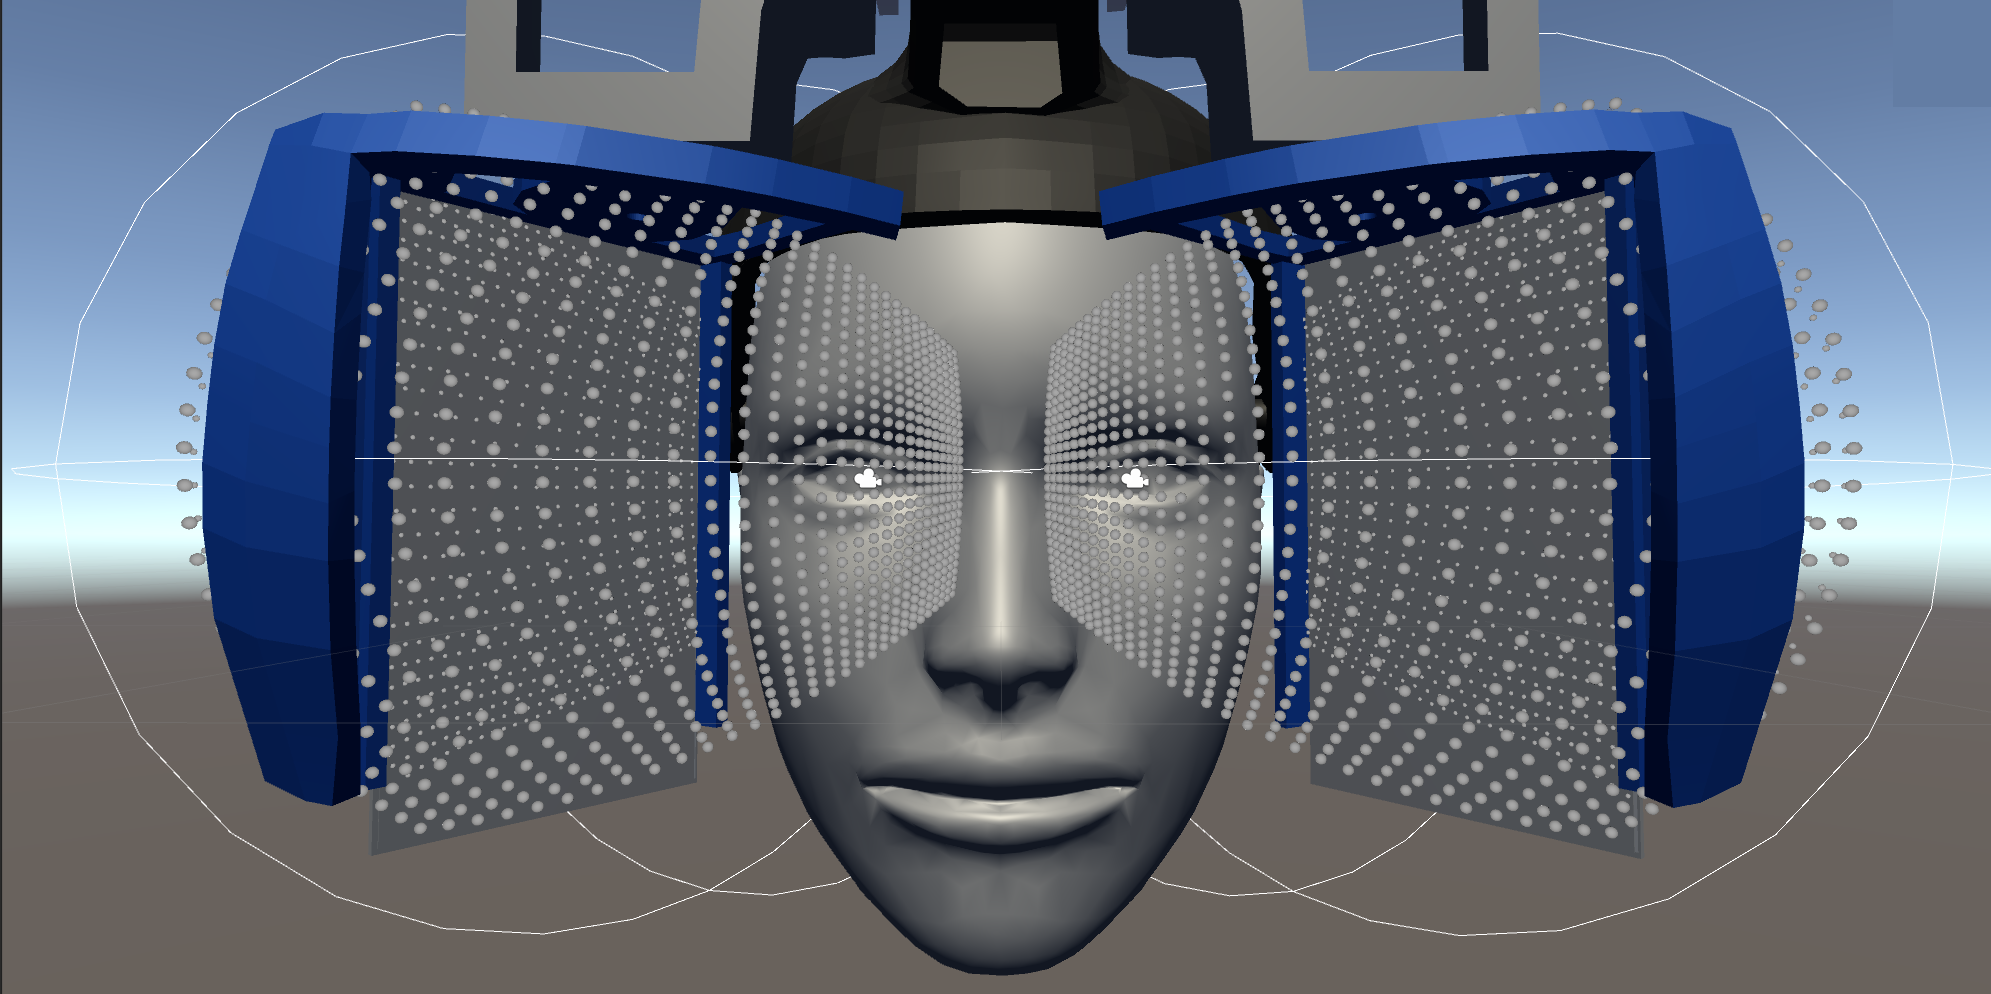
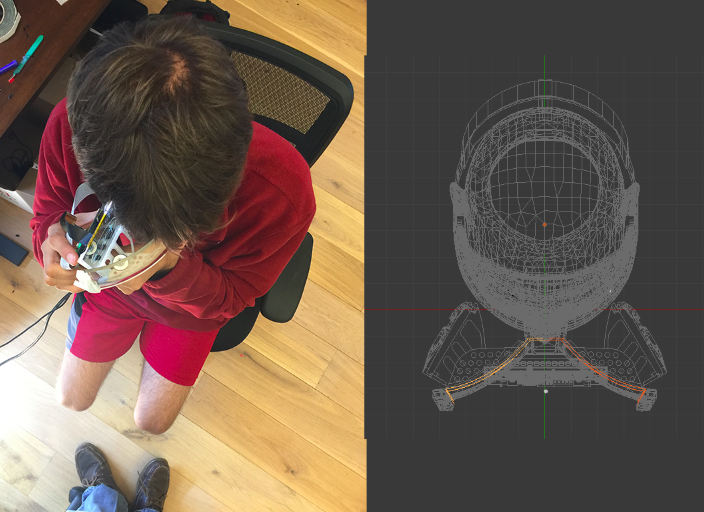
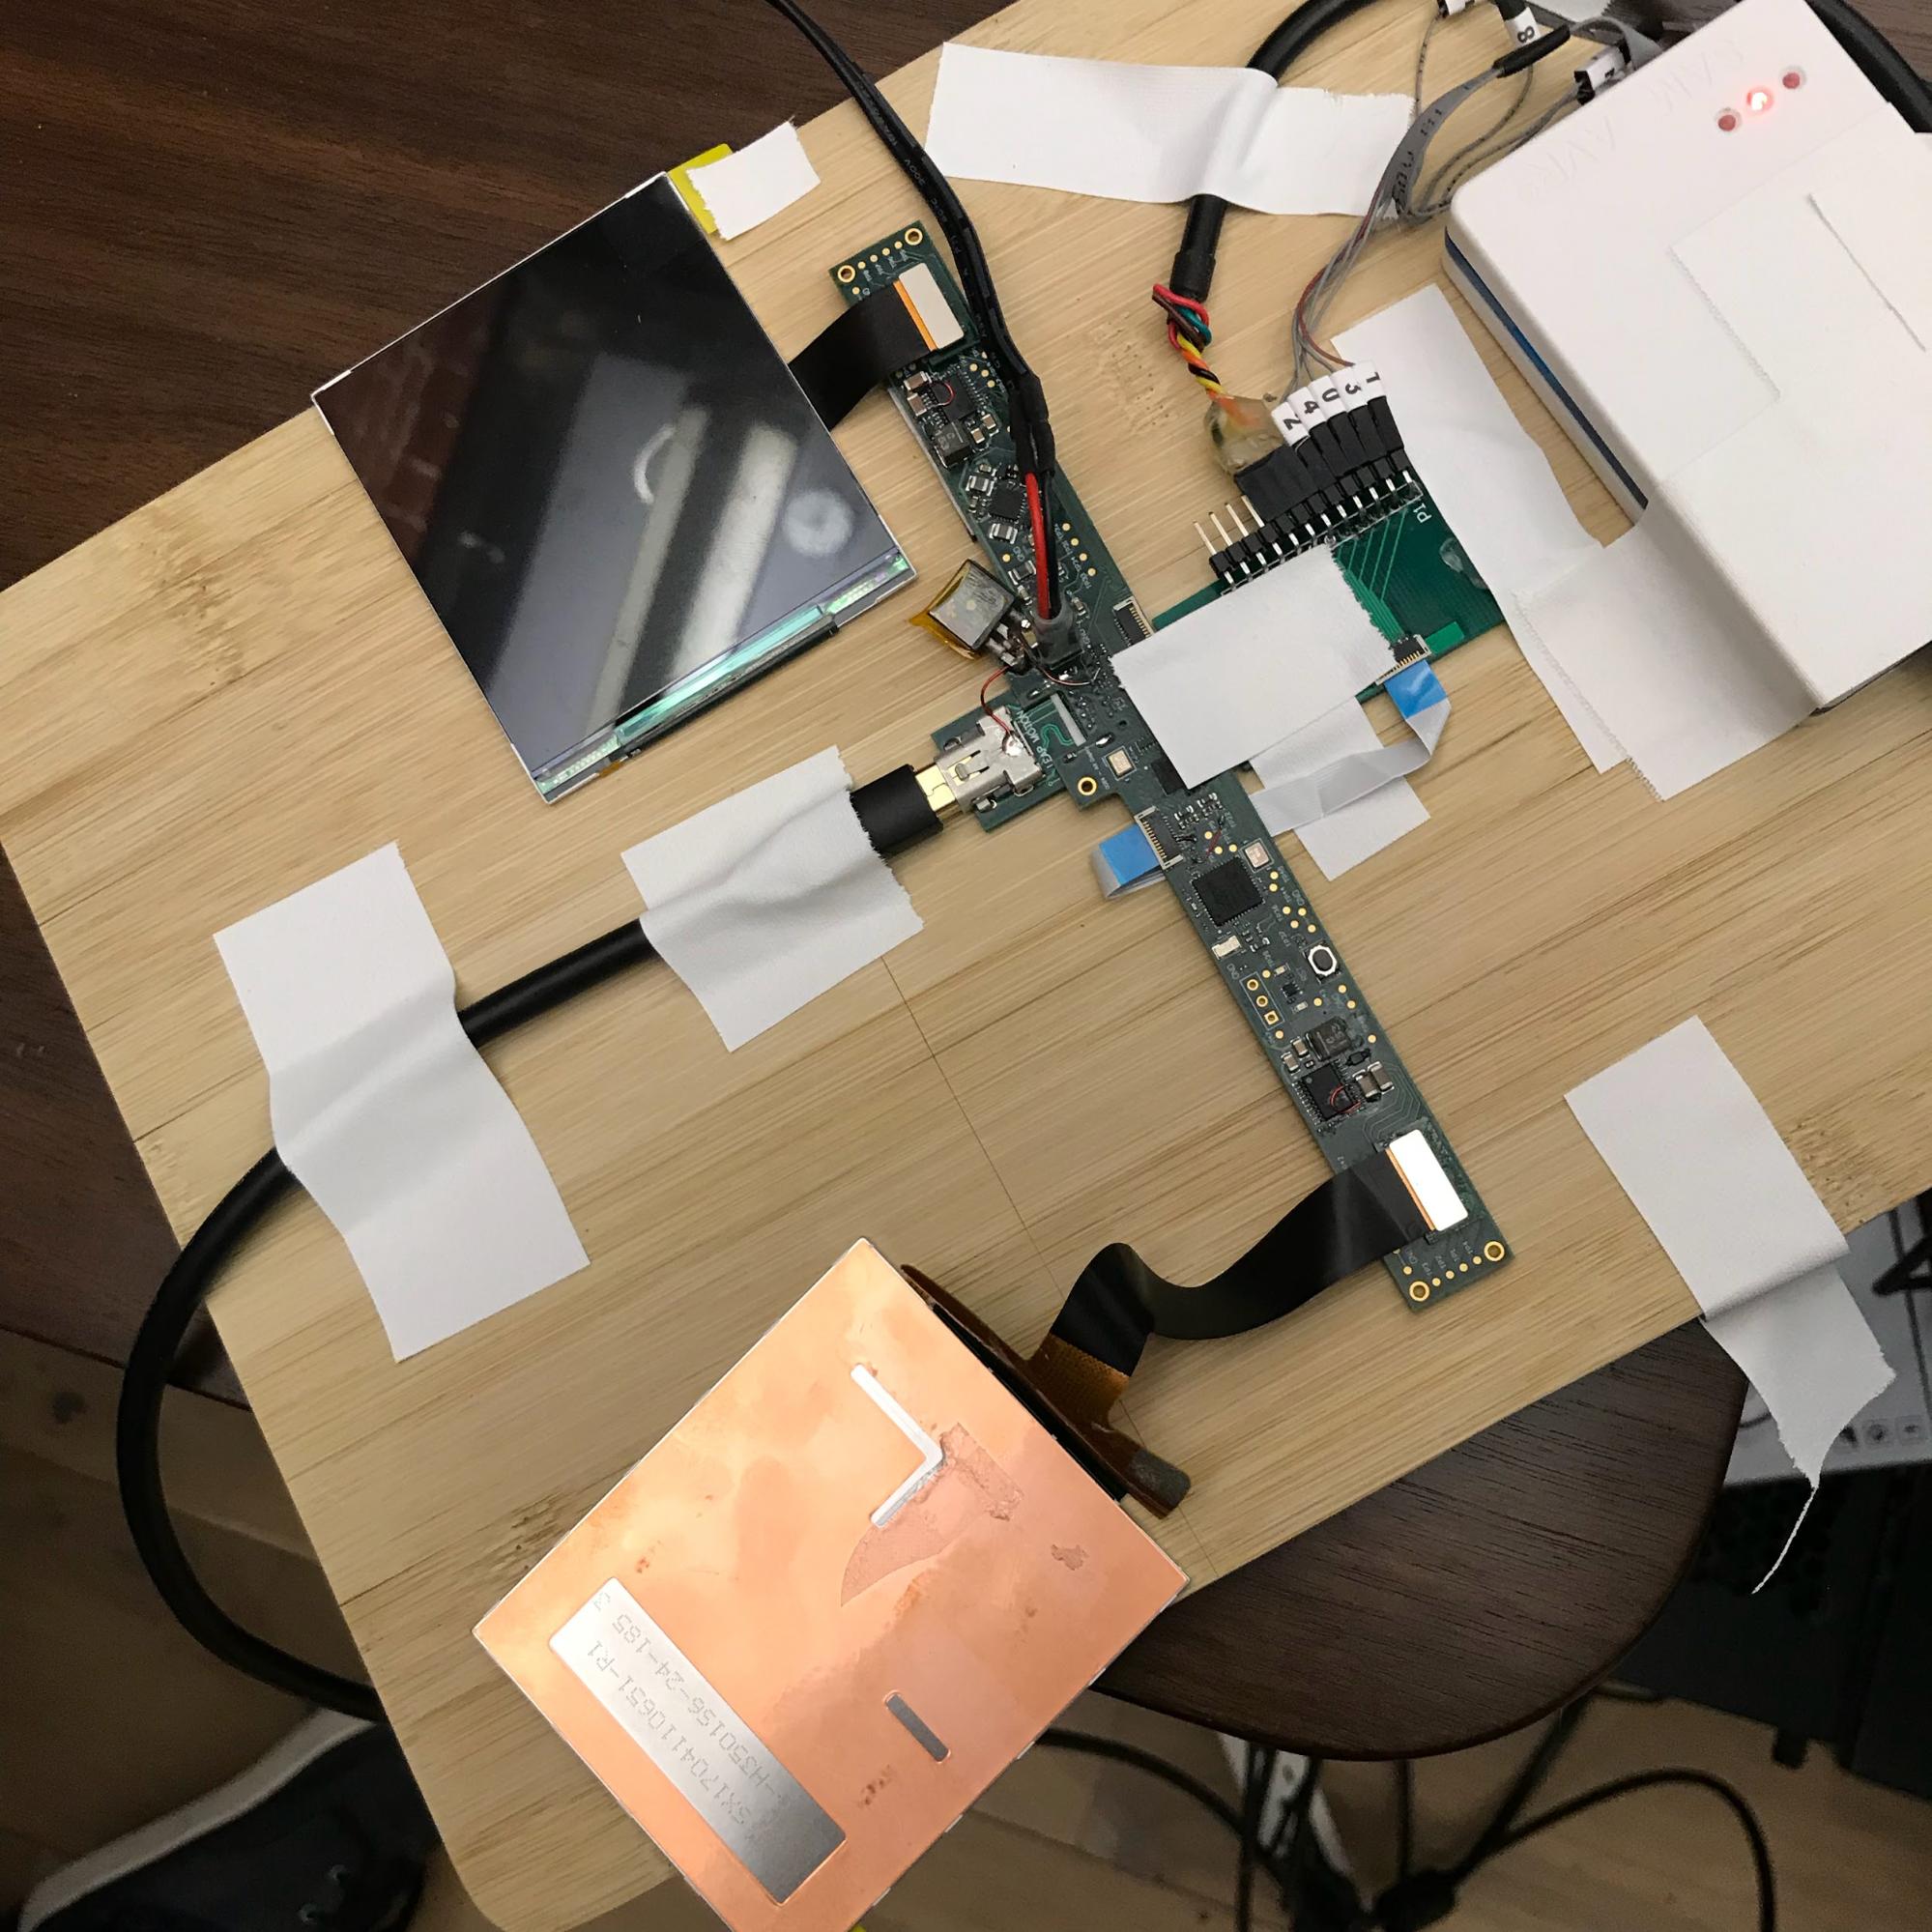
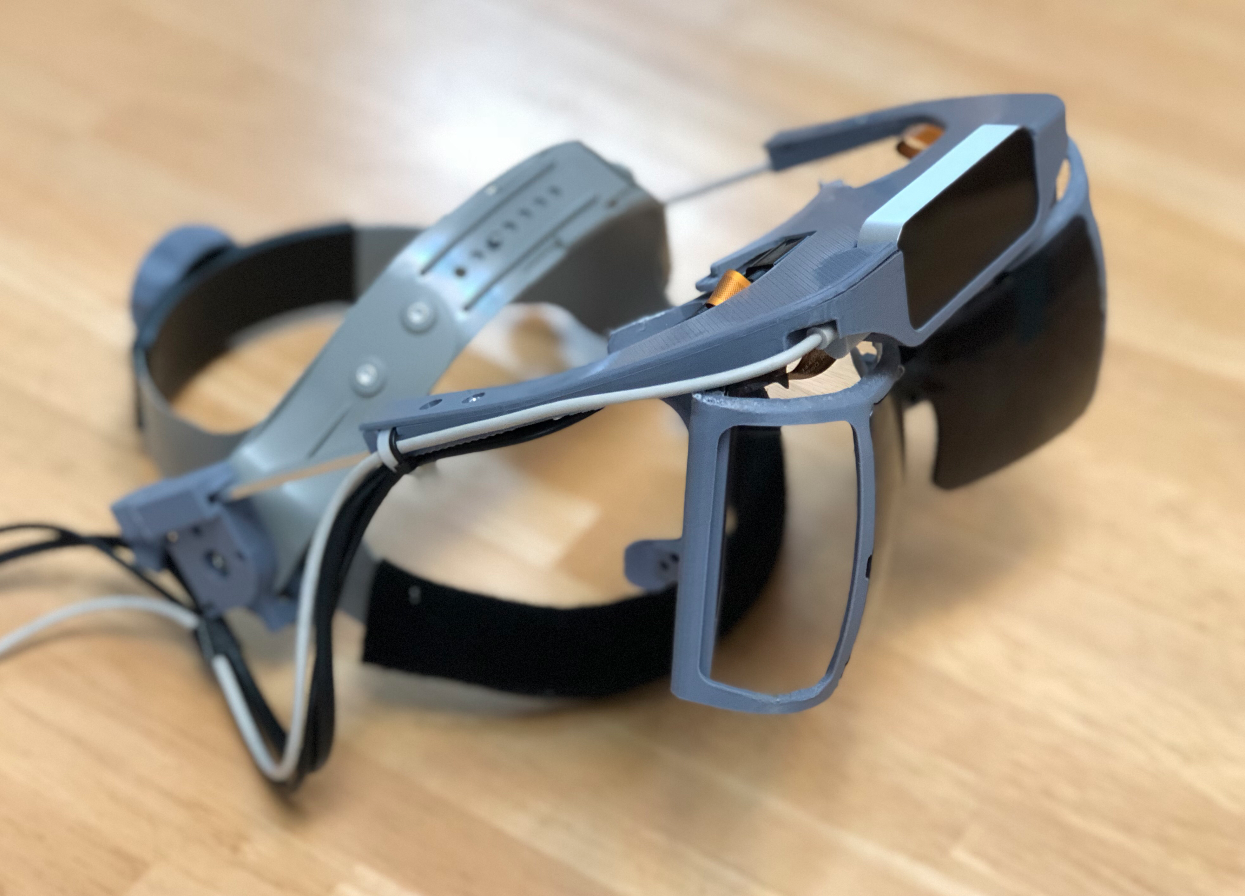
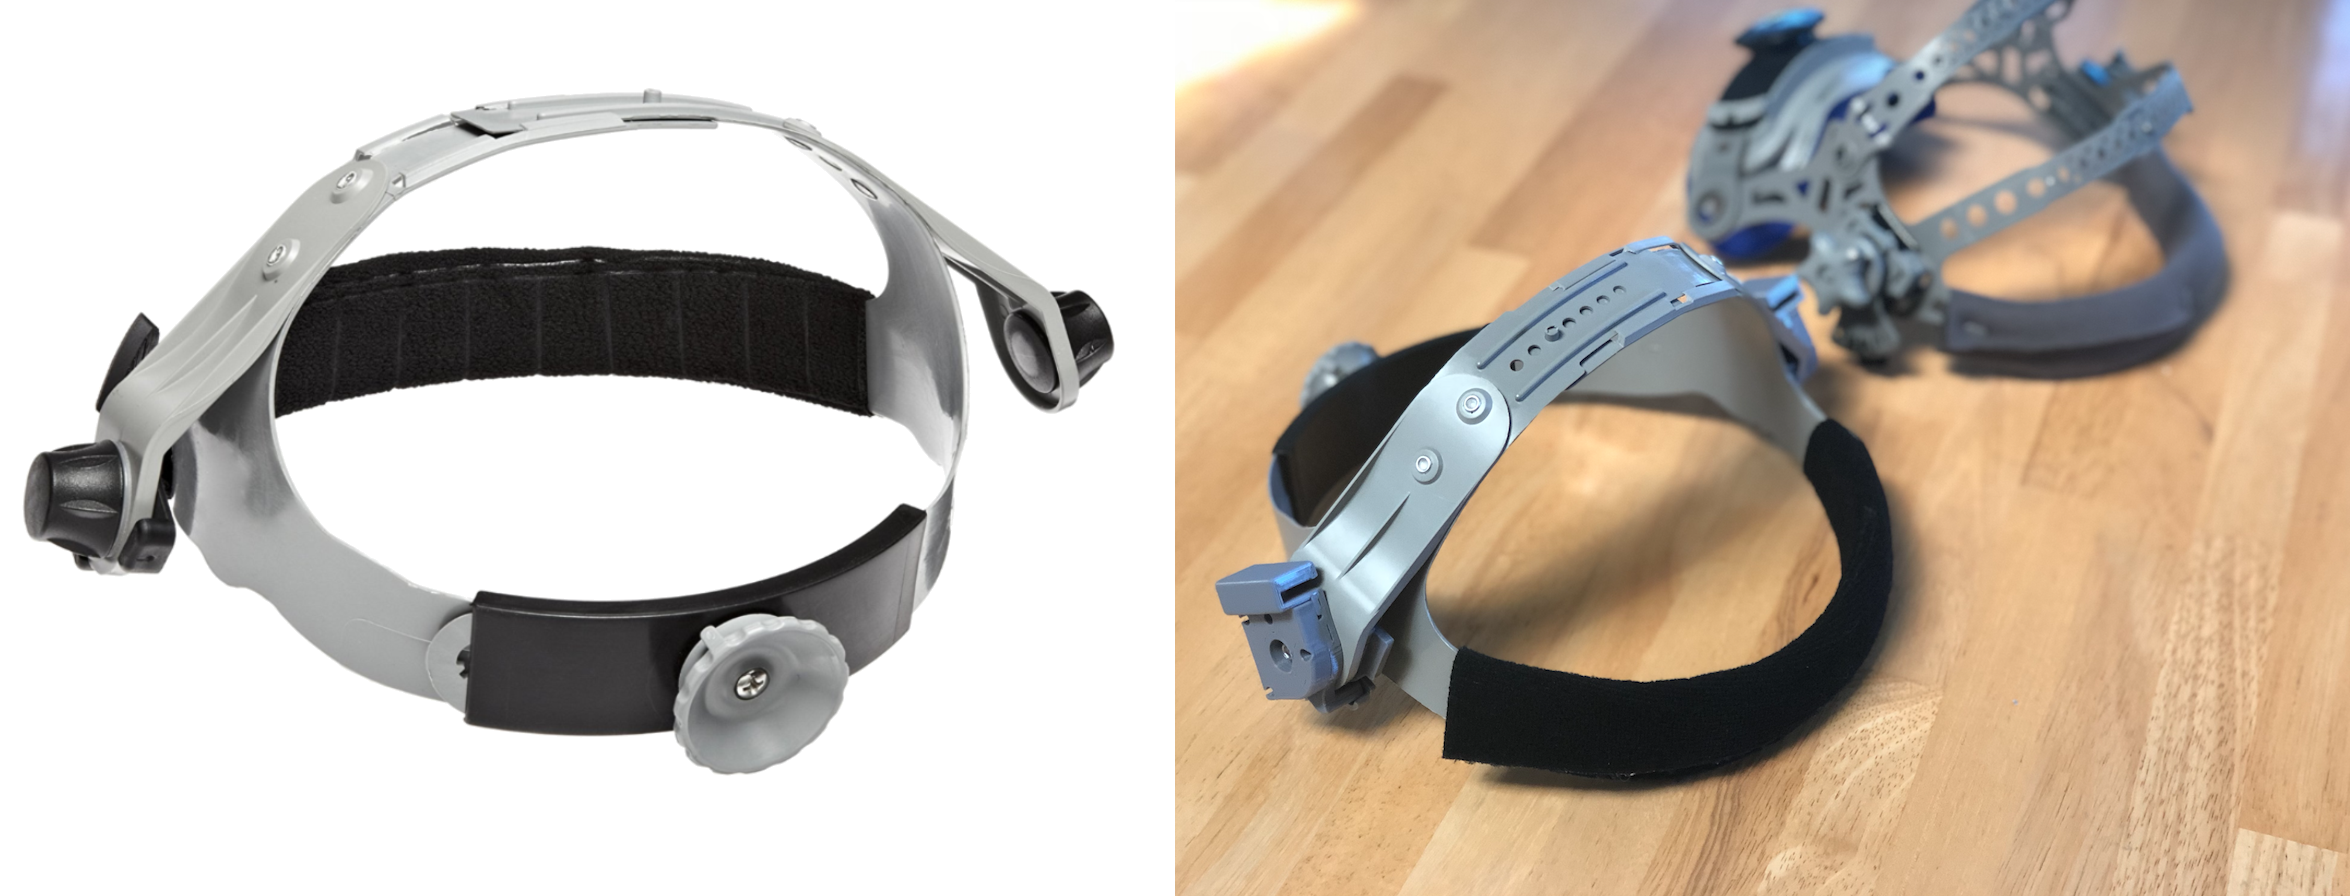
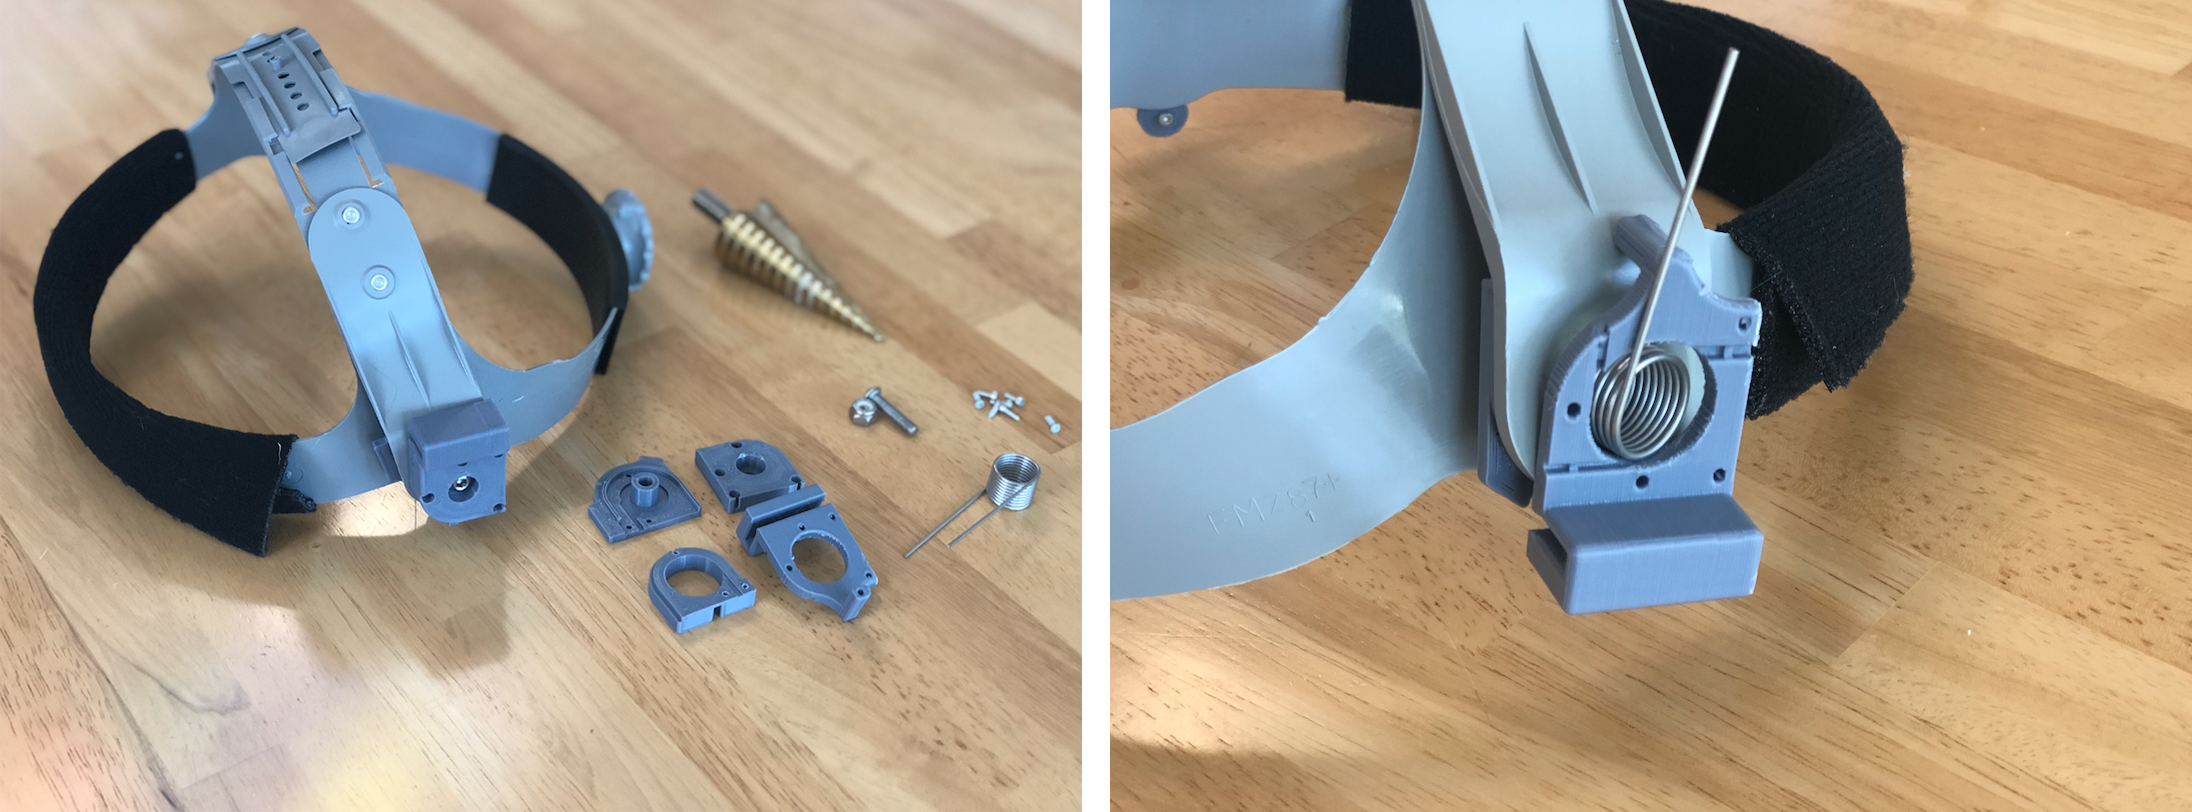
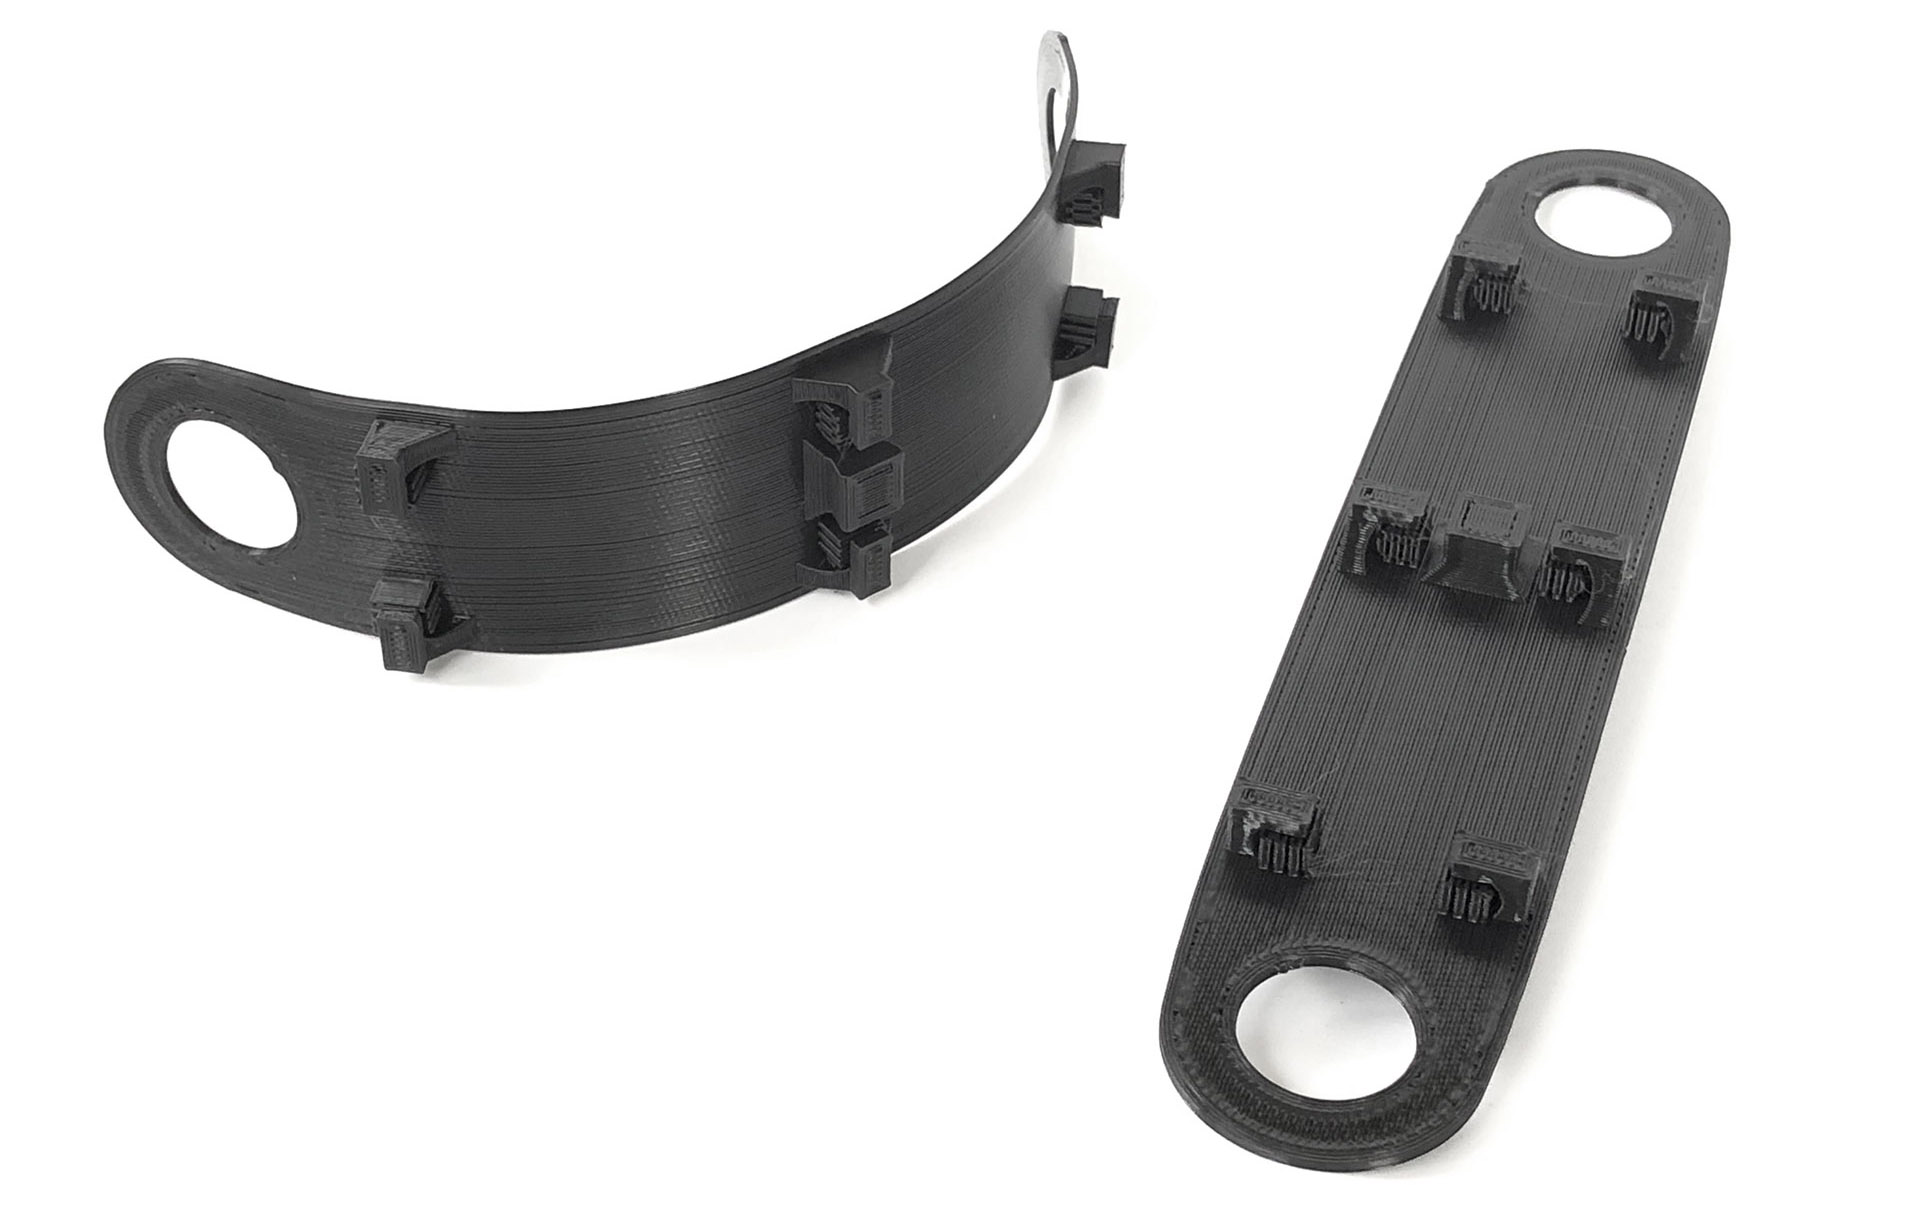
With each design improvement and new prototype, we’ve been guided by the experiences of our test participants. One of our biggest challenges was the facial interface, providing stability without getting in the way of emoting.

Now, the headset only touches the user’s forehead, and optics simply “float” in in front of you. The breakthrough was allowing the headgear and optics to self-align between face and forehead independently. As a bonus, for the first time, it’s usable with glasses!

Release 3 has a lot packed into it. Here are a few more problems we tackled:

New forehead piece. While we enjoyed the flexibility of the welder’s headgear, it interfered with the optics bracket, preventing the optics from getting close enough. Because the forehead band sat so low, the welder’s headgear also required a top strap.

Our new headgear design sits higher and wider, taking on the role of the top strap while dispersing more weight. Choosing against a top strap was important to make it self-evident how the device is worn, making it more inviting and a more seamless experience. New users shouldn’t need help to put on the device.

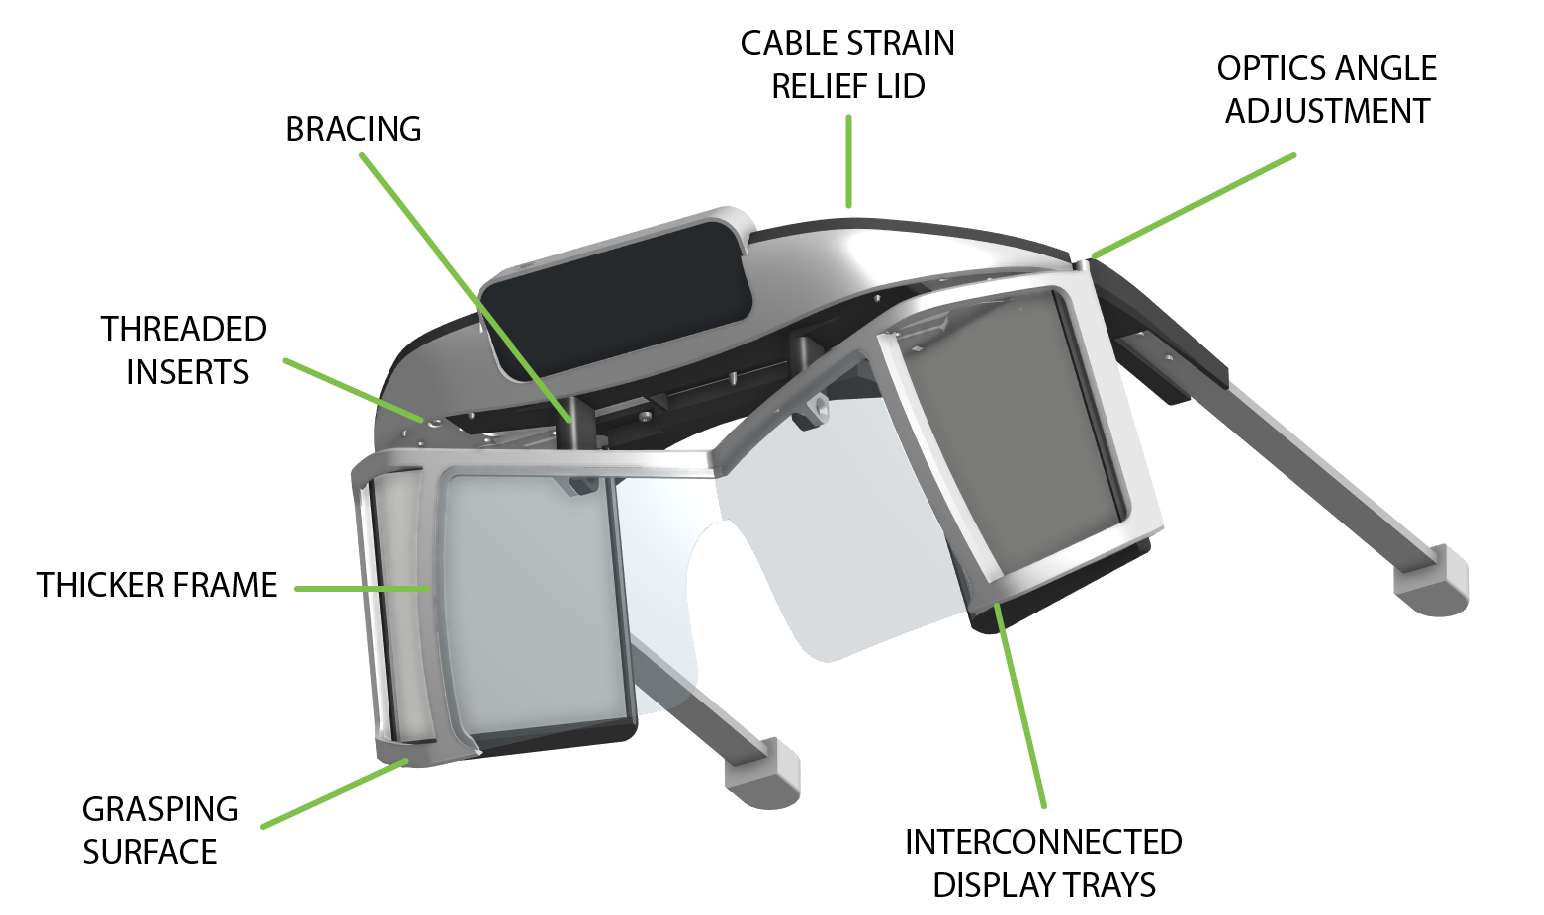
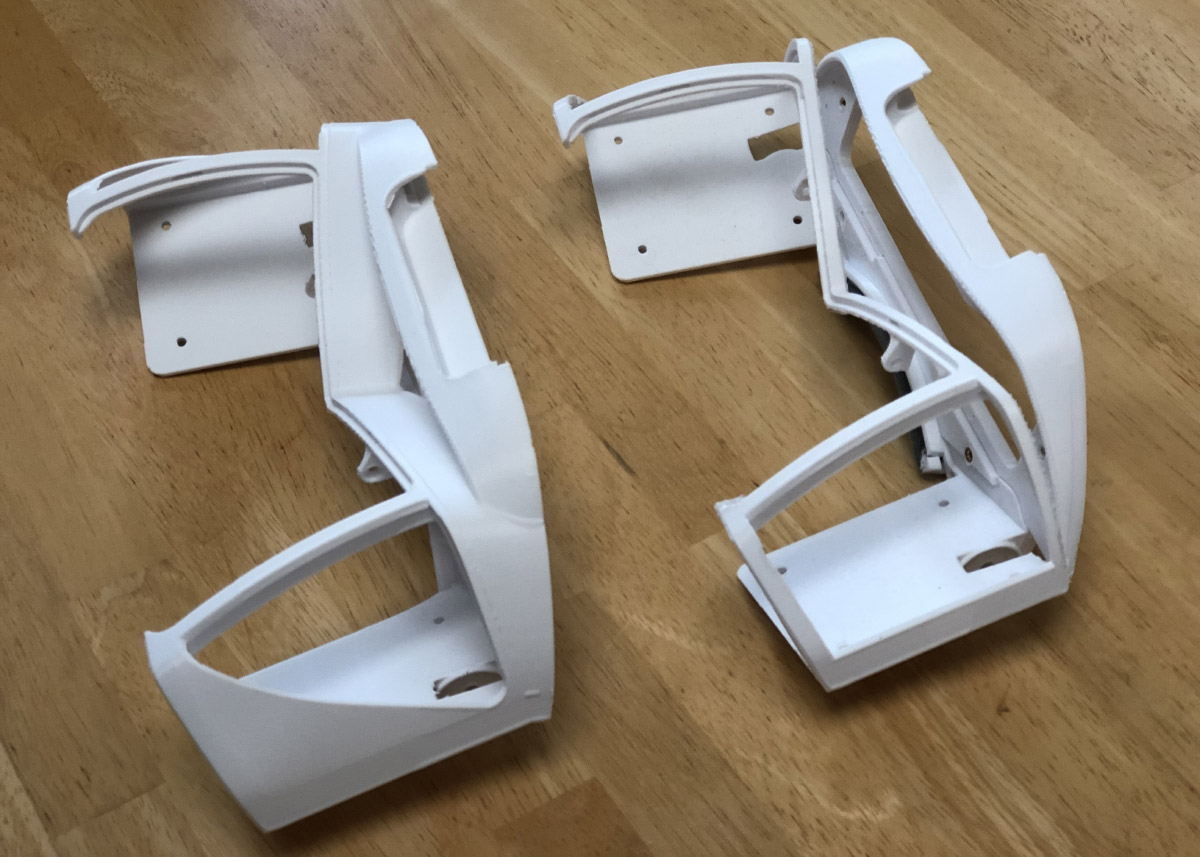
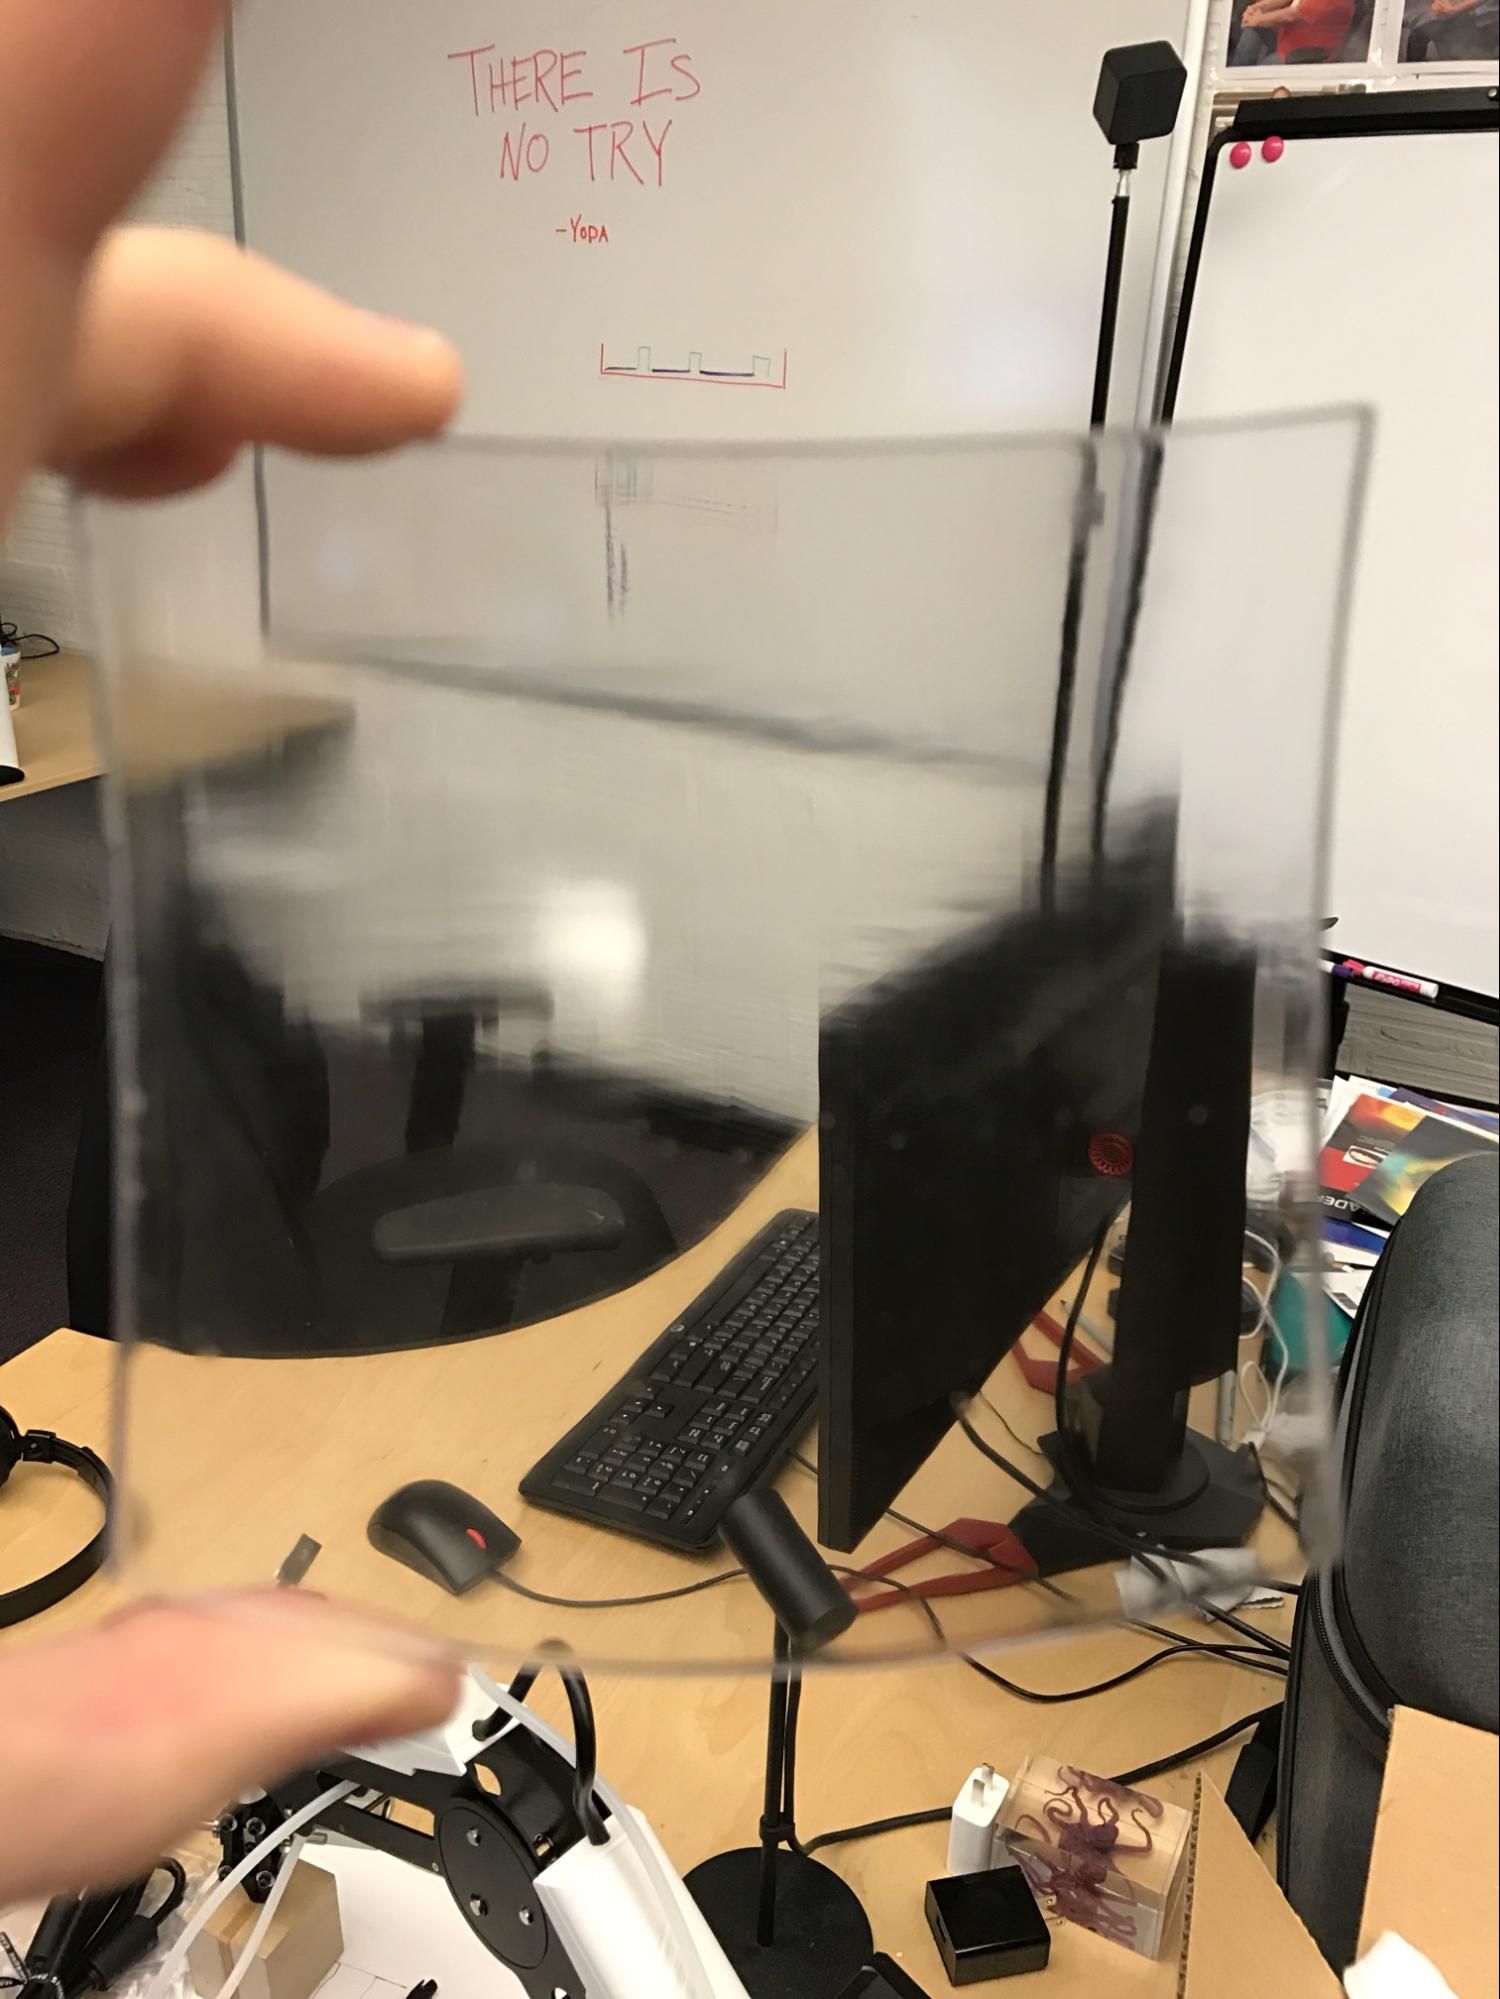
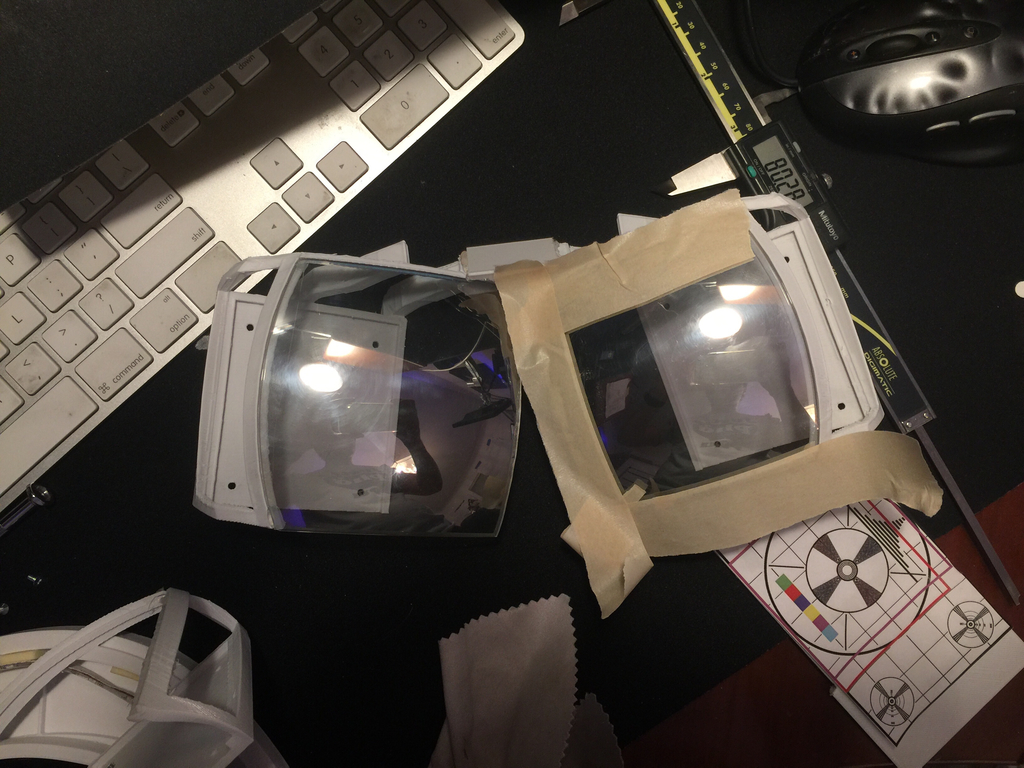
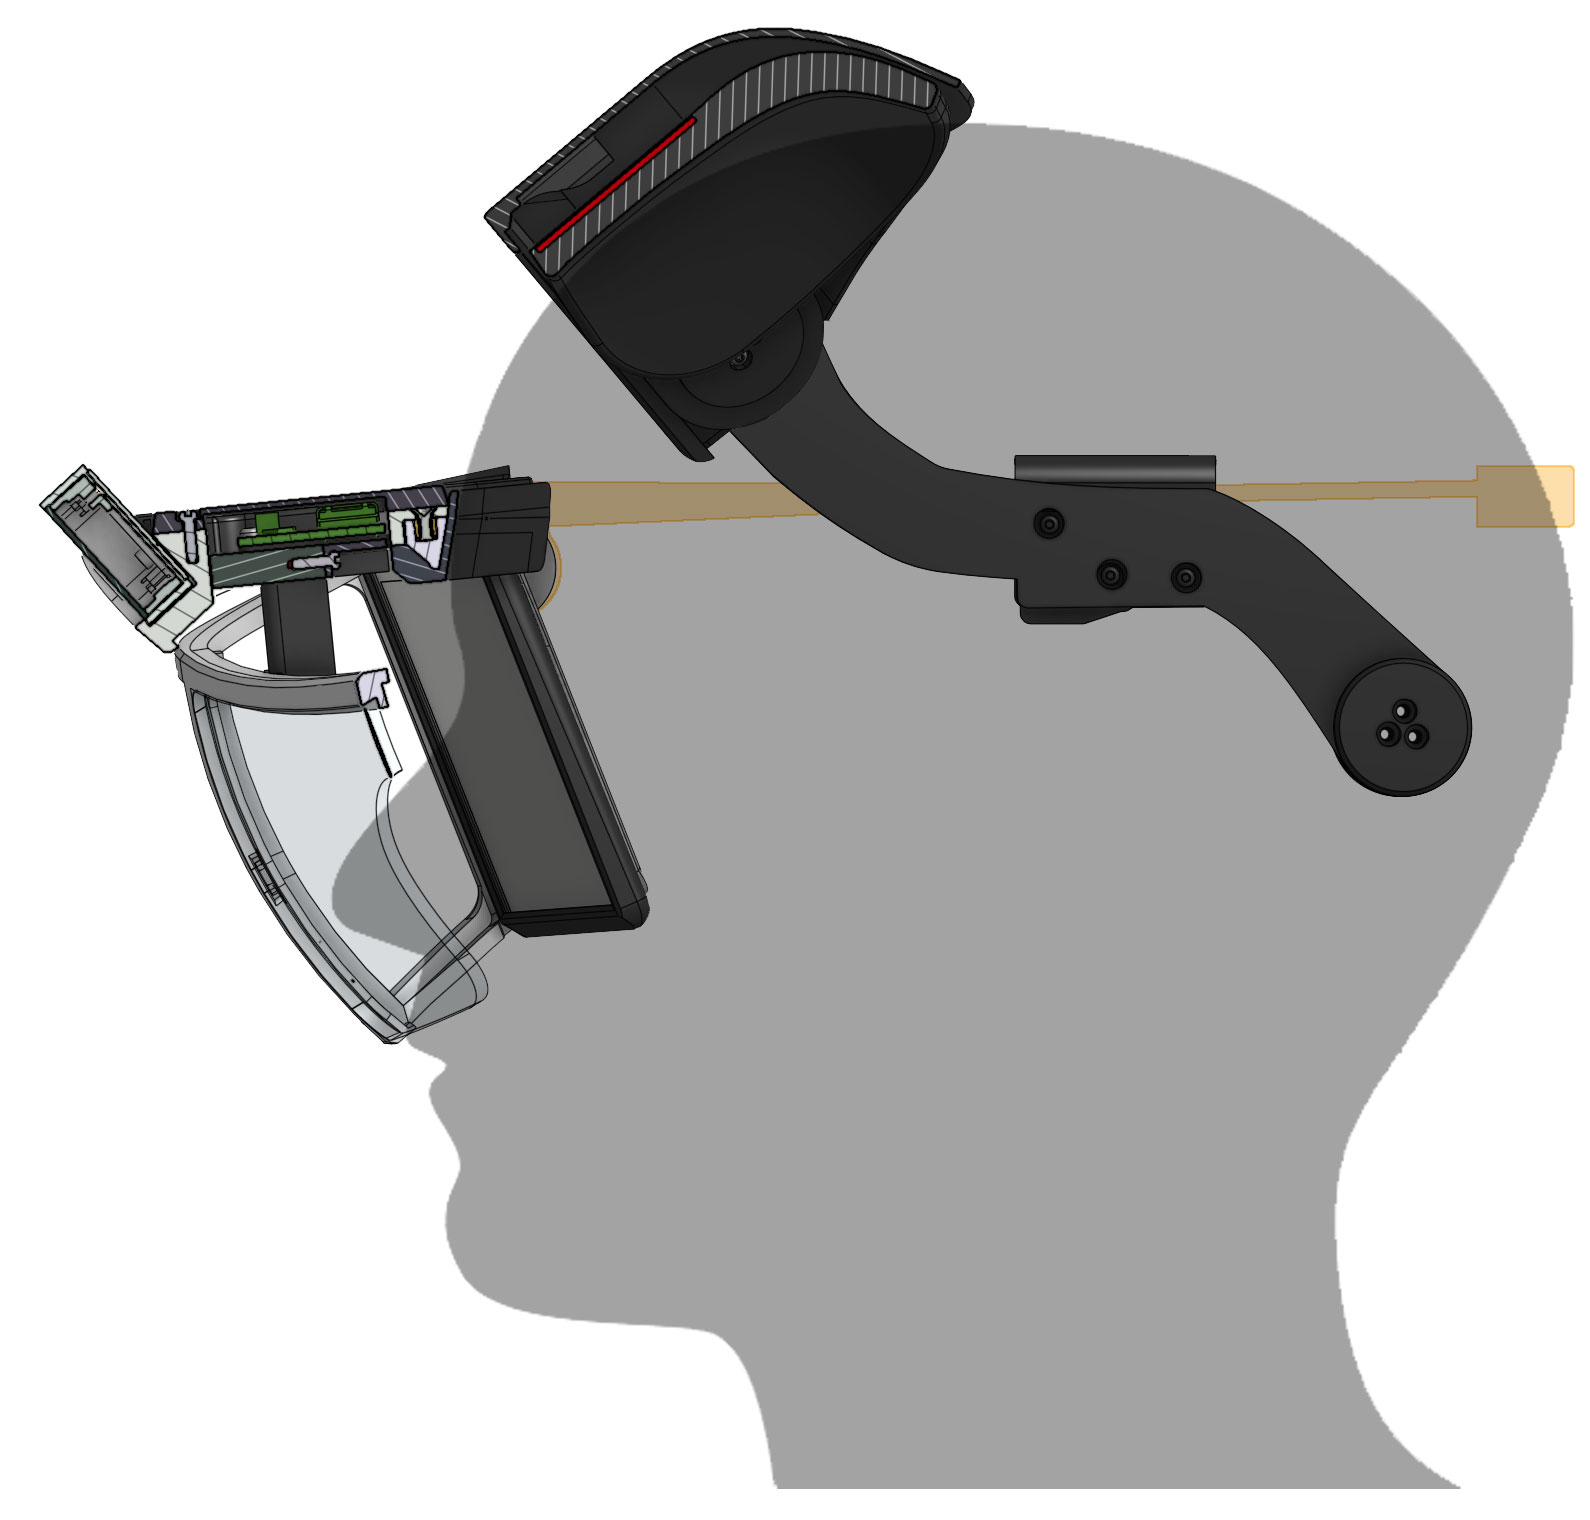
Another problem with the previous designs was slide-away optics. The optics bracket would slide away from the face occasionally, especially if the user tried to look downward.

Now, in addition to the new forehead, brakes are mounted to each side of the headgear. The one-way brake mechanism allows the user to slide the headset towards their face, but not outwards without holding the brake release. The spring is strong enough to resist slipping – even when looking straight down – but can be easily defeated by simply pulling with medium force in case of emergency.

Weight, balance, and stiffness comes as a whole. Most of the North Star headset’s weight comes from the cables. Counterbalancing the weight of the optics by guiding the cables to the back is crucial for comfort, even if no weight is removed. Routing the cables evenly between left and right sides ensures the headset isn’t imbalanced.

By thickening certain areas and interlocking all the components, we stiffened the design so the whole structure acts cohesively. Now there is much less flexure throughout. Earlier prototypes included aluminum rods to stiffen the structure, but clever geometry and better print settings offered similar performance (with a few grams of weight saved)! Finally, instead of thread-forming screws, brass inserts were added for a more reliable and repeatable connection.

Interchangeable focal distances. Fixed focal distances are one of the leading limiting factors in current VR technology. Our eyes naturally change focus to accommodate the real world, while current VR tech renders everything to the same fixed focus. We spent considerable time determining where North Star’s focal distance should be set, and found that it depends on the application. Today we’re releasing two pairs of display mounts – one at 25cm (the same as previous releases) and the other at an arm length’s 75cm. Naturally 75cm is much more comfortable for content further away.

Finally, a little trick we developed for this headgear design: bending 3D prints. An ideal VR/AR headset is light yet strong, but 3D prints are anisotropic – strong in one direction, brittle in another. This means that printing large thin curves will likely result in breaks.

Instead, we printed most of the parts flat. While the plastic is still warm from the print bed, we drape the plastic over a mannequin head. A few seconds later, the plastic cools enough to retain the curved shape. The end result is very strong while using very little plastic.

While the bleeding edge of Project North Star development is in our San Francisco tech hub, the work of the open source community is a constant source of inspiration. With so many people independently 3D printing, adapting, and sharing our AR headset design, we can’t wait to see what you do next with Project North Star. You can download the latest designs from the Project North Star GitHub.

The post Project North Star: Mechanical Update 3 appeared first on Leap Motion Blog.

Bending Reality: North Star’s Calibration System

$
0
0

Bringing new worlds to life doesn’t end with bleeding-edge software – it’s also a battle with the laws of physics. With new community-created headsets appearing in Tokyo and New York, Project North Star is a compelling glimpse into the future of AR interaction. It’s also an exciting engineering challenge, with wide-FOV displays and optics that demanded a whole new calibration and distortion system.

Just as a quick primer: the North Star headset has two screens on either side. These screens face towards the reflectors in front of the wearer. As their name suggests, the reflectors reflect the light coming from the screens, and into the wearer’s eyes.

As you can imagine, this requires a high degree of calibration and alignment, especially in AR. In VR, our brains often gloss over mismatches in time and space, because we have nothing to visually compare them to. In AR, we can see the virtual and real worlds simultaneously – an unforgiving standard that requires a high degree of accuracy.

North Star sets an even higher bar for accuracy and performance, since it must be maintained across a much wider field of view than any previous AR headset. To top it all off, North Star’s optics create a stereo-divergent off-axis distortion that can’t be modelled accurately with conventional radial polynomials.


North Star sets a high bar for accuracy and performance, since it must be maintained across a much wider field of view than any previous augmented reality headset.
Click To Tweet


How can we achieve this high standard? Only with a distortion model that faithfully represents the physical geometry of the optical system. The best way to model any optical system is by raytracing – the process of tracing the path rays of light travel from the light source, through the optical system, to the eye.[1] Raytracing makes it possible to simulate where a given ray of light entering the eye came from on the display, so we can precisely map the distortion between the eye and the screen.[2]

But wait! This only works properly if we know the geometry of the optical system. This is hard with modern small-scale prototyping techniques, which achieve price effectiveness at the cost of poor mechanical tolerancing (relative to the requirements of near-eye optical systems). In developing North Star, we needed a way to measure these mechanical deviations to create a valid distortion mapping.

One of the best ways to understand an optical system is… looking through it!. By comparing what we see against some real-world reference, we can measure the aggregate deviation of the components in the system. A special class of algorithms called “numerical optimizers” lets us solve for the configuration of optical components that minimizes the distortion mismatch between the real-world reference and the virtual image.


Leap Motion North Star calibration combines a foundational principle of Newtonian optics with virtual jiggling.
Click To Tweet


For convenience, we found it was possible to construct our calibration system entirely in the same base 3D environment that handles optical raytracing and 3D rendering. We begin by setting up one of our newer 64mm modules inside the headset and pointing it towards a large flat-screen LCD monitor. A pattern on the monitor lets us to triangulate its position and orientation relative to the headset rig.

With this, we can render an inverted virtual monitor on the headset in the same position as the real monitor in the world. If the two versions of the monitor matched up perfectly, they would additively cancel out to uniform white.[3] (Thanks Newton!) The module can now measure this “deviation from perfect white” as the distortion error caused by the mechanical discrepancy between the physical optical system and the CAD model the raytracer is based on.

This “one-shot” photometric cost metric allows for a speedy enough evaluation to run a gradientless simplex Nelder-Mead optimizer in-the-loop. (Basically, it jiggles the optical elements around until the deviation is below an acceptable level.) While this might sound inefficient, in practice it lets us converge on the correct configuration with a very high degree of precision.[4]


This might be where the story ends – but there are two subtle ways that the optimizer can reach a wrong conclusion. The first kind of local minima rarely arises in practice.[5] The more devious kind comes from the fact that there are multiple optical configurations that can yield the same geometric distortion when viewed from a single perspective. The equally devious solution is to film each eye’s optics from two cameras simultaneously. This lets us solve for a truly accurate optical system for each headset that can be raytraced from any perspective.

In static optical systems, it usually isn’t worth going through the trouble of determining per-headset optical models for distortion correction. However, near-eye displays are anything but static. Eye positions change for lots of reasons – different people’s interpupillary distances (IPDs), headset ergonomics, even the gradual shift of the headset on the head over a session. Any one of these factors alone can hamper the illusion of augmented reality.

Fortunately, by combining the raytracing model with eye tracking, we can compensate for these inconsistencies in real-time for free![6] We’ll cover the North Star headset’s eye tracking capabilities in a future blog post.

The post Bending Reality: North Star’s Calibration System appeared first on Leap Motion Blog.

How a Self-Taught Teen Built His Own North Star Headset

$
0
0

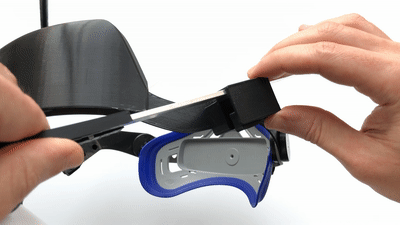
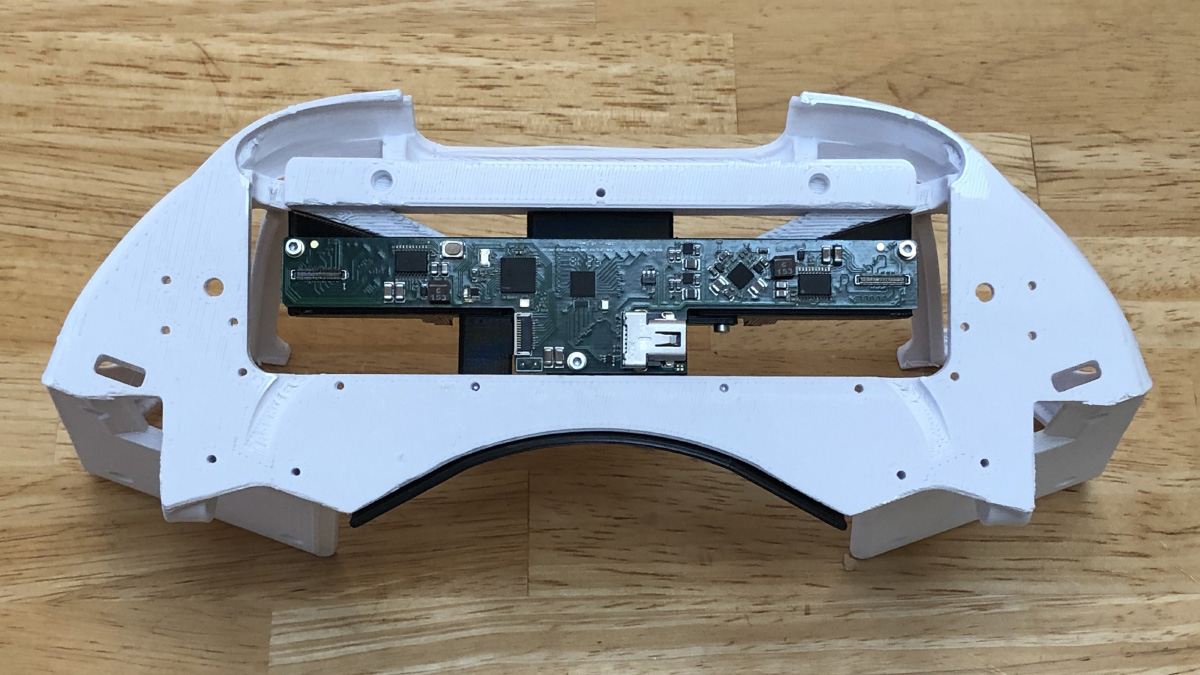
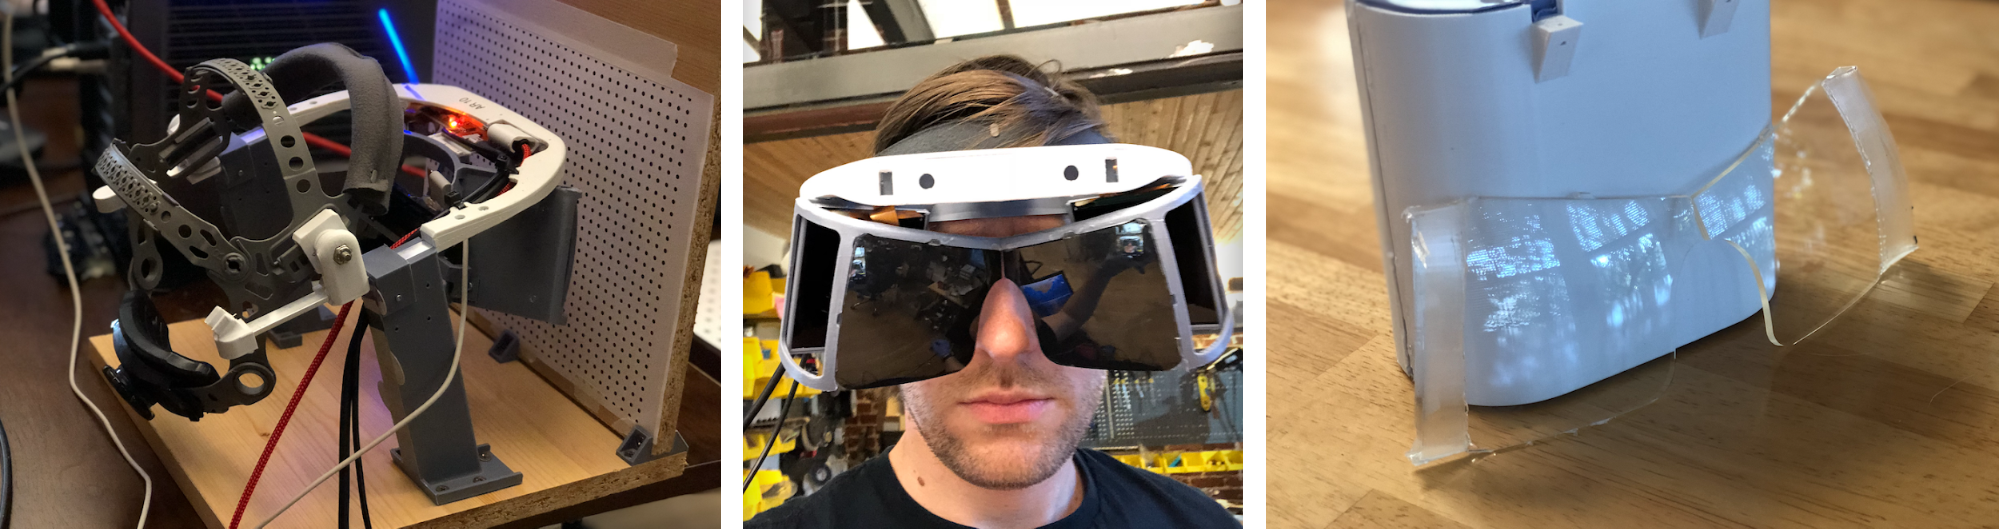
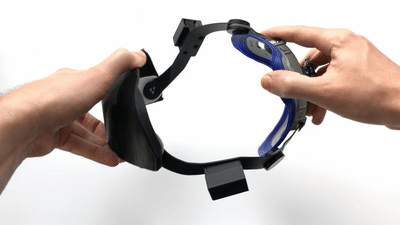
 Over the past few months we’ve hit several major milestones in the development of Project North Star. At the same time, hardware hackers have built their own versions of the AR headset, with new prototypes appearing in Tokyo and New York. But the most surprising developments come from North Carolina, where a 19-year-old AR enthusiast has built multiple North Star headsets and several new demos.

Graham Atlee is a sophomore at High Point University in North Carolina, majoring in entrepreneurship with a minor in computer science. In just a few months, he went from concept sketches and tutorials to building his own headsets. Building augmented reality demos in Unity with North Star is Graham’s first time programming.

Graham records his North Star videos through a hacked Logitech webcam. (As this lacks a heatsink, it’s not recommended for use by anyone.)

“You have to go in and click around, and see what breaks this and that.” For Graham, it’s been a mix of experimentation with computer science textbooks and (naturally) Stack Overflow. Coding “was kind of daunting at first, but it’s like learning a language. Once you pick it up it becomes part of you.”

On the hardware side, Graham is entirely self-taught. He was able to follow build tutorials from Japanese dev group exiii, which include links to all the parts. “Assembling the headset itself is pretty stressful. Be careful with the screws you use, because the plastic is kind of fragile and can crack.”


Augmented reality is going to change the Internet and surpass the World Wide Web.
Click To Tweet


Graham built his first North Star headset using reflectors from exiii, and later upgraded to higher-quality injection-molded lenses from Wearpoint founder Noah Zerkin.

“Augmented reality is going to change the Internet and surpass the World Wide Web. I think it’s going to be bigger than that. It might sound ridiculous or idealistic, but I truly believe that’s where it’s going.” But the real impact of AR however won’t be felt until the latter half of the 2020s. “People in the AR industry like to argue from analogy – ‘this is where the iPhone was.’ The more cynical people say it’s closer to Alan Turing’s machine.”


We need help to figure out what we call the TUI (Tangible User Interface). With North Star I’ve realized how important hands are going to be to the future of AR.
Click To Tweet


By starting a new sharing site – Pumori.io, named after a Himalayan mountain – Graham hopes to collaborate with the open source AR community to explore and create new ways of manipulating information.

“Ideally, we want a situation where anyone can build an AR headset and run spatial computing applications on it. We need help to figure out what we call the TUI (Tangible User Interface). I want to explore rich new interactions, provide stable 3D interfaces, and open-source them for people to use. With North Star I’ve realized how important hands are going to be to the future of AR.”

The post How a Self-Taught Teen Built His Own North Star Headset appeared first on Leap Motion Blog.

Project North Star: Mechanical and Calibration Update 3.1

$
0
0

The future of open source augmented reality just got easier to build. Since our last major release, we’ve streamlined Project North Star even further, including improvements to the calibration system and a simplified optics assembly that 3D prints in half the time. Thanks to feedback from the developer community, we’ve focused on lower part counts, minimizing support material, and reducing the barriers to entry as much as possible. Here’s what’s new with version 3.1.

Introducing the Calibration Rig

As we discussed in our post on the North Star calibration system, small variations in the headset’s optical components affect the alignment of the left- and right-eye images. We have to compensate for this in software to produce a convergent image that minimizes eye strain.

Before we designed the calibration stand, each headset would need to have its screen positions and orientations manually compensated for in software. With the North Star calibrator, we’ve automated this step using two visible-light stereo cameras. The optimization algorithm finds the best distortion parameters automatically by comparing images inside the headset with a known reference. This means that auto-calibration can find best possible image quality within a few minutes. Check out our GitHub project for instructions on the calibration process.

Mechanical Updates

Building on feedback from the developer community, we’ve made the assembly easier and faster to put together. Mechanical Update 3.1 introduces a simplified optics assembly, designated #130-000, that cuts print time in half (as well as being much sturdier).

The biggest cut in print time comes from the fact that we no longer need support material on the lateral overhangs. In addition, two parts were combined into one. This compounding effect saves an entire workday’s worth of print time!

Left: 1 part, 95g, 7 hours, no supports. Right: 2 parts, 87g, 15 hour print, supports needed.

The new assembly, #130-000, is backwards compatible with Release 3. Its components substitute #110-000 and #120-000, the optics assembly, and electronics module respectively. Check out the assembly drawings in the GitHub repo for the four parts you need!

Cutout for Power Pins

Last but not least, we’ve made a small cutout for the power pins on the driver board mount. When we received our NOA Labs driver board, we quickly noticed the interference and made the change to all the assemblies.

This change makes it easy if you’re using pins or soldered wires, either on the top or bottom.

Want to stay in the loop on the latest North Star updates? Join the discussion on Discord!

The post Project North Star: Mechanical and Calibration Update 3.1 appeared first on Leap Motion Blog.

Viewing all 481 articles
Browse latest View live