Quantcast
Channel: Leap Motion Blog
Viewing all 481 articles
Browse latest View live

Cast Spells, Summon Meteors, and Unleash Your Inner Warlock

$
0
0

Magical powers are no longer the stuff of fantasy – not when we can dive into alternate universes.

From the creators of Magicraft, Warlock VR took the second place in this year’s 3D Jam VR Track for its awe-inspiring visuals and satisfying game mechanics. Inside a massive castle hall, you can bring down massive meteors, shoot fireballs, and summon lightning. Storm Bringer Studios have also released Warlock Battle, a multiplayer successor where you can pit your skills against live opponents. Both demos are available free for download on our Developer Gallery.

WarlockVR

Warlock VR first emerged on the Oculus forums, where it was dubbed “Mage Battle VR.” Here’s what it looked like at the prototyping phase back in October:

And here’s what a multiplayer magic duel looks like with our older V2 software. (Both games are also fully compatible with the new Orion software!)

The road from prototype to polished demo involved a lot of testing and experimentation. “We started experimenting and tried possibly a dozens on gestures and spell selection schemes,” says Irakli Kokrashvili, co-founder and CEO of the Georgian studio. “We were inviting testers and observing their reactions, how they were trying to cast spells. We were pleased to see the joy and fun they were having throwing spells with bare hands.”

After the end of the 3D Jam and some positive reviews, the team decided it would be cool if players could battle each other. A quick proof of concept and a few weeks of development later, Warlock Battle was born. “We noted one big downside though. We were spending more and more time ‘testing’ the game and dueling, because it was so addictive! Then we found out that we got 2nd place in the VR/AR track – we couldn’t believe it was true at first.”

“People were discussing our game over the Net, something that was only in our minds a few months ago. Comments like ‘This is what VR is supposed to be,’ ‘Take my money now,’ ‘Add some story and release this ASAP.'”

At this stage, he says, the team is thinking about the best way to make a full game from the experience. The magic is only just beginning. To follow the latest Storm Bringer developments, be sure to check out their Warlock VR Facebook page.

Storm Bringer would also like to thank IliaUni Gamelab and GITA (Georgian Innovation and Technology Agency) for their support.

The post Cast Spells, Summon Meteors, and Unleash Your Inner Warlock appeared first on Leap Motion Blog.


How to Upgrade to the Orion Core Unity Assets

$
0
0

We’ve just released an updated version of our newly overhauled Unity Core Assets for the Orion Beta. Along with major performance improvements and an improved workflow, you also now have access to the first of many add-on modules. There’s never been a better time to upgrade from the older Unity assets for V2 tracking, so we put together a quick guide to show you how.

These are truly “core” Core Assets, so there are some features missing from the current Orion assets. If your project relies on the following, you might want to wait:

  • The recording/playback functionality of HandController
  • Image Hands
  • Rigged hands (except for the new “Capsule Hands” seen in Blocks)
  • Widgets

NOTE: Simply trying to move the old scripts for these resources into the Orion assets will not work. We are currently working on adding this functionality back into the assets.

Step 1

Delete the current Leap Motion assets from your project. This will probably cause compile errors, script unlinks, and generally break everything.

Step 2

Import the new assets into your project. This is not expected to fix compile errors or script links. But we’re on the right path!

Step 3

Resolve compile errors:

  • Any references to HandController.GetFrame() should now be directed at LeapProvider.CurrentFrame.
  • For any component that references LeapProvider, you will need to add a serialized LeapProvider field to the component, and link it to the LeapProvider component via the Unity gameObject inspector.

Step 4

Verify that demo scenes work. Visit Assets/LeapMotion/Scenes/Leap_Hands_Demo or Leap_Hands_Demo_VR to verify that the Orion Core Unity Assets are functioning correctly.

Step 5

Change coordinate space references in scripts.

Previously, if you wanted to get the position of the palm of a hand, you might have done something like this to convert from the Leap Motion coordinate space to the Unity coordinate space:

handController.transform.TransformPoint(hand.PalmPosition.ToUnityScaled());

With our new system, the Frame object is converted to the Unity coordinate space ahead of time. This saves time and improves performance because the calculations don’t have to be continuously repeated each time you want to access a position, but it also means that the code would need to be updated:

hand.PalmPosition.ToVector3();

Step 6

Re-create your camera rig.

We recommend that you create your camera rig by starting with the LMHeadMountedRig, and adding or changing things about it to create your own camera rig. Here’s a quick tour of the new camera rig and its components.

CenterEyeAnchor:

  • Camera: The main camera object for the camera rig. Target eye should be ‘Both’!
  • LeapImageRetriever: Responsible for uploading the controller’s video passthrough and other relevant image information to the graphics card.
  • LeapVRCameraControl: Responsible for overriding the IPD and camera position in the case that Image/Hand alignment is desired. Also dispatches useful camera events that other scripts are dependent on. If you don’t want Image/Hand alignment, we highly recommend unchecking OverrideEyePosition so that the user’s IPD is normal!

LeapSpace:

  • LeapVRTemporalWarping: Responsible for applying the correct offset to the movement of the camera rig to account for any latencies or differences in movement. This can drastically help the feeling of ‘swaying’ that can otherwise happen when the head moves.

LeapHandController:

  • LeapProvider: Responsible for acquiring frames from the service and making them available to the scene. Also responsible for doing the conversion from the Leap Motion coordinate space to the Unity coordinate space.
  • HandPool: Responsible for organizing Hand objects. Used by the user to specify the hand representations they want in the scene.
  • LeapHandController: Acts as the ‘glue’ between LeapProvider and HandPool. Acquires hand representations from HandPool, and drives them using frame data acquired from LeapProvider.

QuadBackground:

  • This quad is rendering using a special shader that accesses the controller’s image data. The quad is rendered behind all other objects, allowing objects like Leap Motion hands to align with it. It can be disabled or removed if you don’t plan to have an image background in your scene.

Step 7

Test it! If you run into any mysterious errors, please post the error report and troublesome code sample in our community forums.

The post How to Upgrade to the Orion Core Unity Assets appeared first on Leap Motion Blog.

Redesigning Our Unity Core Assets: New Workflow and Architecture for Orion

$
0
0

Leap Motion’s new Orion software represents a radical shift in our controller’s ability to see your hands. In tandem, we’ve also been giving our Unity toolset an overhaul from the ground up. The Core Asset Orion documentation has details on using the tools and the underlying API, but to help you get acquainted, here’s some background and higher-level context for how the package works and where it’s headed.

VR involves some intense performance demands. To meet these demands, we’ve been looking at every step of our pipeline. We started with a brand new LeapC client architecture for streamlined data throughput from the Leap service into Unity. This takes advantage of a new, closer-to-the-metal API that’s built in C. Then we significantly refactored the final step of our pipeline, our Unity hand control classes. This was driven by what we’ve learned from several years of developing with Leap Motion hands and an eye towards both performance and workflow.

The new Core Asset is a minimalist subset of previous releases – you could probably call it the “core” Core Asset. We’ve also started down our new roadmap of add-on modules, starting with the new Pinch Utilities Module. This will both upgrade our existing tools and expand it with new features. In the weeks to come, we’ll be releasing modules like a package of both new and updated hand models and scripts, a new update to our Leap Motion VR Widgets, and other modules that will make your toolbox more powerful than ever.

New Workflow for Hands in Unity

Performance optimization was the key driver as we started rebuilding our client side pipeline with a new LeapC implementation of our API. And since we were rearchitecting the set of C# classes that drives our hands to work with our shiny new LeapC API bindings, we also had the chance to improve some of our Unity workflow.

One key workflow improvement we’ve created is what we call “persistent hands.” This means that you can now see Leap Motion hand models – 3D representations with Leap IHandModel scripts attached – in the Unity Editor hierarchy window and in the scene view at editor time. We’ve done this by having a few methods in the IHandModel that execute at Editor update time and not at runtime. There are now default poses for Leap Motion hands that are sent to the hand models to initialize and pose them in the scene view.

orion_unity_3

This is huge, because now you can visualize your 3D hands compared to the rest of the objects in your scene without having to play, place your hands in front of the controller, and then pause. Pressing my mouse with my nose or elbow while holding my hands up many times over the last year drove home the value of this feature. Combined with the LeapHandController’s frustum gizmo (visible in the Scene view if you have the LeapHandController GameObject selected), this is a helpful way to gauge where and how far your hands will reach in your scene.

Another workflow enhancement is that by having our geometry + script hand assemblies as instances in our Unity scenes – instead of instantiating at runtime – it’s now easier to drive hands that may be attached to larger hierarchies. This makes it easier to experiment with driving avatars and characters.

To support this, we’ve also added an abstract class called HandTransitionBehavior.cs, which is attached to a hand model and called when the model receives or loses Leap Motion hand data. For this beta, we’ve implemented the simplest version of this possible with HandEnableDisable.cs which – wait for it – enables and disables the hand model. More importantly, developers can now easily implement their own behaviors, say fading or dropping, to trigger when a hand model transitions between tracking and not tracking.

Additionally, we’ve created an abstract interface class for our Leap HandModels, called IHandModel.cs. This new class allows developers more freedom in how you build Leap Motion hand models. So if you want to make hands out of flame particles, metaballs, or whatever inspired hands you dream up, you can wrap them in an IHandModel to drive them with Hand data. And as you build them, you’ll be able to see how Leap Motion data will affect them directly in the Editor. We’re just beginning to use this new functionality ourselves as we build our next generation of hand models.

How the New Unity Architecture Works

With this new workflow and optimizations to our class architecture, we now have a different structure to our Prefabs and their Monobehavior components. Additionally, Unity’s new VR support and the Oculus 0.8.0 runtime allow us to have simpler camera rig prefabs.

As in previous releases, LeapHandControllers are attached to these camera rig prefabs. Then, instead of instantiating hand prefabs from the Unity project’s asset collection at runtime, hand models need to be present in the hierarchy as instances. This means dragging in hand prefabs first and then dragging those instances to their respective slot on the new HandPool component, which sits alongside the new LeapHandController component.

Our Core Asset package has been, until now, anchored by the HandController class, which over time had grown to serve multiple roles. One of our first tasks in rebuilding the Core Asset was to split the roles of the old HandController into several simple smaller C# classes. For this, we took inspiration for the programming pattern called the Factory pattern which provides a nice metaphor for understanding how our Unity-side system works. In the Factory pattern, there’s an Assembler that uses a Factory to make Products.

orion_unity_2

The new, greatly simplified LeapHandController.cs acts as our Assembler. It uses our new HandPool.cs as the Factory. The HandPool’s Products are HandRepresentations, which are combinations of a 3D hand model and script assembly paired with the Leap Hand data to drive them.

You can watch this in action if you run either our the Core Asset example scenes (/Assets/LeapMotion/Scene/) with the LeapHandController GameObject selected. If you watch the HandPool component you’ll see all the hand models from the scene added to the Model Pool at start. Then, when a person’s hand begins being tracked, LeapHandController asks the HandPool for a new graphics HandRepresentation and a physics HandRepresentation. You’ll see those models removed from the Model Pool. And when the person’s hand leaves tracking, you’ll see both of the those models added back to the pool to be ready for the next Leap Hand assignment.

orion_unity_1

To flesh out this part of the system, the new LeapProvider class, attached to the same GameObject as the LeapHandController, deals with getting all the hand position data from the Leap Service. Again this is an example of removing this task from our LeapHandController to make for collection of simpler components vs. fewer but more complex, harder to understand scripts.

As always, we’re looking forward to your feedback and truly looking forward to the next batch of Leap Motion VR projects. Stayed tuned for more updates as we build new add-on modules in the weeks to come.

The post Redesigning Our Unity Core Assets: New Workflow and Architecture for Orion appeared first on Leap Motion Blog.

Power at Your Fingertips: Pinch Utilities for Orion

$
0
0

You can do a lot of things with Blocks: smack them around, turn off gravity, select different modes and shapes. But at its heart, our flagship demo for Orion contains two fundamental interactions – creating blocks and grabbing blocks. These are built on pinching and grabbing, which are based on how we naturally use our hands in the real world.

This week we’re excited to share Pinch Utilities, a new module for our Unity Core Assets that gives you access to the power of pinch. Pinch Utilities is a basic component for detecting a pinch gesture and providing useful information about it. With the radically enhanced tracking capabilities of Orion, this fundamental interactive “building block” makes it possible to interact with digital content like never before.

As part of this release, we’ve included two simple demos that show how you can integrate Pinch into your project – Pinch Move and Pinch Draw.

PinchSquare

With Pinch Move, you can twist, transform, and explore the inside of a Menger sponge. Pinching with one hand instantly locks the cube’s motions to your hand, so that you can easily move it around. Use two hands to rotate the shape and change its size. Shrink it to the size of a building block, or stretch it into infinity. The demo includes options for single-axis or full object rotation.

Pinch Draw is a simple creative demo that uses pinch interactions to create sketches in midair – transforming your fingers into 3D paintbrushes. Simple interactions like these can be a powerful foundation to more complex experiences.

Inside the Pinch Utilities module, you’ll find a Unity Behavior called LeapPinchDetector. This is the reusable component that detects the gesture and provides your project with the information it needs.

Pinch Utilities just the first of many fundamental building tools that we have in development. So fire up the demos, start building, and let us know what modules you’d like to see next!

PinchDraw

The post Power at Your Fingertips: Pinch Utilities for Orion appeared first on Leap Motion Blog.

Defeat Your Enemies with Rock-Paper-Scissors in RPS Island

$
0
0

One of the most widely played games on the face of the planet is your only means of survival in RPS Island. Created by ISVR, it took third place in this year’s 3D Jam VR Track for addictive gameplay and solid interaction design. Faced with a never-ending onslaught of enemies on a tropical island, you must defeat them by signalling their weakness. The demo is available free for download on our Developer Gallery.

rps

ISVR is an indie studio based in Beijing, formed last year to focus on VR game development. RPS Island was originally inspired by games between ISVR founder Yi Zhang and his five-year-old daughter. “We have lot of fun with it, so it came into my mind when we decided to join the 3D Jam. We designed lots of details for characters, background story, etc. and we hope players could have a new experience with RPS.”

rps-island-team

Yi has worked as a game artist and programmer since 2004, producing PC, web, and mobile games. We asked him about his preferred RPS strategy, and while there is random chance involved, he points out that it’s often possible to outthink human opponents.

“There are some Chinese professors who reported on social cycling and conditional responses in rock-paper-scissors. The result is there are a few more people who choose ‘rock’ than others, and if the player didn’t lose in this round (won or tied), in the next round there is a higher possibility he will choose the same.”

Despite building an award-winning game around rock-paper-scissors, it seems like ISVR has terrible luck in the real world – at a recent developer meetup where the game was played, they all lost in the first round. “And later people asked me what VR game we did. I told them RPS Island…”

“My daughter also outthinks me, and she enjoys defeating me a lot.”

The post Defeat Your Enemies with Rock-Paper-Scissors in RPS Island appeared first on Leap Motion Blog.

Build and Smash Voxel Worlds with A Vox Eclipse and Dino Destroyer

$
0
0

One mass extinction event wasn’t enough! Earth’s remaining dinosaur population is making a comeback. In Vox Rocks Dino Destroyer, you can blast through four levels of block-filled action with the power of magnetics, color coordination, and broken dino teeth. Created by Mark Mayer, Dino Destroyer is the 4th place winner of the 3D Jam VR Track.

But before the dinosaur apocalypse, there was A Vox Eclipse – a desktop game that lets you design block creations by combining hand gestures with traditional button controls. Rotate, re-position and highlight your model with your dominant hand, and use your other hand to click or type to command the tools you need. We caught up with Mark to talk about his development process and how he made the jump from desktop to VR.

VoxEclipse

A Vox Eclipse

Inspired by apps like Sculpting, Mark’s original idea behind A Vox Eclipse “was that using a combination of physical buttons for activated input and Leap Motion’s hand positioning for a fully 3D cursor could help me interact a lot more effectively by taking best of both worlds. I was already working on some voxel ideas in Unity and rolled them in to create A Vox Eclipse.”

A Vox Eclipse is open sourced on GitHub and was built in Unity, Visual Studio (Community Edition), and Adobe Illustrator. “Most of my scripting is done in a separate Visual Studio project which builds managed code DLLs that are automatically deployed to my Unity project. I appreciate the added modularity the DLLs create without needing to import and export Unity packages, and it makes for a trimmer Unity project overall. For A Vox Eclipse, I used Illustrator to create the basic block palettes and the overall UI as easily scaleable vector art.”

“From a learning perspective, I could see it used as a very rudimentary introduction to the world of 3D modeling. Creating things with virtual blocks is a lot simpler than placing verts on a mesh and being able to move your hand in 3D space around a model can be more intuitive than trying to manipulate a camera to correctly position a 2D camera.”

Vox Rocks Dino Destroyer

Development on Vox Rocks started after we visited Philly during the 2015 3D Jam Tour. “A few friends and I spent the next day or so kicking around ideas that focused on some of the bigger points made during Leap Motion’s presentation. Specifically, taking advantage of hand presence and the existence of depth perception. We landed on the idea of a ‘physics’ shooting gallery and development iterated on making that fun right up to the deadline. I kept a work in progress video channel going every week or so and flipping through it sort of illustrates the the game’s idea taking shape.”

“I’ve walked away with a much greater appreciation for new players and for getting their help prototyping new interactions as early as possible. Learning what hand motions are (and are not) making sense up front saves major time down the line. Ideas that just make sense after hours of playing with the Leap Motion Controller can (and most likely are) totally alien to a new player. So, if I can’t get my gamer friends to start understanding my game’s controls after a few sentences, I should probably start looking real hard at what it is I’m asking them to do.”

“That aside, there have been a lot of lessons learned around game development and Unity in general. Leap Motion’s Unity API documentation pages, the forums and (of course) Stack Overflow have been invaluable in getting this far. For my next VR project I’m looking to pull in a lot of the creation mechanics from A Vox Eclipse. I think the next goal is to put together a game that asks players build things up in addition to blowing them apart. For example, Superstruct was another personal jam entry favorite. I really liked its core use of user generated terrain to solve the given puzzles. I’m looking forward to working with that concept and seeing how it plays with Vox Rock’s shooting and magnetic puzzle mechanics.”

The post Build and Smash Voxel Worlds with A Vox Eclipse and Dino Destroyer appeared first on Leap Motion Blog.

Oculus Rift Consumer Edition FAQ

$
0
0

With the recent release of the Oculus Rift CV1 and 1.3 SDK, this is an exciting time for virtual reality. Here’s what you need to know to start playing and building with the consumer edition.

How can I build in Unity with the 1.3 SDK?

Upgrading to a new SDK can be time-consuming and complicated. But not today! With just one simple Unity patch, you’ll be ready to tackle the brave new world of consumer VR. Using our latest Unity Core Assets, just download Unity 5.3.4p1 and install the OVRPlugin for Unity 1.3.0.

If you’re updating a project from the 0.8 SDK, you’ll also want to check out Oculus’ migration guide.

How about Unreal Engine?

Unreal Engine 4.11 doesn’t currently have Oculus 1.3 support, but is coming soon in the 4.11.1 hotfix. Once it arrives, the new official Leap Motion UE4 plugin should work with it right away.

Orion_3

Do Leap Motion demos work with the 1.3 runtime?

Blocks, Geometric, Pinch Move, Lyra, and Pinch Draw have all been updated to Oculus SDK 1.3, with the new versions available alongside their earlier 0.8 counterparts. We’re also working on a solution to ensure that the VR Visualizer will be available across different runtimes.

Flight sim lovers will be excited to learn that FlyInside already offers 1.3 support. For older demos, you might also want to try a runtime switcher utility. Subscribe to our newsletter or follow us @LeapMotion in the days and weeks ahead. (Protip: the Oculus 1.3 tag in the gallery is also good place to check.)

Does the VR Developer Mount work with CV1?

Yes, we’ve updated our VR Developer Mount to be compatible with the latest generation of VR headsets, including the Oculus Rift and HTC Vive. The new kit features updated adhesives and a much longer 15-foot USB extension cable, allowing for room-scale flexibility. You can order it now from our web store.LMC_w_Oculus_Mount-web2_grande_c2bc43b2-53ac-4a4b-ab7e-4d76dc6e9571_large

If you want to adapt your older mount to work with the CV1, this quick hack will help.

(Updated April 5, 2016)

Does it interfere with CV1 tracking?

Not at all! On the DK2, the Leap Motion Controller covered three LEDs in the center of the faceplate, and it didn’t affect Constellation tracking in the slightest. The mount covers two LEDs on the CV1, leaving nine still visible to the tracking camera.

What can the mounted controller track?

The Leap Motion Controller’s field of view (FOV) is 150 degrees wide and 120 degrees deep (averaging 135 degrees). Since its FOV exceeds that of the CV1, your hands will always appear within the virtual FOV.

If you have any other questions about the VR Developer Mount and CV1 support, let us know in the comments!

The post Oculus Rift Consumer Edition FAQ appeared first on Leap Motion Blog.

Leap Motion VR Support Now Directly Integrated in Unreal Engine

$
0
0

Bringing hands into virtual reality just got a major upgrade. Now officially integrated in Unreal Engine 4.11, getnamo’s independent plugin for Leap Motion makes it faster and easier than ever to integrate Leap Motion Orion into your VR projects!

unreal_gif1 This popular community plugin is now the official plugin and brings new features like rigged character hands, Image Hands, passthrough, and built-in support for the Oculus Rift. Visit developer.leapmotion.com/unreal to get started.

The new plugin is also fully compatible with the radically new tracking capabilities of our Orion software. “It’s amazing to see the Leap Motion Controller improve over time in an engine where you have full control,” says getnamo, aka Jan Kaniewski.

“You could see hints of what it could be early on, but it was at times frustrating. Now with Orion that frustration is gone and you can just reach out and touch things. You know they’re not there, but in your mind and in your hands, phantom sensations give you momentary feelings of their solid realness.”

From Aerospace Engineer to VR Dreamsmith

Jan started his career as an aerospace engineer, but found the industry “glacial” and boring. After the launch of the first iPhone, he dove into the fledgling iPhone OS, creating a teaching app for quick mental mathematics. “The small audience that used it, loved it. It was an empowering opportunity. You could now build small, simple apps and they would affect thousands, potentially millions of people around the world. I was hooked.”

After ordering the Rift in 2013, Jan released several VR experiments, starting with Rift Mountain in the first Oculus VR Jam. This continued with Skycall: Rook Island, a “hilariously exhausting real bird flapping experience using Hydras in UDK. Around this time it hit me: dreamsmith. A childhood dream of mine was now real, just as I imagined it when I was young, running with outstretched hands with eyes fixed on an invisible horizon.”

“There is no return from that.”

Unreal Engine 4 and Open Source

With the release of UE4 as an open-source C++ game engine, getnamo catapulted into building input plugins, culminating with his Leap Motion project. Originally forked from Marc Weiser’s UE4 plugin, it’s evolved a lot over two years.

“UE4’s open source nature has started paying dividends and we’re getting a lot of really cool community projects and plugins all with a simple goal of being there in the future, together. This a core tenet for me. We’re all in this journey together, and you don’t know how wide your wings are until you take flight and then show others how to fly.”

Next Up: NexusVR.io

Jan’s next major project is one that he started with a small demo for the 2015 3D Jam – NexusVR. It lets you move between social spaces like VRChat, Convrge, Altspace, or JanusVR without having to drop out of VR. Multiplayer support is up next.

“We want to visit all places, see all things, so why not build a bridge and make the crossing a bit easier? It will be a cool place, one where you can play, socialize, or just see the wonders of the metaverse. Always bring your towel.”

nexusvr

The post Leap Motion VR Support Now Directly Integrated in Unreal Engine appeared first on Leap Motion Blog.


Hacking the (Old) VR Developer Mount for the Oculus Rift and HTC Vive

$
0
0

Earlier today, we released an update to our VR Developer Mount – with 15-foot extension cables and updated adhesives for curved headsets! If you want to adapt your older kit to the Oculus Rift CV1 and HTC Vive, here’s a quick guide that will help:

Thicker Adhesive Strips

The VR Developer Mount has a flat design that works perfectly for flat HMDs like the Rift DK2. To use it on the curved Rift CV1 and Vive faceplates, you’ll need a slightly thicker adhesive strip. This provides a stronger hold along the entire width of the mount.

Just about any 1/8″ adhesive strips should do the trick! You can get them from your local hardware store or from Amazon: http://bit.ly/DIYadhesive. And don’t worry – these strips won’t stain or leave nasty residue on your headset.

From there, here’s how to do it:

leap-motion-oculus-vive-mount-adaptation-guide

Cords

Room-scale virtual reality means longer cords, which is why we’ve included a 15-foot extender cable in our updated VR Developer Mount kits. If you have an Oculus Rift, you’ll want to get a longer extender as well.

Unlike the Oculus Rift CV1, the HTC Vive has an onboard USB port that’s fully compatible with the Leap Motion Controller. However, we’ve found that it doesn’t have enough throughput if the Vive camera is activated. The camera is defaulted to off right now, but we’d recommend using the USB extender so that you don’t miss out on new Chaperone features.

mount-mini

Getting your new headset in May or later? Place a preorder for the upcoming curved VR Developer Mount at store.leapmotion.com.

The post Hacking the (Old) VR Developer Mount for the Oculus Rift and HTC Vive appeared first on Leap Motion Blog.

HTC Vive FAQ: What You Need to Know About Leap Motion + SteamVR

$
0
0

Today we’re happy to announce an update to our VR Developer Mount designed to be compatible with the latest generation of VR headsets! The new kit features updated adhesives and a much longer 15-foot USB extension cable, allowing for room-scale flexibility. You can order it now from our web store.

Along with last week’s Unreal 4.11 release and the social possibilities of AltspaceVR, you now have everything you need to play, build, and connect with the Vive. Here’s a quick guide to everything from Lighthouse tracking to Unreal development.

What can I try right now with the Vive?

Human beings are naturally expressive, and we can say a lot with our hands. AltspaceVR is a virtual social space where you can strap on your Vive and meet people from around the world. Leap Motion adds a whole new level of expression to your virtual avatar – so you can point, wave, or dance. Watch for more Vive-compatible demos on our developer gallery.

Does it work with the Vive Controllers?

We designed the Orion software to be robust in all kinds of environments, even when your hands are physically touching other objects. While it’s not truly seamless, we were surprised to see how well Orion tracking and the Vive controllers play together without any engineering effort:

View post on imgur.com

How can I build with Unreal Engine?

UE4 has built-in Vive support, and with the new official plugin release in Unreal Engine 4.11, it’s easier than ever to get started with Leap Motion + Vive.

There are two important differences between the Rift and Vive to keep in mind. The first is the offset. On the Oculus Rift, the distance between the controller and your eyes is about 8 cm. The virtual controller within the game engine needs to have the same offset from the VR cameras. Since the Vive is slightly bulkier, this offset should be increased to 9.5 cm.

component-in-vr

The second difference is a little trickier – image passthrough. The plugin currently delivers infrared images with a field-of-view (FOV) crop fixed to Rift DK2. Because the Vive FOV is different, augmented reality projects will not work correctly on the Vive. This will be resolved in a future release so that passthrough will be HMD-agnostic.

To get started with Unreal Engine and Vive, visit developer.leapmotion.com/unreal.

When will the Unity assets support Vive?

The Unity Core Assets are built to use the native VR plugin in Unity 5.3, which doesn’t include Vive support. However, that’s going to change with Unity 5.4, currently in beta. Our early testing with the beta has been promising, and we’re looking forward to exploring more on that front.

Does it interfere with Lighthouse tracking?

No, our technology uses a narrow range of near-infrared light that doesn’t overlap with the Lighthouse system. The VR Developer Mount fits neatly in the empty space in the middle of the faceplate:

LM Mount+Vive-Front-smaller

Can I use the onboard USB port?

While the onboard USB works right now, we’ve found that it doesn’t have enough throughput if the Vive camera is activated. The camera is defaulted to off right now, but we’d recommend using the USB extender so that you don’t miss out.

Have a question about Leap Motion + HTC Vive? Let us know in the comments and practice your dance moves – we’ll see you in Altspace!

The post HTC Vive FAQ: What You Need to Know About Leap Motion + SteamVR appeared first on Leap Motion Blog.

6 Pinchy Projects: Sword Art Online, Planetary Genesis, 3D Art and More

$
0
0

Last month, we released our Pinch Utilities Module, making it easier to create experiences based on how we naturally use our hands in the real world. Here are six community projects that are using this fundamental interactive building block for 3D creativity, menu design, and godlike solar system powers.

Triangulate

triangulate2

Scott Kuehnert’s Triangulate is an augmented reality art program that lets you fill your space with colorful triangles by pinching them out of the air. Using a Hovercast menu on your left palm, you can toggle passthrough, activate a snap grid, clear the canvas, and more.

Graffiti 3D

Recently updated for Oculus 1.3, Scott’s Graffiti 3D lets you doodle in 3D space with the colors and materials of your choice, now using a core pinch mechanic. You can also use a “crimp” gesture (with your thumb meeting the side of your hand).

Using another Hovercast menu, you can control brush color, size, material (cartoon, metal, porcelain, clay, neon, wireframe), and perform a variety of utility functions (such as export/import meshes, turn on augmented reality mode, undo strokes, and clear the canvas).

Sword Art Online GUI

SAO V2

Inspired by the near-future world of Sword Art Online, this simple tech demo is an experiment in menu design and interactions. One of the options allows you to draw in 3D space, while the menu can be grabbed and moved around the scene.

Notice Me Senpai (aka Sloth)

Fulfill your dream of interacting with the world’s cutest sloth. He reacts to three simple hand gestures – thumbs up, peace sign, and (naturally) the middle finger. Pinch in the air to create drawings for your new friend.

VR Solar System Playground

Imagine having the power to bring planets into existence and fling them into orbit. Shared last month on /r/leapmotion, this video also features an early arm menu.

Draw and Scale

This quick project from Mike Harris combines the move and draw utilities to enable a radical shift in perspective. Draw something that can fit in the palm of your hand, then stretch it out and walk inside your creation.

What’s your favorite pinch project – and what new resources would you like to see? Let us know in our 2016 developer survey and get the chance to win one of five $100 Unreal/Unity asset credits (full details).

The post 6 Pinchy Projects: Sword Art Online, Planetary Genesis, 3D Art and More appeared first on Leap Motion Blog.

5 Unreal Assets for Your Next Orion VR Project

$
0
0

Sometimes the right asset can make all the difference. With our 2016 developer survey in full swing, we thought we’d share some great assets that you could buy with one of five $100 Unity/Unreal asset credit prizes!

VFX Weather Pack  – $19.99

Whimsical fall leaves, melancholy rain, spooky fog – weather can be a powerful way to set the tone for your virtual world (or give your users Storm-like superpowers). This weather effects pack includes rain, snow, falling leaves, lightning, fog, and dust.

VFX Fire Pack – $19.99

fire

Using the weather and fire packs, Fnordcorps from Spectacular-Ocular.com has been working on integrating different particle effects into Leap Motion hand controls. With a simple hand menu, users can create rain, thunder, lightning, or fire on demand, or even set your hands on fire! Check it out:

Alchemist’s House – $29.99

alchemistshouse

Create a medieval interior location with this comprehensive pack, including more than 100 assets – walls, floor, ceiling, pillars, stairs, windows, furniture, props, and more. Alchemist’s House features a low poly count to keep performance high.

Showdown – Free

Released in September, Epic’s VR showcase experience takes you through a cinematic, bullet-time inspired action scene. It’s an incredible example of how you can optimize for 90-frames-per-second VR, and the whole project is free for download, including its content library. Grab it from the Learn tab on the Epic Games launcher.

For another fully open source VR project, check out Epic’s DK2 showcase Couch Knights, which handles the joystick-like movement of a small avatar with networking.

Infinity Blade Assets – Free

infinity

We’ve mentioned this incredible treasure trove before, but it’s always worth bringing up. Completely free for Unreal development, the 7,600 art and sound assets on the Marketplace represent $3 million in content development. That’s everything from tone set pieces, flowing lava, magic effects, smoke, lightning, and weapons to thousands of raw audio files and sound cues.

Protip: The assets that Epic includes in their tutorials and demo scenes are generally usable for your own Unreal projects. The content example pack is incredible, with destructables, level design, and effects like magic powers.

Thanks to andrewtek, Fnordcorps at Spectacular-Ocular.com, and the amazing getnamo for their suggestions. Take our developer survey by May 8th for your chance to win some sweet credits!

The post 5 Unreal Assets for Your Next Orion VR Project appeared first on Leap Motion Blog.

3D Jam: Now with Over $75K in Prizes!

$
0
0

Our second annual 3D Jam kicks off in just a few weeks, and it’s bigger than ever! Today we’re excited to announce new prizes for competitors, bringing up our prize total to over $75,000. And we’re just getting started.

Beginning September 28th, developers around the world will compete to build the most amazing motion-controlled experiences for desktop, AR/VR, the Internet of Things, and beyond. The competition runs for 6 weeks, with registration open now. Everyone who signs up for the 3D Jam gets a special hardware discount code when they register, and teams who complete their submission by the November 9th deadline get their hardware cost refunded. See our updated official rules for details.

Thanks to the generous teams at Unity, OSVR, and NVIDIA, jammers now have the chance to win the following along with $50,000 in cash prizes:

  • 2 Unity Suites
  • 9 Unity Pro licenses
  • 6 OSVR Hacker Dev Kits
  • 6 NVIDIA GeForce GTX 980 Ti graphics cards

3djam-2015-prizes

Prize Breakdown

AR/VR TRACK
Augmented and virtual reality experiences built on tethered HMDs

1st Prize
$10,000
Unity Suite
2 OSVR HDKs
NVIDIA GeForce GTX 980 Ti

2nd Prize
$7,500
Unity Pro
OSVR HDK
NVIDIA GeForce GTX 980 Ti

3rd Prize
$5,000
Unity Pro
OSVR HDK
NVIDIA GeForce GTX 980 Ti

4th Prize
$2,500
Unity Pro
OSVR HDK

5th Prize
$1,000
Unity Pro
OSVR HDK

Community Favorites (2)
$500
Unity Pro

OPEN TRACK
All other platforms, from desktop and mobile to the Internet of Things

1st Prize
$10,000
Unity Suite
NVIDIA GeForce GTX 980 Ti

2nd Prize
$7,500
Unity Pro
NVIDIA GeForce GTX 980 Ti

3rd Prize
$5,000
Unity Pro
NVIDIA GeForce GTX 980 Ti

Community Favorite (1)
$500
Unity Pro

Unityunity-logo is an incredible game development engine that lets you build for almost any platform. Our Unity Core Assets make it easy for developers to get started with desktop and VR/AR, including image passthrough, Image Hands, and UI Widgets. Imagine what you could build with a one-year professional license and the power of Unity at your fingertips.

osvr-hacker-dev-kitOSVR is both an open source VR development platform and an upcoming development kit. Their goal is to create an open framework that brings input devices, games, and output devices together.

nvidia-logoFinally, whether you want to experience the future of VR, or you just want a kickass gaming rig, the GeForce GTX 980 Ti graphics card from NVIDIA is the way to go.

The 3D Jam Tour

This month, we’re also hitting up DC, Philly, New York, Boston, and Toronto as part of our global 3D Jam Tour. Our European tour in August packed meetups and workshops in Cologne, Berlin, and London – with lots of developers geared up and ready for the competition. Check out our Meetup page for more details!

leap-motion-3d-jam-events

Are you ready to take your place in the 3D Jam? Register for the 3D Jam online now to gear up and get started, and stay tuned for more announcements in the coming weeks!

The post 3D Jam: Now with Over $75K in Prizes! appeared first on Leap Motion Blog.

6 More Amazing Unity Assets for Orion VR

$
0
0

Last year, we featured 6 kickass Unity assets with the power to bring your project to the next level. Since we’re giving away five $100 Unity/Unreal asset credits as part of our 2016 developer survey, we thought we’d share some more cool stuff you can buy with cold hard virtual cash. From a community-created Leap Motion UI design asset, to the awe-inspiring glow effect in Blocks, here are 6 more jaw-dropping Unity assets for your next Orion project.

Custom Pointer ($17)

Recently updated for Orion, Custom Pointer lets you turn any Transform or Leap Motion finger into a pointer that can interact with the UI. It also includes classes that work specifically with our Unity core assets – both V2 and Orion.

SE Natural Bloom & Dirty Lens

SE-natural-bloom

This one has a special place in our hearts, as it’s the only Unity Store asset that we used while building Blocks. It plays a big part in giving the blocks their ethereal glow.

Orion_8-magicglow

PhysicsRecorder

physics-recorder

Using PhysicsRecorder, you can rapidly capture and record the transform values of GameObjects, allowing you to create static animations from real-time physics. This increases performance by baking your physics to animation clips.

ProBuilder Advanced – $95

From prototyping quick levels to building advanced geometry, ProBuilder Advanced overcomes a lot of creative barriers in bringing your vision to life.

Alternatively, Pro-Core’s ProGrids ($20) gives you a visual functional grid, which snaps on all 3 axes, so that objects always snap to the grid. This makes level-building faster and more precise as everything pops into place.

Final IK – $90

This solid inverse kinematics solution was in beta for a year and a half before its full release in January. If you’re looking to create a hand-driven avatar, this is the plugin for you.

Squiggle – $20

unity-squiggle

Sometimes the best assets are the ones that the user never sees. Squiggle is a general tool that visualizes the way values change over time, which really helps with debugging.

Thanks to /u/yezzer and Doctor Memory for their suggestions. Don’t forget to take the survey for your chance to win Unity/Unreal credit!

The post 6 More Amazing Unity Assets for Orion VR appeared first on Leap Motion Blog.

Redesigning Our Unity Core Assets Part II: New Features in 4.1.0

$
0
0

With our latest Unity Core Assets release, we’re excited to unveil full support for the Unity 5.4 beta, which features native support for the HTC Vive. This is the fourth release since the previous installment in this series, when we shared some background on the ground-up re-architecting of our hand data pipeline. Today we’re going to look under the surface and into the future.

As our Orion beta tracking evolves, we’ve continued behind the scenes to hammer on every aspect of our client-side data handling for performance and efficiency. We’re also actively refining developer-side workflows and expanding the features of our toolset for building hand-enabled VR experiences. And in some cases, we’re adding features to the Core Assets to support upcoming Unity Modules.

For this release, we focused on our HandPool class. This Unity MonoBehavior component not only manages the collection of hand models for the rest of the system, it defines much of the workflow for the way you add hands to your scene. This release brings some refinements but also a significant new feature – the ability to have multiple pairs of hand models and to easily enable or disable those pairs at runtime.

While working on demonstration projects here at Leap Motion, we’ve found ourselves wanting to use different sets of hands for a variety of reasons. For complex graphical representations, it might be helpful to have hand models that only provide shadows, or only provide glows in addition to the main hands. A superhero game could benefit from the flexibility of completely different iHandModel implementations for fire hands versus ice hands. And some experiences might benefit from different hands for different UI situations.

The HandPool component, located on the same GameObject as the LeapHandController and LeapServiceProvider components, now has an exposed Size value for our ModelPool’s list of ModelGroups. Setting this value allows you to define how many pairs of hands you’d like in your scene. If you change this number from 2 to 3, slots for another pair of models will appear. You can assign a name for your new model pair so you can refer to it at runtime.

As in previous versions of Core Assets, you can drag iHandModel prefabs from the Project window to be children of the LeapHandController GameObject in the Hierarchy window. When you do this, the iHandModel component in the model prefab receives a default Leap hand pose. Since all Leap hand models inherit from the iHandModel, class this means that each pair of hands will align with the others.

You can test this by adding two DebugHand prefabs to your LeapHandController. In the Inspector for each DebugHand, you can set the Handedness to Left and Right. Then drag these children into their new slots. For the iHandModels to align, just be sure that the local translations and rotations of your iHandModel’s transform are zeroed out.

redesigning-unity-leap-motion2

We’ve also improved the DebugHand script to show the rotation basis for each Leap Bone. These are immediately visible in the Scene window, but there’s a trick that allows you to view them in the game window as well. If the Gizmos button at the top right of the Game window is enabled and you select the LeapHandController in the Hierarchy window, you can view collider-based physics hands as well as the new Debug hands.

Using the Debug hands in this way can be help for – wait for it – debugging your other hands to verify they’re lining up with Leap Motion data! We hope this will be a helpful workflow when you’re building your own iHandModel implementations.

The new multiple hands feature becomes even more powerful with the added ability to enable and disable pairs at runtime. In the Inspector, you can set the IsEnabled boolean value for each model pair. This will control whether those models are used when you Start your scene. But more importantly, you can enable and disable these pairs at runtime with HandPool’s EnableGroup() and DisableGroup() methods.

redesigning-unity-leap-motion1

Here’s a simple script you can attach to the LeapHandController. It will allow you to use the keyboard to enable and disable groups:

using UnityEngine;
using System.Collections;
using Leap.Unity;

public class ToggleModelGroups : MonoBehaviour {
 
  private HandPool handPool;
 
  void Start() {
    handPool = GetComponent<HandPool>();
  }
	
  void Update () {
    if (Input.GetKeyDown(KeyCode.U)) {
      handPool.DisableGroup("Graphics_Hands");
    }
    if (Input.GetKeyDown(KeyCode.I)) {
      handPool.EnableGroup("Graphics_Hands");
    }
  }
}

Refactoring the HandPool class to support these new features while maintaining and improving encapsulation required some scrutiny and iteration. This work also allowed us to simplify the developer-facing UI we exposed in the Inspector. Where previous versions had the notion of a ModelCollection which populated our ModelPool at runtime, the new workflow is to add iHandModels directly to the HandPool simplifying the code and UI simultaneously.

To watch the ModelPool system at work and get a solid understanding of the system (like we did in the previous blog post), you can comment out the [HideInInspector] tag above the modeList variable on line 39 of HandPool.cs. Each pair of iHandModels is part of a ModelGroup class. Its modeList gets populated at runtime. When a new Leap Hand starts tracking, an iHandModel is removed from the modelList and returned to the modelList – and therefore the ModelPool – when that Leap Hand stops tracking.

Each model pair has a CanDuplicate boolean value that works in tandem with iHandModel’s public Handedness enum. When CanDuplicate is set to True, this provides some flexibility to the Leap Motion tracking by allowing more than one copy of a Right or Left iHandModel. This can allow hands to initialize slightly faster in some cases, but also lets you create scenes where you’d like other users to put their hands in as well. Setting this to False allows you to ensure that only one Right and Left hand will be used at any time, which is useful if you’re going to drive the hands of a character or avatar.

Finally, our further refactoring has allowed us to relax the requirement that HandPool receive only instances from the scene Hierarchy. Prefabs can once again be dragged directly from the Project window directly into HandPool’s iHandModel slots. While this removes our ability to visualize the hand in the Scene view during edit time, we’re striving to allow the most flexibility for all sorts of workflows.

These new features are already allowing us to experiment with and demonstrate new use cases. But more importantly, they’re immediately providing the basis for new Unity Modules currently under construction. These will unlock new features and workflows like hand models, the ability to create your own hand models, user interface assets to streamline the creation of wearable menus in VR, and more.

The post Redesigning Our Unity Core Assets Part II: New Features in 4.1.0 appeared first on Leap Motion Blog.


Welcome to CadaVR: A Living Cadaver Laboratory on the Web

$
0
0

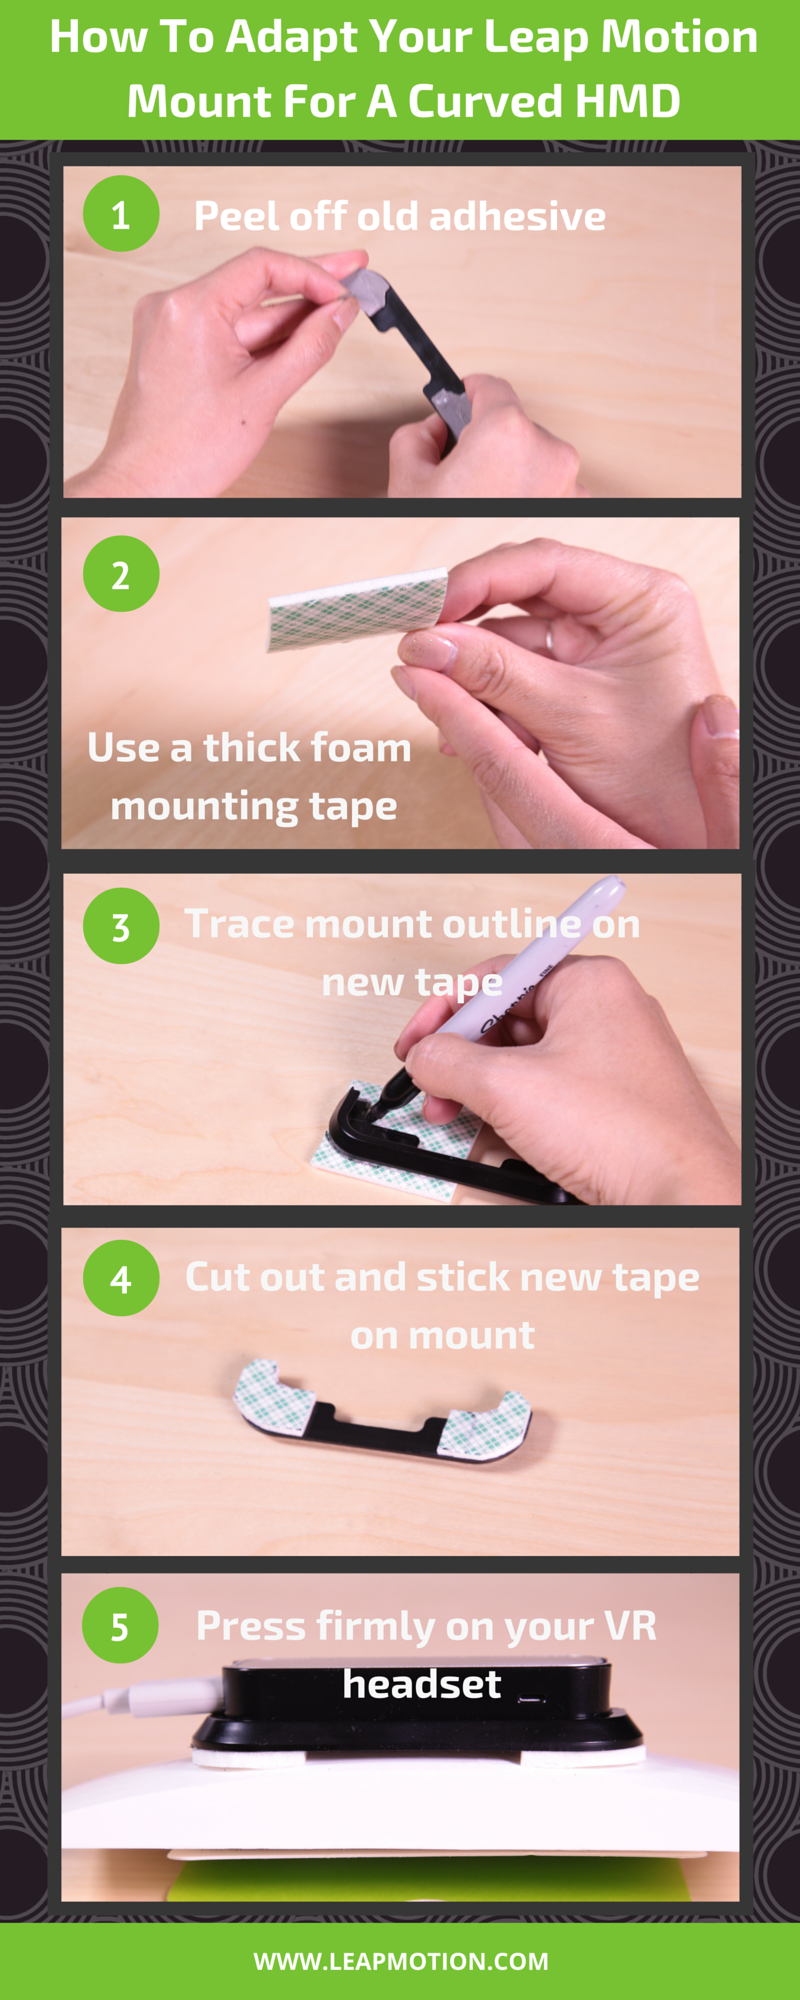
For hundreds of years, dead bodies (cadavers) have taught medical students about human anatomy. In cadaver labs, students dissect, touch, rotate, and explore organs in hands-on experiences that make knowledge stick for a lifetime.

Unfortunately, these experiences are out of reach for most of us. Cadaver labs are expensive to run and cadavers are in limited supply, so non-medical students have to settle for secondary learning experiences like iPad apps and websites. These experiences are good, but not nearly as effective as the hands-on learning experiences students get in the lab.

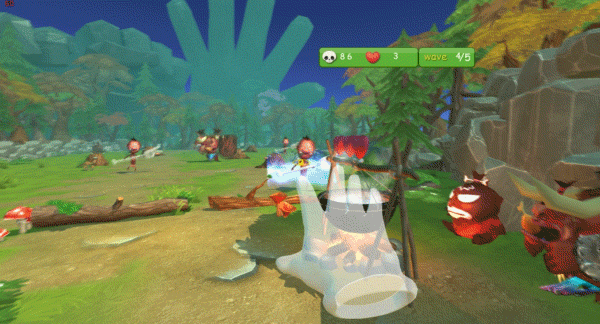
That’s why we created CadaVR, a “living” virtual reality cadaver lab that emulates a real cadaver lab, minus the crowd (4-8 students per cadaver), unforgiving smell, and expensive cost. Not only does CadaVR let students use their hands and other senses to learn about anatomy, but it also has things that are not available in physical labs, such as a simulation of how the heart beats. (If you’re a medical student and you detect a heartbeat in your cadaver, you should probably run!)

At this stage of the project, we’ve designed CadaVR to teach students very simple facts about the heart through its task-driven interface. We’re also developing a lesson-building platform that gives content curators the ability to easily create lessons from within virtual reality using their hands and voice. In this post, we’ll take a look at some of the capabilities that we’re building, and our long-term vision for VR education.

CadaVR is built on the web, so you can access anywhere, anytime. Get the project on the Leap Motion Developer Gallery!

Interaction Design

cadavr-2

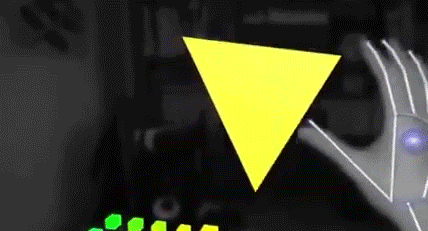
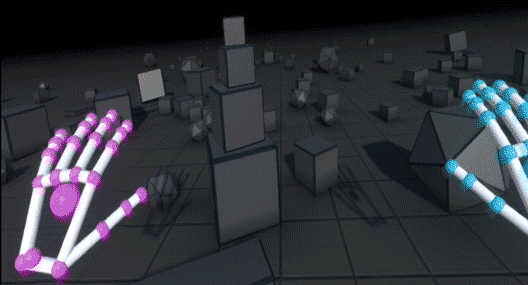
Grabbing. You can reach out into the virtual world and grab objects with your hands. This lets you touch anatomy similar to how you would in a physical cadaver lab, which teaches you how large structures are, as well as where they are located in the body.

cadavr-6

Scaling. While grabbing an object with one hand, you can use your other hand to make the object bigger or smaller. This makes it easier to learn about small anatomical structures, such as veins, arteries and small muscles. It’s also just fun to play around with. Have you ever seen a heart the size of your face?

The grabbing and zooming logics have each been modularized into a single script so they can be reused. You can find them on GitHub here and here, along with several examples. Keep in mind that all code is currently in the prototype stage!

cadavr-5

Tasks. Students in the cadaver lab generally learn by completing specific tasks, so we replicated that experience in CadaVR. When a task is completed, CadaVR shows the title of the next task along with a detailed description. The idea here is for professors to provide detailed descriptions, including images and video, of tasks students need to perform.

Today, CadaVR contains a rough prototype of the task-driven environment. We plan to expand this feature to support tasks like simple organ dissections and comprehensive pin tests. We can’t wait to do more user testing with the task mechanism, so if you have a chance to try it out and want to send us feedback, please do!

User Testing and Lessons Learned

cadavr-3

We believe that VR applications have the most potential when they use multiple input methods. While this opens up a smoother user experience, it also involves a lot of testing and iteration.

We initially built CadaVR around gestures. For example, we used line-of-sight and length-of-gaze to simulate clicking things that were out of reach, and supported a rotation gesture to simulate rotating. We quickly learned that minimizing the amount of energy required for each action was extremely important. For instance, if an object is placed too high, gazing to click could strain the neck. Also, gestures that require several repetitions, such as our initial rotation gesture that rotated the heart too slowly, can quickly tire out users.

“We quickly learned that minimizing the amount of energy required for each action was extremely important.”

On the other hand, some set of precision is important, so rotating too fast could lead to a suboptimal experience. We learned from this, then prototyped grabbing objects, which inherently supports precision rotating, and seems to feel much more natural for our users.

We also found that the distance of virtual objects is extremely important. A heart positioned 1.5 meters away may be within my reach, but will be out of reach of my younger nephew. This means we need to dynamically position things based on each user’s attributes. Fortunately, Leap Motion provides this information, which makes writing the code a lot easier.

Future

cadavr-4

As we continue to expand CadaVR, one of the most important features is our lesson builder. We like to say that it’s analogous to creating a web page in WordPress or Squarespace, except we believe natural input (i.e. hands and voice) will make creating content much easier and faster. We’re building this lesson builder because we believe a platform that gives anyone the ability to create effective learning environments will improve education around the world.

New environments. We believe the environment that students work in greatly impacts how they study. The wonderful thing about virtual reality is that we can create CadaVR outside of the cadaver lab. We don’t need to simulate a room filled with dead bodies; rather, we can put a cadaver in space, in a calming grassy field, or even in a library. And given that each person is different, we want to allow each person to choose the environment that suits them best.

Physiology. Imagine grabbing a beating heart, holding it your hand, rotating it, enlarging it, and stepping inside to learn how the valves open and close and how the ventricles push blood towards outside organs. Imagine a similar experience in the lungs, the stomach, and blood cells. We plan to give content creators physiological tools so they can simulate normal and pathological functions and create compelling experiences that are not only cool, but also give students a new perspective to learn about the functions of the human body

Haptic feedback. This is the primary advantage a physical cadaver lab has over a virtual lab. Once we can simulate haptics, we can simulate what tissues feel like, both normal and pathological, as well as simulate what physiology feels like. Suitable haptics aren’t ready today, but we’ll be first in line when they are.

“We plan to give content creators physiological tools so they can simulate normal and pathological functions.”

Our long-term vision is to create a platform that gives anyone the ability to create lessons about anything. Math, science, history, architecture, construction, environmental planning – you name it. We plan to do this by creating a set of APIs that give web developers access to upload custom objects, whether it be a simple bouncing ball to help teach gravity, or a crane to help teach construction.

These custom objects will then be used by lesson curators to create compelling physics lessons, immersive construction training simulations, learning environments that teach what’s difficult to learn from two dimensional surfaces, learning environments that are not feasible to create in the physical world, and everything in between.

We want to improve education around the world, and we know we can’t do it alone. We’re extremely excited about Leap Motion and VR, and their potential impact on how people teach and learn around the globe. If you would like to learn more about CadaVR, stay updated, and/or help us take the next step, please check out our website and GitHub repo.

Team CadaVR

Ahmad Aljadaan is a PhD student studying Biomedical and Health Informatics at the University of Washington, and a software and usability engineer with 4 years experience at Stanford University. His research focus on predictive analytics, building visualization tools that help physicians make predictions about patients at risk of readmission.

Mark Laughery is a Masters student in Human-Centered Design & Engineering with experience at six tech startups in Seattle. His background is in business analysis and product management.

Ryan James is a PhD student studying Biomedical and Health Informatics at the University of Washington, a software developer with 4 years of industry experience at Microsoft, and an entrepreneur with one year of experience running a small company in 2010. His research focuses primarily on understanding how medical professionals interact, learn and collaborate in virtual reality.

The post Welcome to CadaVR: A Living Cadaver Laboratory on the Web appeared first on Leap Motion Blog.
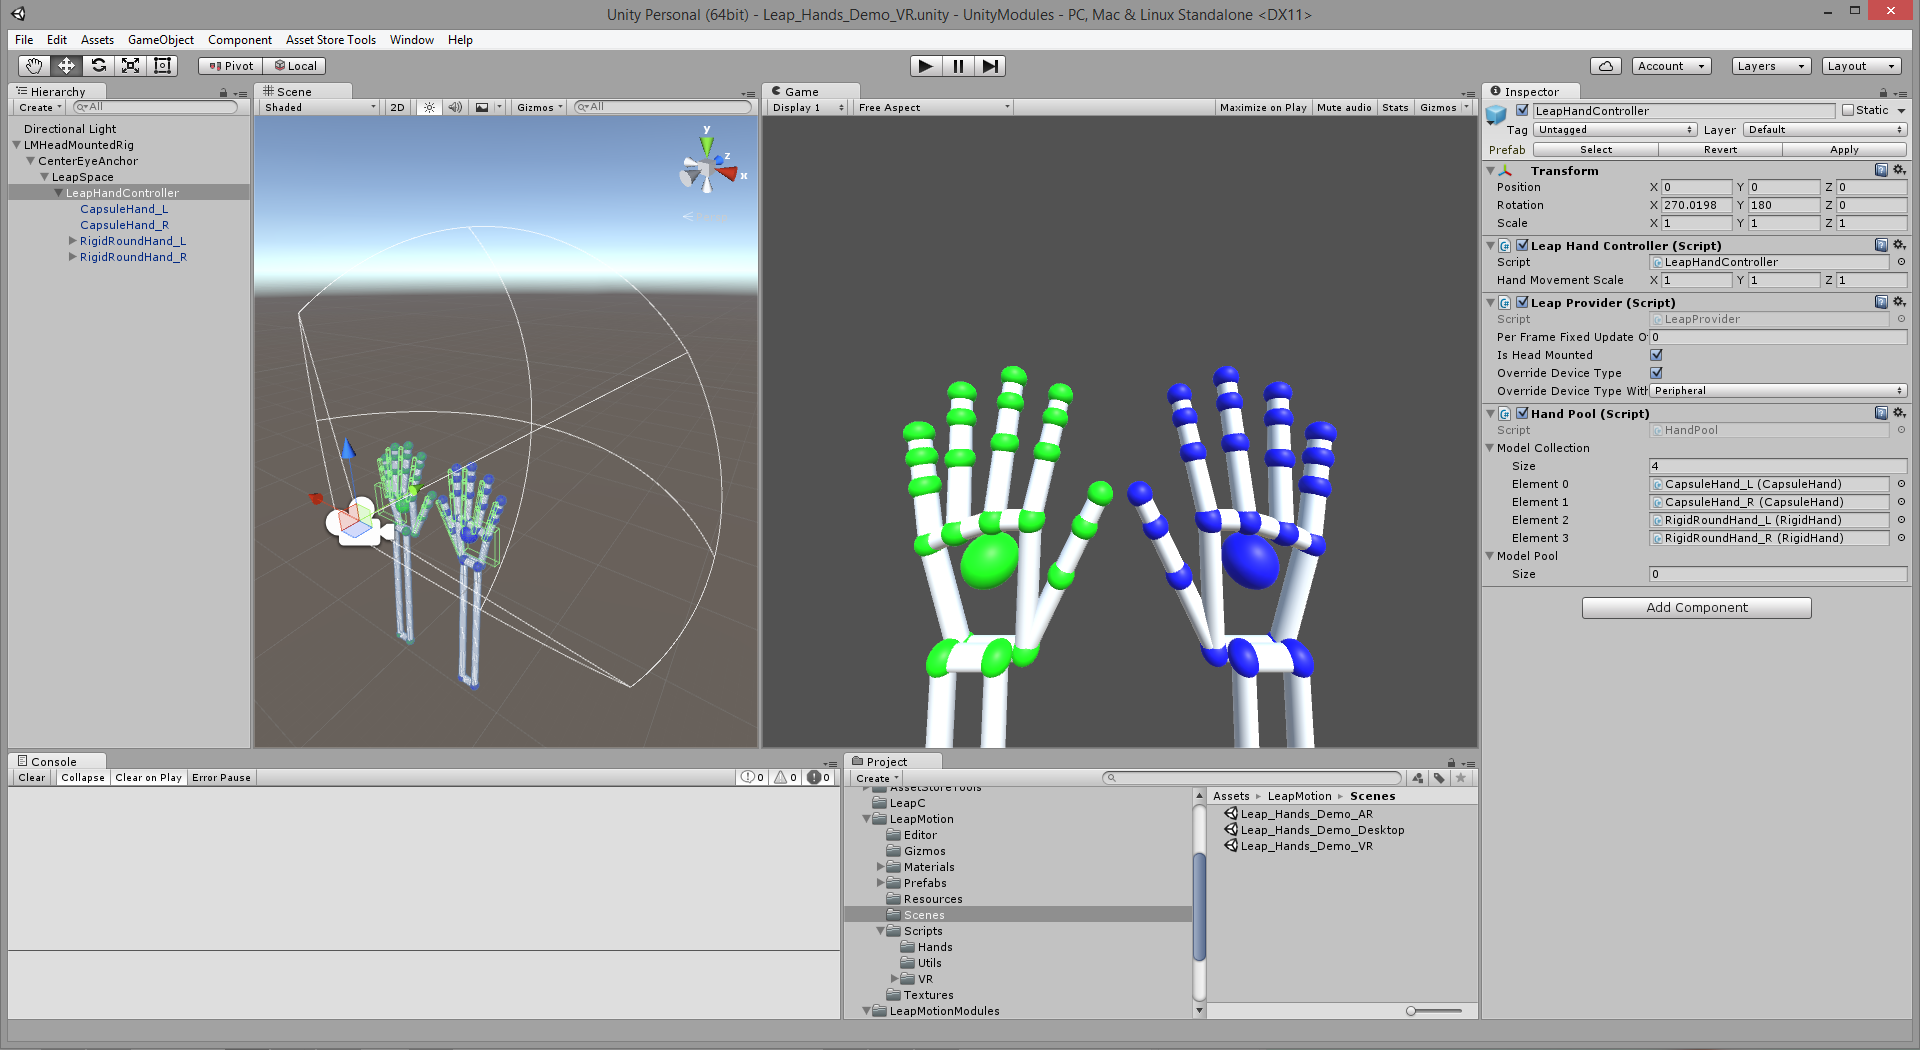
New Unity Asset Feature: Thumbs up for Detectors!

$
0
0

With this week’s Unity Core Asset release, we’ve made a few changes to our Pinch Utilities – including some new features that extend its capabilities! These new utilities have been folded into the main Core Assets package, retiring the former Pinch Utility module.

So what are these new features? We call them Detectors, and they provide a convenient way to detect what a user’s hand is doing. In addition to detecting pinches, you can now detect when the fingers of a hand are curled or extended, whether a finger or palm is pointing in a particular direction, and whether the hand or fingertip are close to one of a set of target objects. (A grab detector is coming soon!)

What’s more, these detectors can be combined together using a Logic Gate. The Detector Logic Gate is itself a detector that logically combines two or more other detectors to determine its own state. Need a thumbs up gesture? Combine a thumb-extended detector with a thumb-pointing-upward detector using a logic gate.

Only thumb extended

This gate is configured as an AND gate. You can also use NOT, NAND, and NOR gates.

detector-range

The thumb pointing up detector is active, but the other fingers are also extended – so no thumbs up is detected.

Detectors dispatch standard Unity events when they activate or deactivate. This makes it easy to hook up objects and scripts to a detector straight from the Unity editor — without writing a line of code.

Each detector can draw gizmos that make it easy to see its configured conditions and whether it’s currently active or inactive.

Detectors are designed to be small building blocks that you can put together into something interesting. This also has the benefit that it is easy to write your own detector scripts.

You can find all the Detector scripts, including the PinchDetector, as part of the Unity Core Assets. Example scenes are located in the Detection Examples package, which also contains an additional scene that illustrates how to use detectors.

The post New Unity Asset Feature: Thumbs up for Detectors! appeared first on Leap Motion Blog.

Unlocking New Hands in the Unity Core Assets: Part I

$
0
0

In rebuilding our Unity developer toolset from the ground up, we started by rearchitecting the interfaces that receive data from the Leap Motion device. Moving up the tech stack, we then refactored most of the mid-level Unity scripts that pair the Leap hand data with 3D models and manages those representations. Most recently, we’ve moved another step up our stack to the code that drives the 3D models themselves.

With the release of our new Hands Module, we’ve returned to providing a range of example hands to add onto our new Orion toolset. We’ve started with a small set of examples ranging from rigged meshes with improved rigged mesh workflow, to abstract geometric hands that are dynamically generated based on the real-world proportions of the user’s hand!

Our abstract geometric hands are now dynamically generated based on the real-world proportions of the user’s hand.

These are not only examples that can be used directly in projects, but act as examples of the variety of way hands can be created. In short, the Hands Module unlocks the power to drive many types of hand model implementations, which is critical to supporting as many types of projects as possible.

To boost development with the Hand Module, we’ve added some new capabilities to our Core Assets that allow for multiple hand models per hand, and to enable and disable combinations of these representations at runtime. The Hands Module includes a Hands_Viewer_Demo scene which serves double duty as a hands gallery and as an example of how to use these of controlling model groups at runtime. If you run that scene, try pressing the 0 key to hide all the hand pairs, then press the 4 and 7 keys. This reveals a transparent rigged hand that is dynamically sized to the user’s hand, along with parametrically generated hands that fit inside the transparent hand.

unity-hands-module1

The simple example script CycleHandPairs controls the enabling, disabling, and toggling of the hand pairs in this scene. It illustrates how to call HandPool’s DisableGroup(), EnableGroup(), or ToggleGroup methods with the name that you provide that ModelGroup in the Inspector.

Hand Model Examples

Try out all the new hand models on our Developer Gallery.

Whether driving a full character, first-person arms, or disembodied hands, 3D meshes animated with skeletal deformations are one of the most common approaches to showing hands in games and VR. With this release, we’ve updated our RiggedHand.cs and RiggedFinger.cs scripts to work with Leap Motion Orion tracking and to improve workflow for 3D mesh hands.

The RiggedHand script is an implementation of the IHandModel class that provides methods that drive the 3D model’s transforms with Leap Hand data. The rigged IHandModel and the Leap Hand data are paired to become an IHandRepresentation and are then managed and driven by the HandPool and LeapHandController classes. RiggedHand gets assigned to the top of a hand model’s hierarchy and maintains a list of references to RiggedFinger scripts. The RiggedFinger components get attached to the top of each finger’s hierarchy and maintain a list of references to that finger’s bone transforms.

Both RiggedHand and RiggedFinger also derive from HandModel and FingerModel scripts, as do the RigidHand and RigidFinger classes, which drive Leap Motion physics hands. HandModel and FingerModel classes provide a collection of methods calculating the positions and rotations of the various transforms of a model. The RiggedHand and RiggedFinger scripts then use these methods for updating the hand and fingers.

unity-hands-module3

The first set of example hands we’ve included in the Hands Module – LoPoly_Rigged_Hand_Left and LoPoly_Rigged_Hand_Right, are low-polygon – stylized non-realistic hands. Consisting of a mere 800 polygons and a single mesh for each hand, they provide performant hands for VR on both desktop and mobile.  These hand models can be used with a wide variety of possible shaders to provide the foundational basis for many possible styles.

These meshes are also weighted and sculpted to allow their skeleton transforms to be driven by rotations only, or – with the DeformPosition switch in the RiggedFinger components – to be driven with bone positions as well. This allows the rigged hands to be deformed to match the size and proportions of the user’s hands in real time. In the Hands_Viewer_Demo Unity scene, you can see this by comparing hand pair 1 to hand pair 2, and hand pair 3 to hand pair 4.

Another setting worth noting in these examples is in the RiggedHand component. The Model Palm at Leap Wrist switch is set to True. This allows the script to accommodate typical hand skeletons which have the palm transform located at or near the wrist. Under the hood, this directs the RiggedHand component to drive the rigged hand’s palm transform with a combination of the Leap Motion data’s wrist position and the Leap Motion palm rotation.

unity-hands-module4

Another set of hand prefabs, the PepperBaseCut and PepperBaseFull hands, provide examples of much higher polygon, realistically sculpted hands. At 20,000 polygons each, these hands aren’t suitable for mobile applications, but are included to illustrate a variety of hand models. Again, these models can be used with a variety of shaders. These prefabs have RiggedHand’s Model Palm at Leap Wrist set to False. They provide an example of driving a hierarchy whose palm transform is located at the palm center.

Finally, we’ve included some parametrically generated hands that use the PolyHand and PolyFinger classes. PolyFinger actually constructs its own mesh on InitFinger() and updates its vertices for each frame on UpdateFinger(). This illustrates a completely different approach from RiggedHands, in that the mesh is created dynamically at runtime. Because of the scene persistence feature that we added – where IHandModel calls these methods through its InitHand() and UpdateHand() methods at Editor time – you can see what these PolyFingers look like in the Scene view as you construct your project.

In the next blog post in this series, we’ll walk through the process of modeling and rigging your own hands from scratch in Maya, then setting these hands up in Unity and creating prefabs. And as part of that process, we’ll step through the improved setup for rigged hands.

unity-hands-module2

The post Unlocking New Hands in the Unity Core Assets: Part I appeared first on Leap Motion Blog.

New Unity Module for User Interface Input

$
0
0

Unity Widgets are back – with a new name and massively streamlined functionality! Just released for our Unity Core Assets, the UI Input Module provides a simplified interface for physically interacting with World Space Canvases within Unity’s UI System. This makes it simple for developers to create one-to-one tactile user interfaces in VR.

The module also provides “CompressibleUI” scripts that enable UI elements to pop-up and flatten in response to touch. You can try the new inputs in our latest Developer Gallery demo, or download the Module from our Unity page.

What’s Inside?

One of the goals of our module releases is to provide you with the tools for interpreting and using hand tracking data to make building hand-enabled experiences faster and easier. The UI Input Module aims to do just that. By using the new LeapEventSystem prefab, developers can easily use their old worldspace user-interfaces and menus with hand tracking. Setting it up is as simple as ensuring that there’s a LeapEventSystem in the scene and that menus are close enough to touch.

Additionally, our pre-constructed UI Widgets demonstrate how to put together a diegetic UI Element that works well with compression and touch. Their built-in sound effects add haptic cues that give the sense of each button and slider having an internal mechanism for more satisfying interactions. We’ve include examples for Buttons, Sliders, and Scroll Panels in the module.

The CompressibleUI helper utility makes it easy to have animated, 3D UIs that respond to touch and interaction. This utility also animates the opacity of drop shadows, giving your UI elements that extra sense of depth necessary for fulfilling interactions. This utility is used in each of our example Widgets.

Quick Setup Guide

  1. Set up a Leap Camera Rig normally by dragging in an LMHeadMountedRig prefab from the Unity Core Assets
  2. Go to the LeapMotionModules/UIInput/Prefabs folder and drag a “LeapEventSystem” prefab onto your scene
  3. Create a Canvas object and add UI Elements to it
    • Standard GUI elements can be added by right-clicking on the parent Canvas and selecting UI->Button/Slider/etc.
      • The Leap UI Input Module works out-of-the-box with Unity’s uGUI system
    • Or special Leap UI Elements, which can be found in the Prefabs folder
      • These prefabs are also compatible with mouse Interaction
  4. Test out your new menu in VR!

Note: The UI Module does not recognize Canvases that are instantiated at runtime. For custom UI Elements, make sure the GameObject with the “Selectable” component is the only one in its hierarchy that has “RaycastTarget” enabled.

Designing with the UI Input Module

As a new type of interface, it’s very important that developers use the UI Input Module in ways that feel natural and intuitive to first-time users. Here are a few tips for developing with the module:

Big buttons. They’re easier to read in VR and easier to select.

Drop shadows. Use drop shadows on your UI elements to signify when they’re depressed or elevated. Shadows and shading are powerful depth cues for conveying button states.

Sound effects. These are a powerful way to signify the success or failure of an action. It’s very important to use a sound effect upon both the initiation of an interaction and its termination. Missing sound effects on the termination of an action can leave the user feeling confused or unfulfilled.

CompressibleUI. This is a small helper utility within the Module that allows UI elements to expand and compress in relation to the surface of the canvas – in response to both touch and general interaction. It can also control the opacity of drop shadows. It’s a powerful tool toward increasing the dynamism of your UI elements.

Start with examples. Use the prefabs included in the UI Input Module as examples for setting up your own UI and components. You’ll also find tooltips on the Event System parameters that will help you learn how everything works.

That’s all for now! Next week we’ll be featuring an experimental approach to UI input that we’ve been playing with. In the meantime, we’d love to hear what you think about the UI Input Module – leave your feedback in the comments!

The post New Unity Module for User Interface Input appeared first on Leap Motion Blog.

David Holz in AltspaceVR

Viewing all 481 articles
Browse latest View live